Introduction
Hetzner Cloud offers robust VPS and dedicated server solutions at a fraction of the cost of major cloud providers like AWS, GCP, or Azure. This guide outlines the steps to configure a fully functional development environment on Hetzner Cloud, incorporating the following services:
- Secure Virtual Private Cloud (VPC) using Hetzner Cloud Networks for isolated networking.
- WireGuard VPN for secure access to the VPC.
- Hetzner Cloud Load Balancers (public and internal) to manage access to services.
- Kubernetes Cluster to orchestrate and run containerized applications.
- Flannel as a basic option for Container Network Interface (CNI)
- Hetzner Cloud Controller to enable Kubernetes to provision and manage Hetzner Cloud Load Balancers.
- Hetzner CSI Driver for Kubernetes to dynamically provision and manage Hetzner Cloud Volumes.
- Kubernetes Node Autoscaler for Hetzner to dynamically scale cluster capacity based on workload demands.
- Ingress Nginx Controller to provide access to the services.
- Cert-Manager with Cloudflare Integration to automate valid TLS certificates for public and internal services.
- Gitea Git Hosting Service with Gitea Actions for version control and CI/CD workflows.
- ArgoCD for GitOps-driven deployments, ensuring continuous delivery and infrastructure consistency.
This setup leverages Hetzner Cloud’s cost-effective infrastructure to create a secure, scalable, and automated development environment tailored for modern application deployment.
Hetzner overview
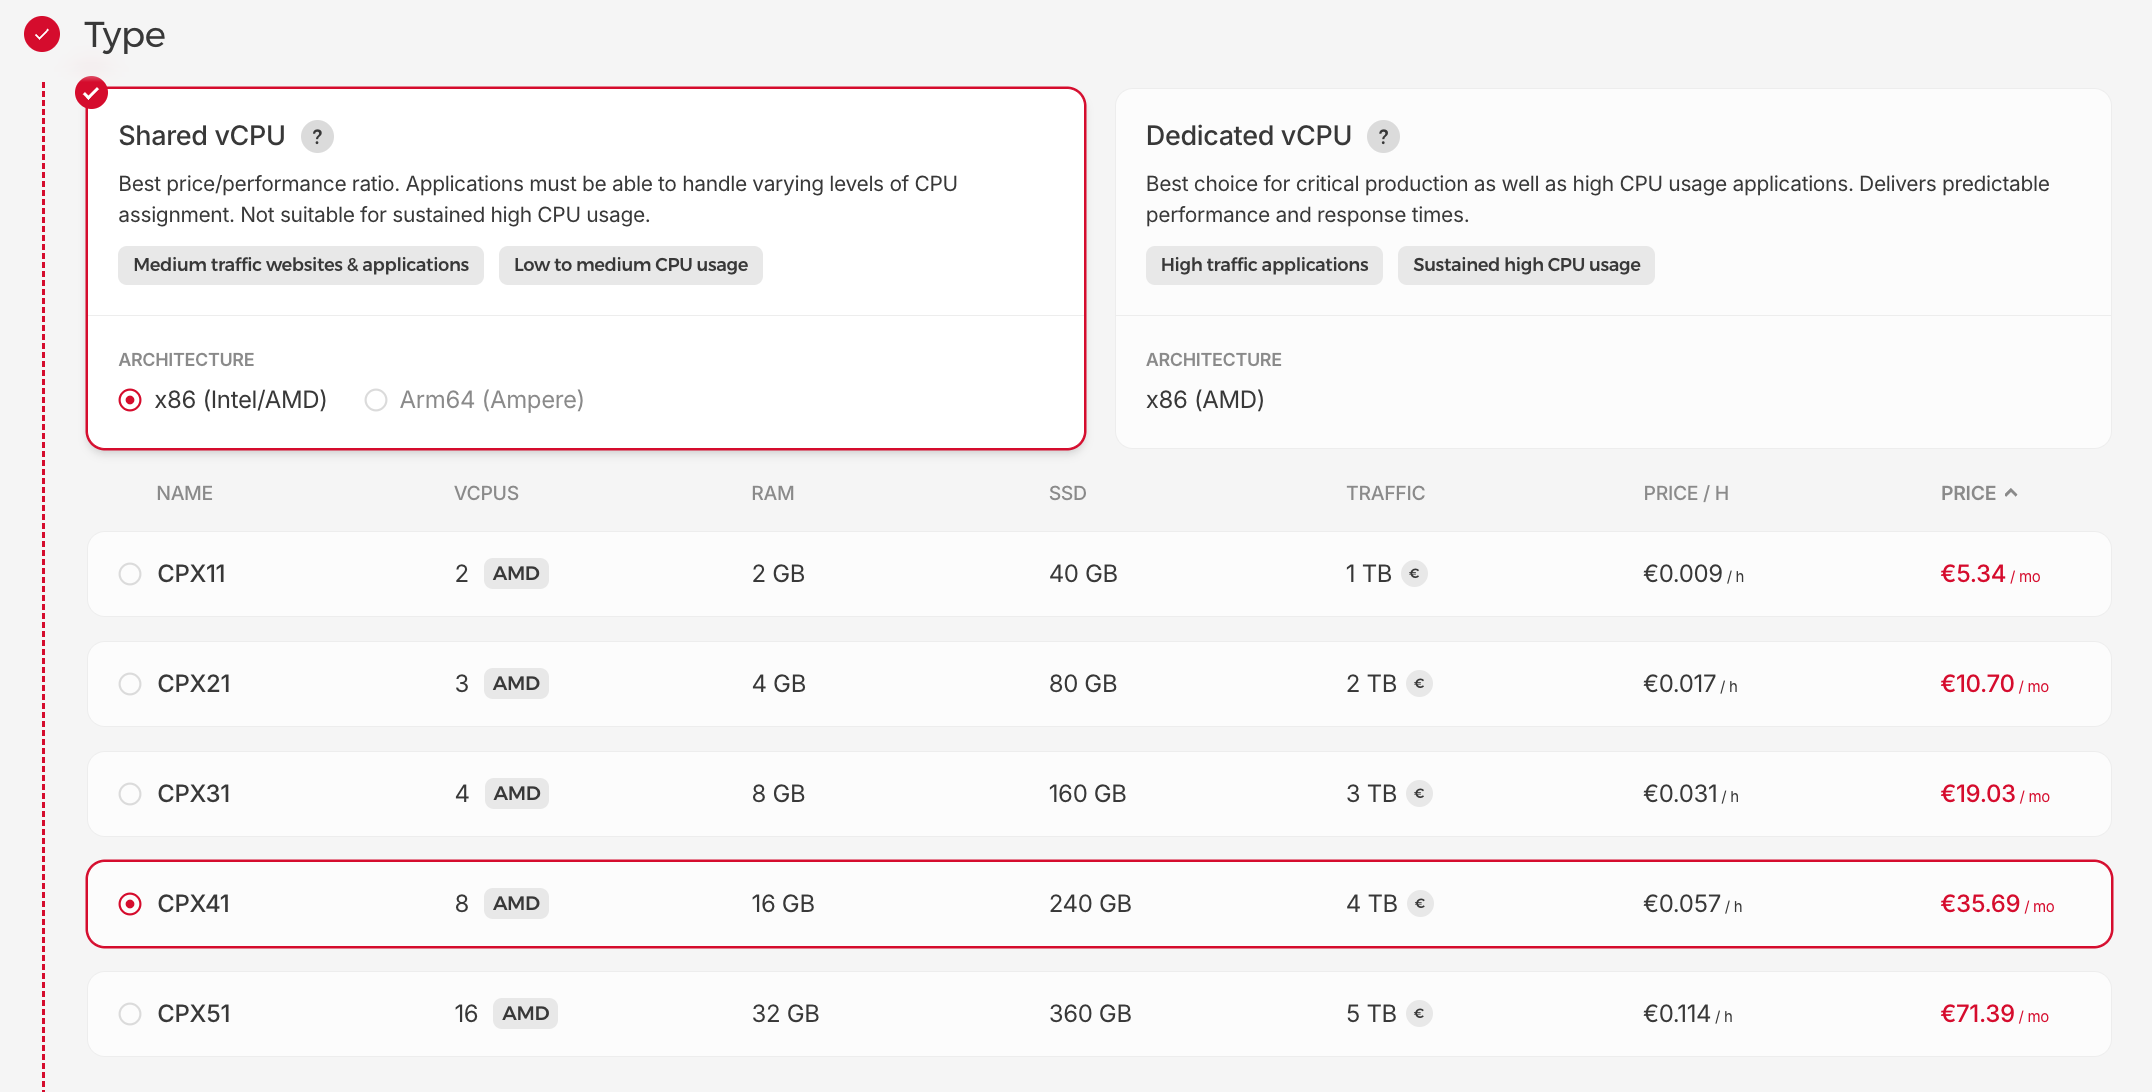
Hetzner provides Virtual Cloud Servers with flexible configurations featuring AMD or Intel CPUs. For instance, the CPX41 shared VPS instance, powered by AMD EPYC™ 7002, offers 8 vCPUs, 16GB RAM, and a 240GB NVMe SSD, delivering a Geekbench 6 single-core score of ~1500 and multi-core of ~8000 is available at €28-50/month in data centers located in the USA, Germany, Finland and Singapore.
| Instance Name | vCPUs | RAM | SSD | Single-Core GeekBench | Multi-Core GeekBench | Price USA/mo | Price GER,FIN/mo | Price SGP/mo |
|---|---|---|---|---|---|---|---|---|
| CPX51 (Shared) | 16 AMD | 32GB | 360GB | ~1500 | ~11000 | €71.39 | €64.74 | €91.51 |
| CPX41 (Shared) | 8 AMD | 16GB | 240GB | ~1500 | ~8000 | €35.69 | €29.39 | €50.69 |
| CX42 (Shared) | 8 Intel | 16GB | 160GB | ~600 | ~3200 | - | €18.92 | - |
| CPX31 (Shared) | 4 AMD | 8GB | 160GB | ~1500 | ~4500 | €19.03 | €15.59 | €29.51 |
Create Hetzner Cloud Project
- New Project can be created in Hetzner Cloud Console .
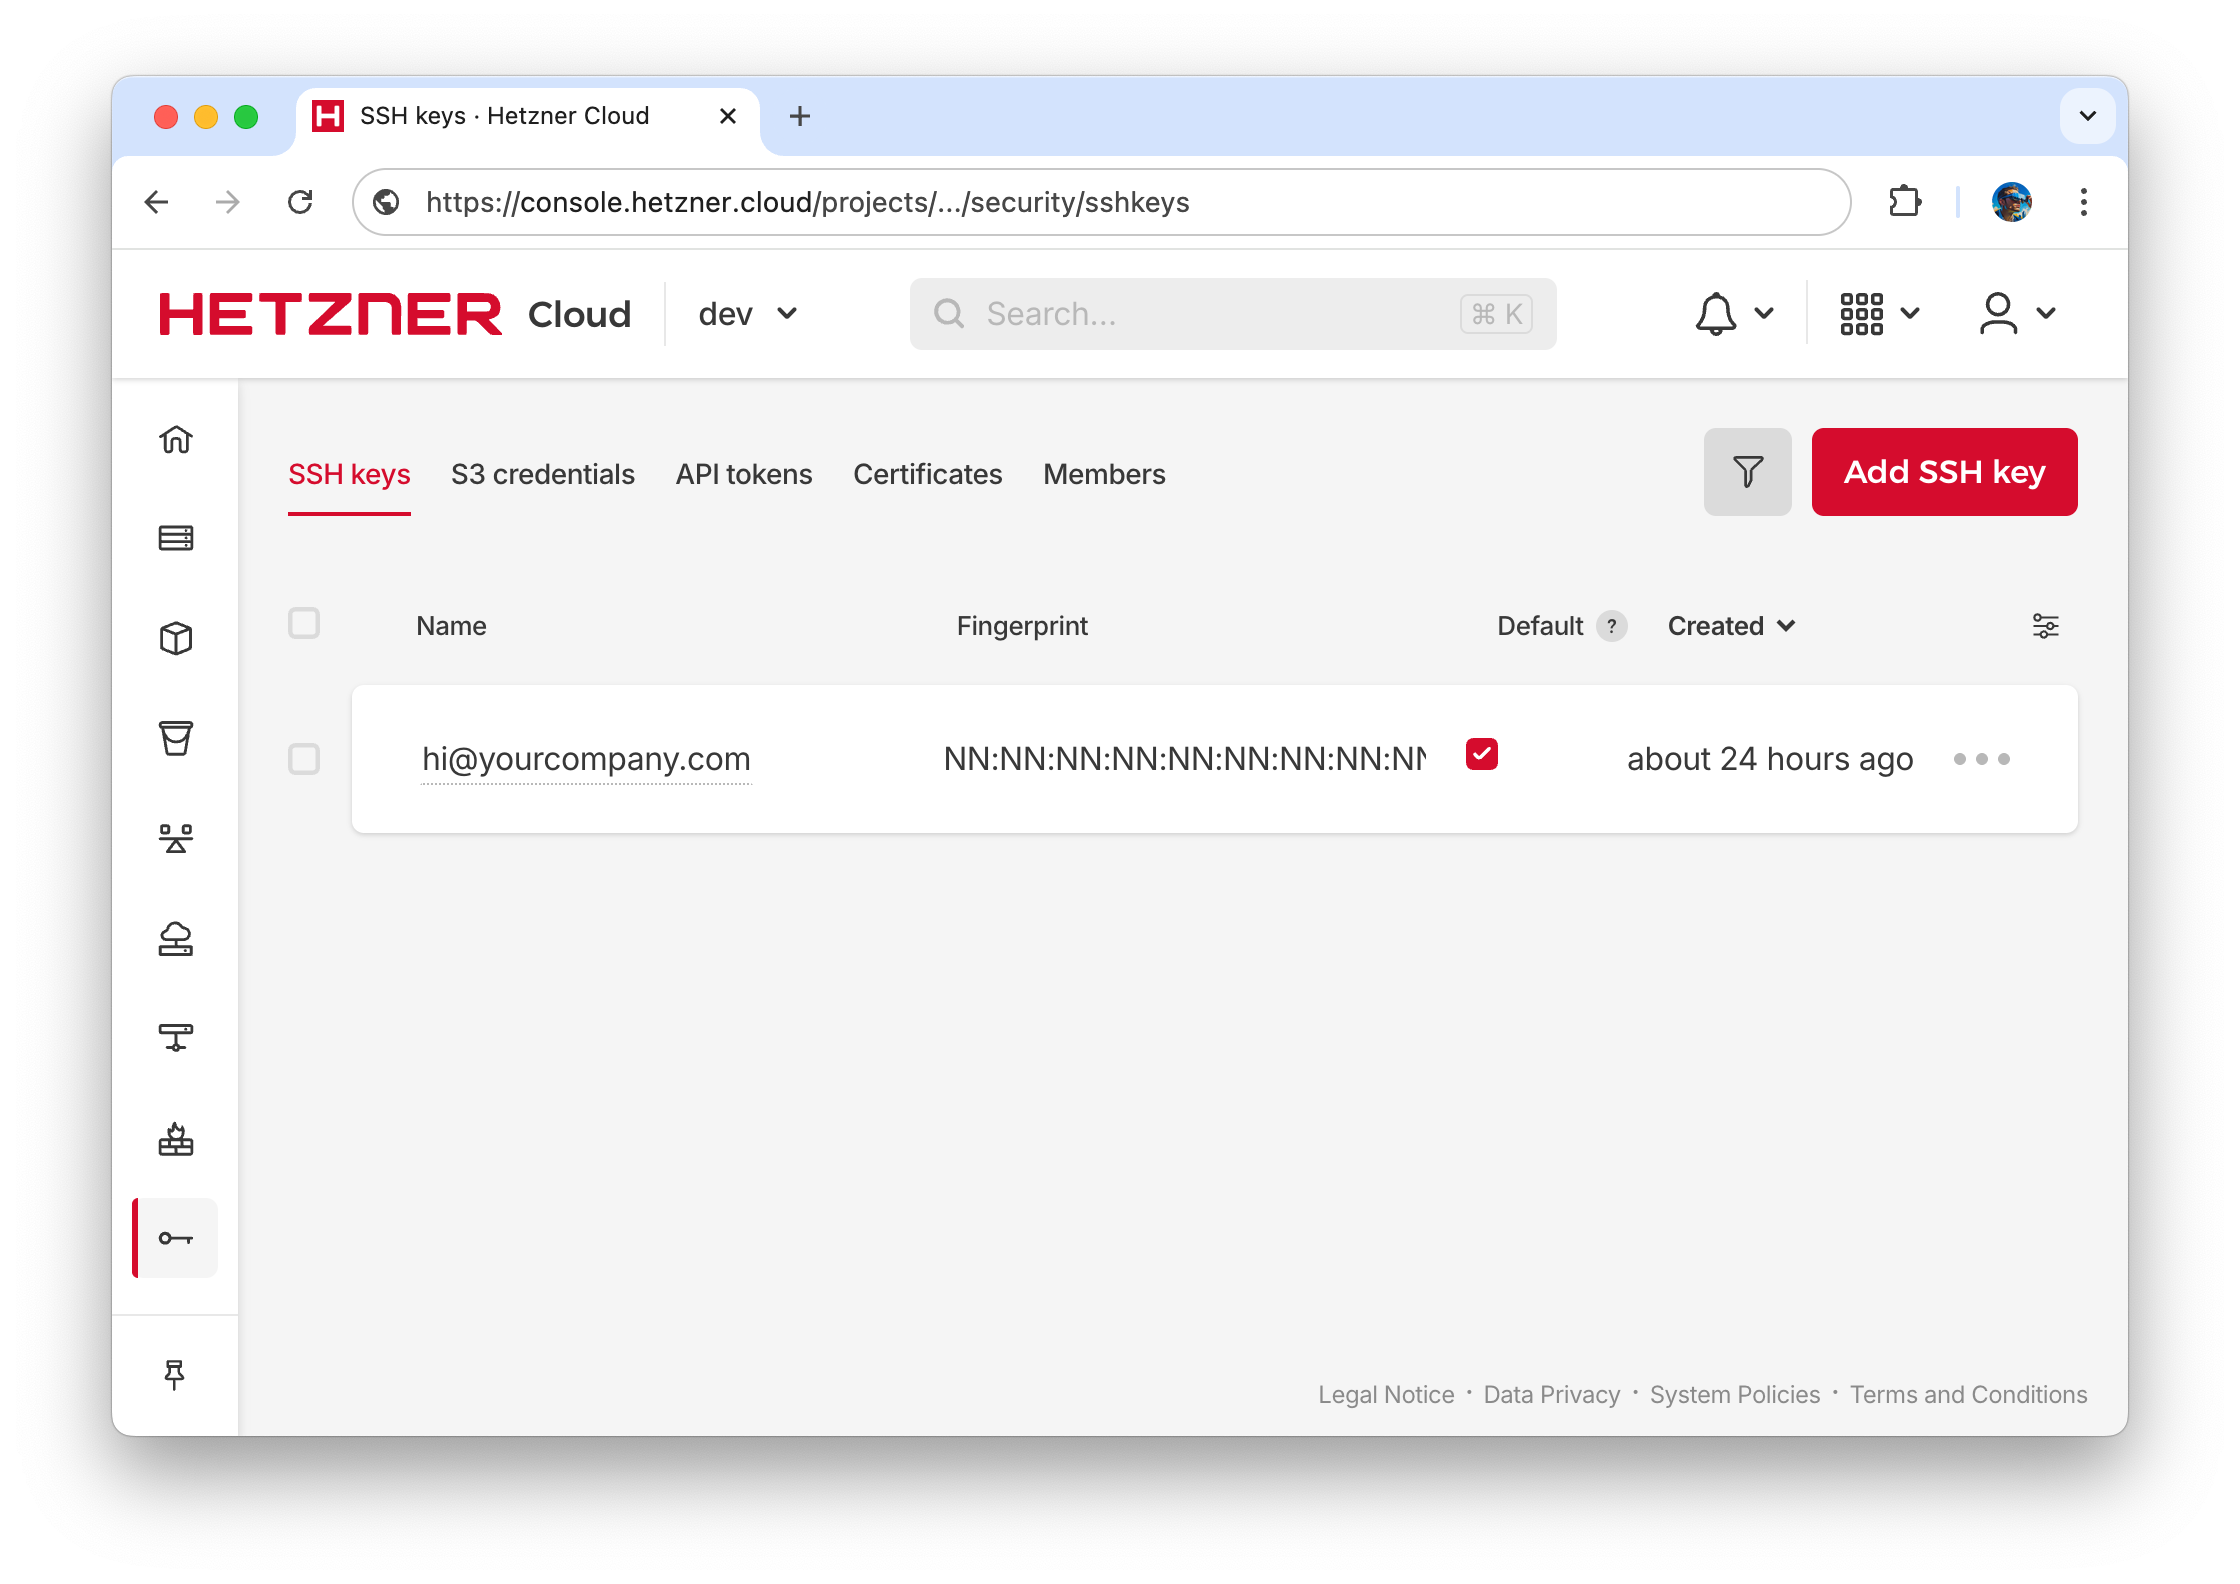
- Find or create your SSH public key
cat ~/.ssh/id_rsa.pubIf you don’t have ssh key, follow the guide or google for it .
- Upload your SSH public key in Hetzner Console Security/SSH keys menu for easy access to servers
Create Private network
Let’s start setting up a Virtual Private Cloud (VPC) by creating a new private network with CIDR 10.0.0.0/24. Go to the Networks menu and click the Create Network button, name the network internal-network, select the desired zone and use 10.0.0.0/24 as the IP address range.
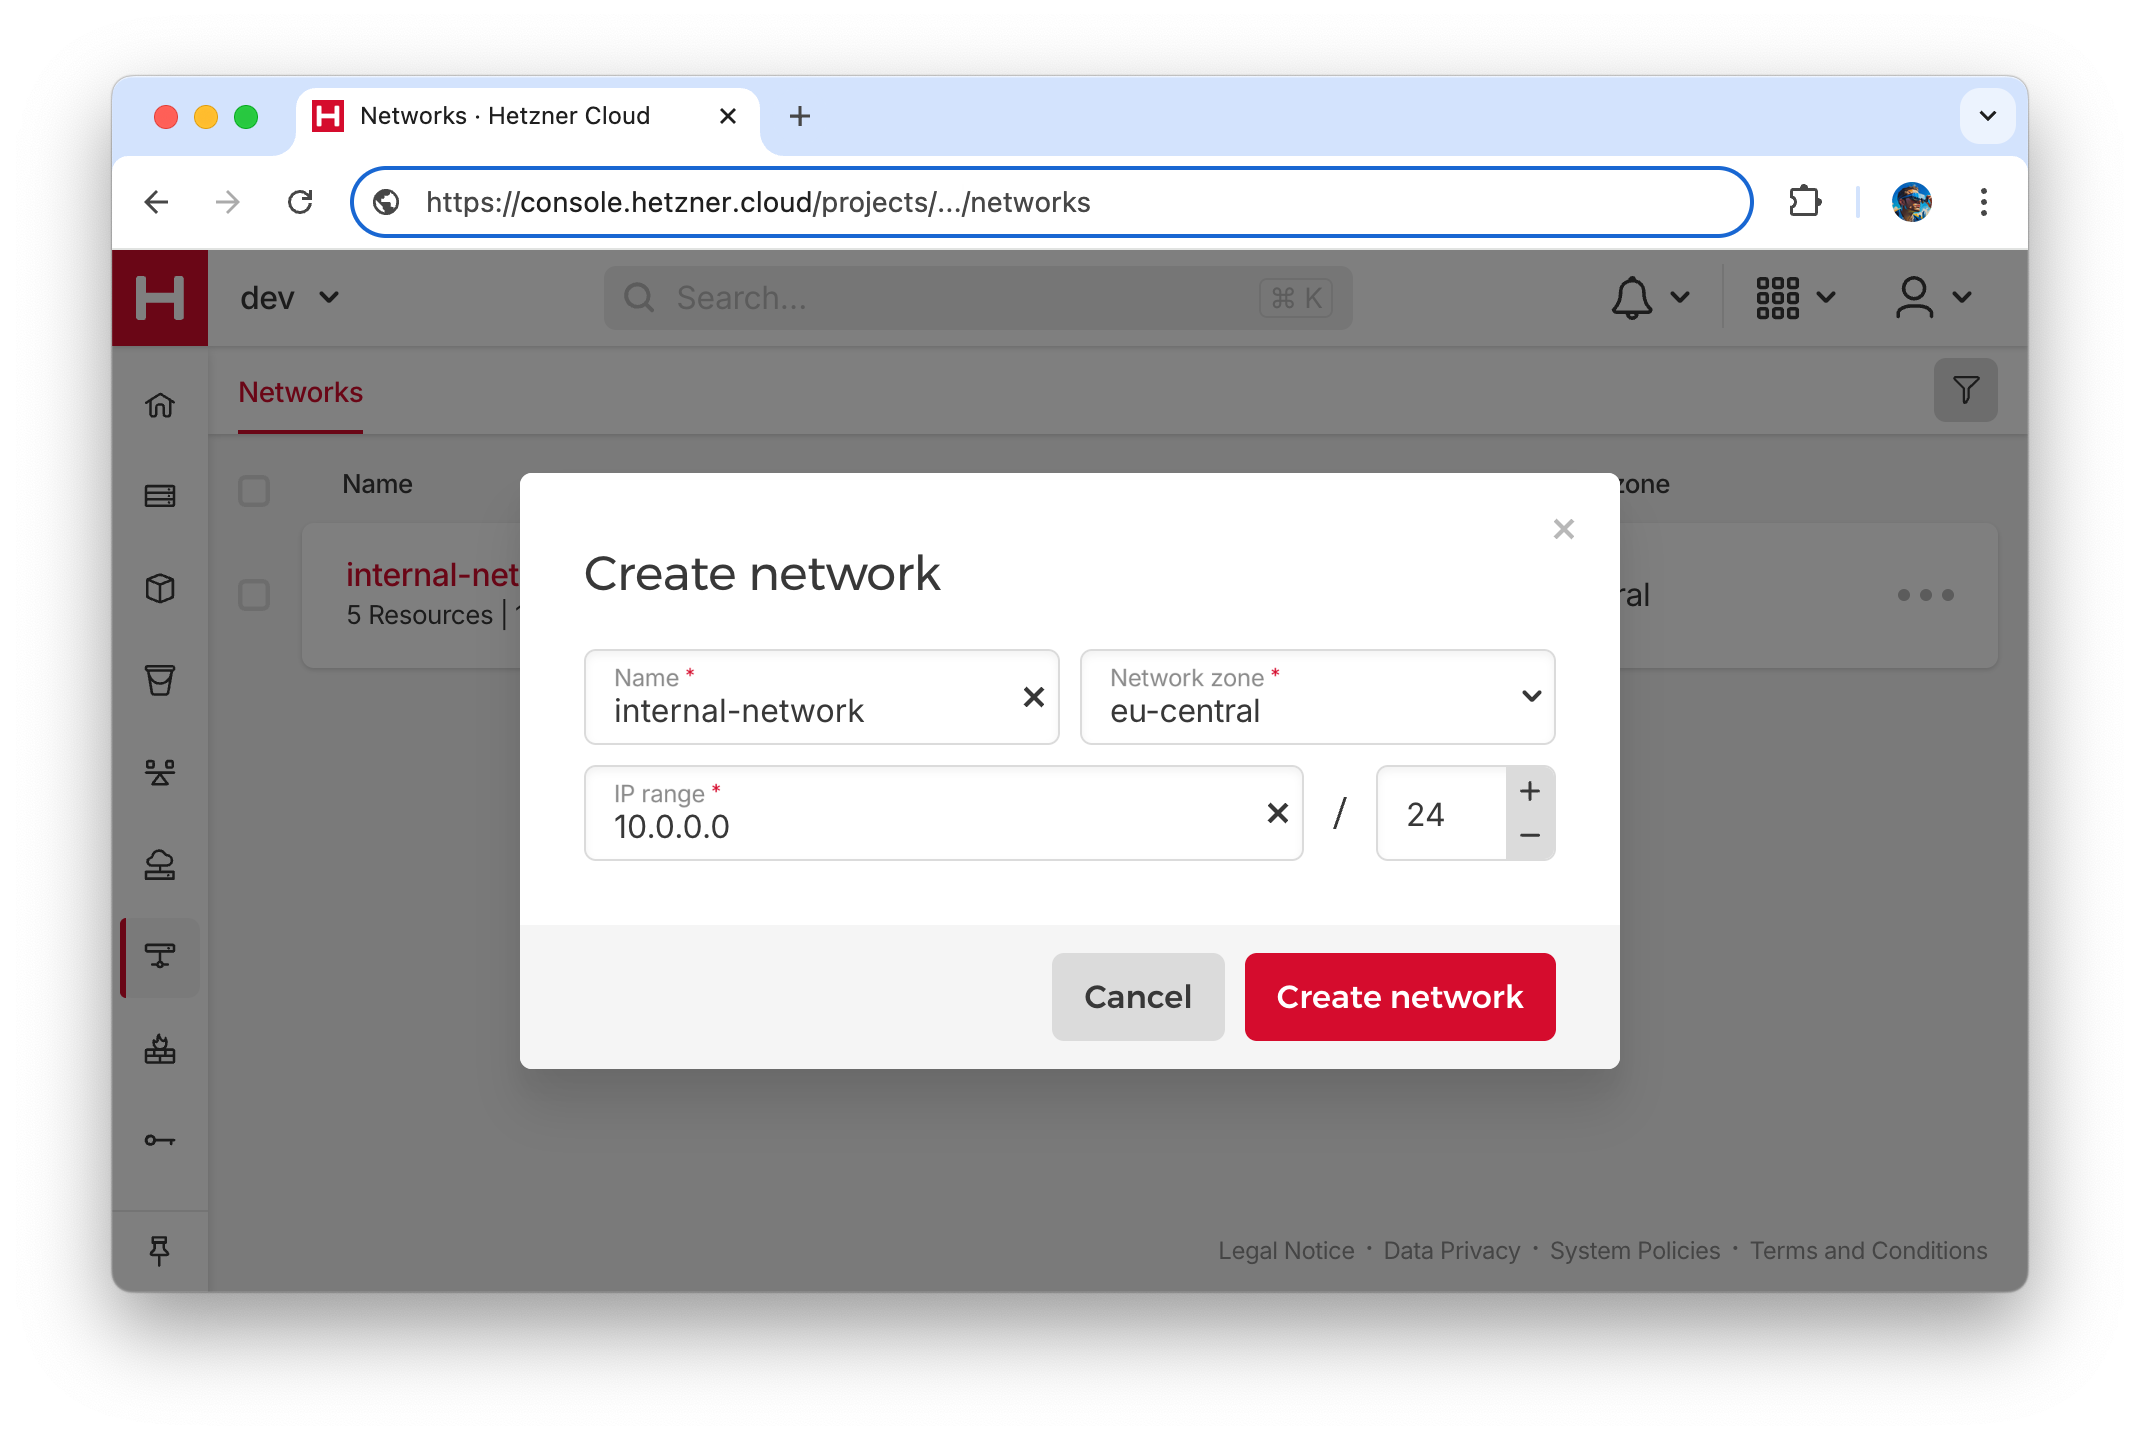 All our servers will be connected to this private network, and external access to internal resources will only be possible through VPN or Load Balancers.
Provision VPN server
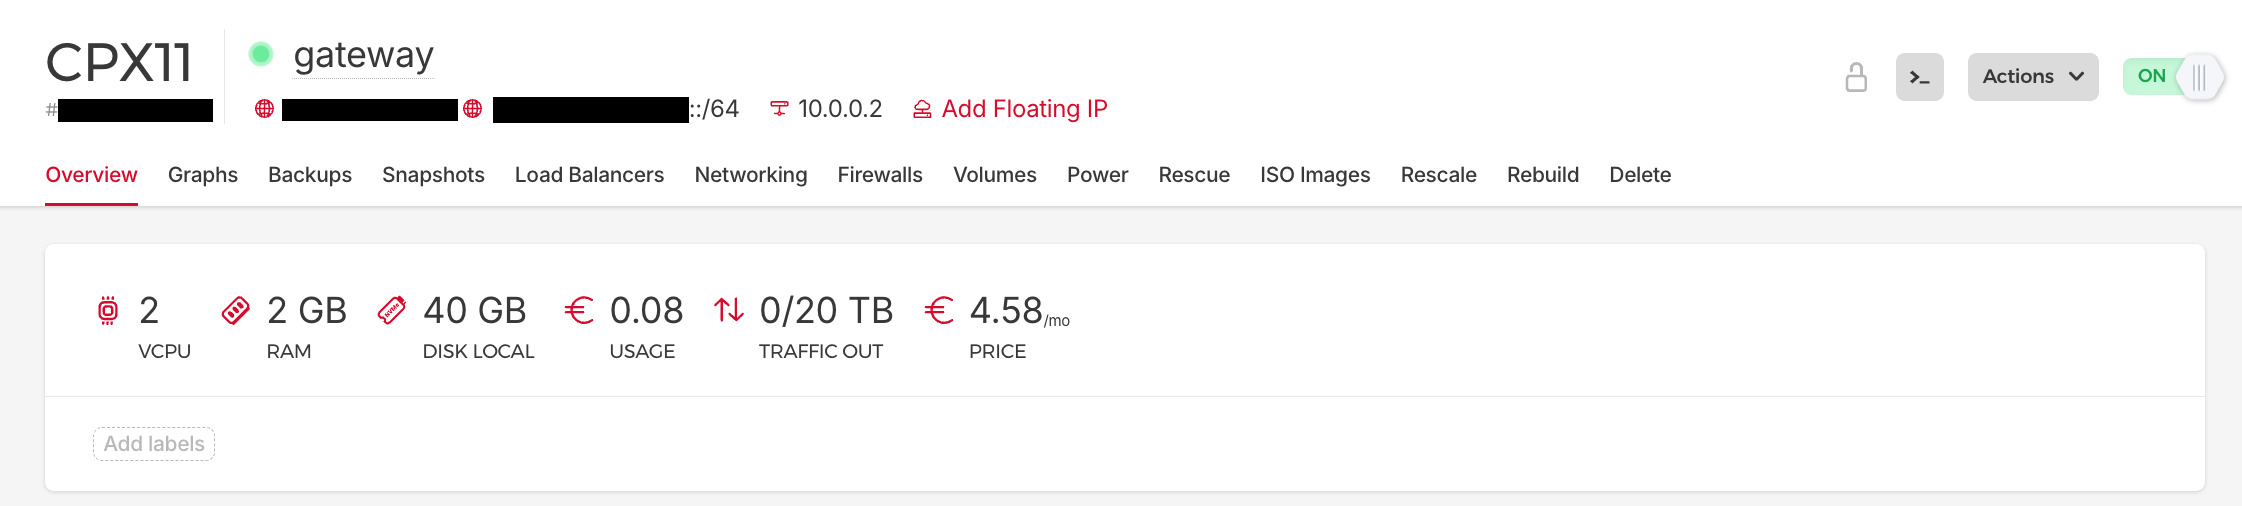
- To access the VPC we will need a VPN server. For these purposes we can use CPX11 server with 2 vCPUs, 2GB RAM instance (€5/month). Got to the Server menu, click on “Add Server” button, select Location, Image (Ubuntu 24.04), Shared vCPU as a Type, CPX11.
- The server should have public and private IP addresses, so do not foreget to enable “Private networks” checkbox in the server configuration and choose previously created private network.
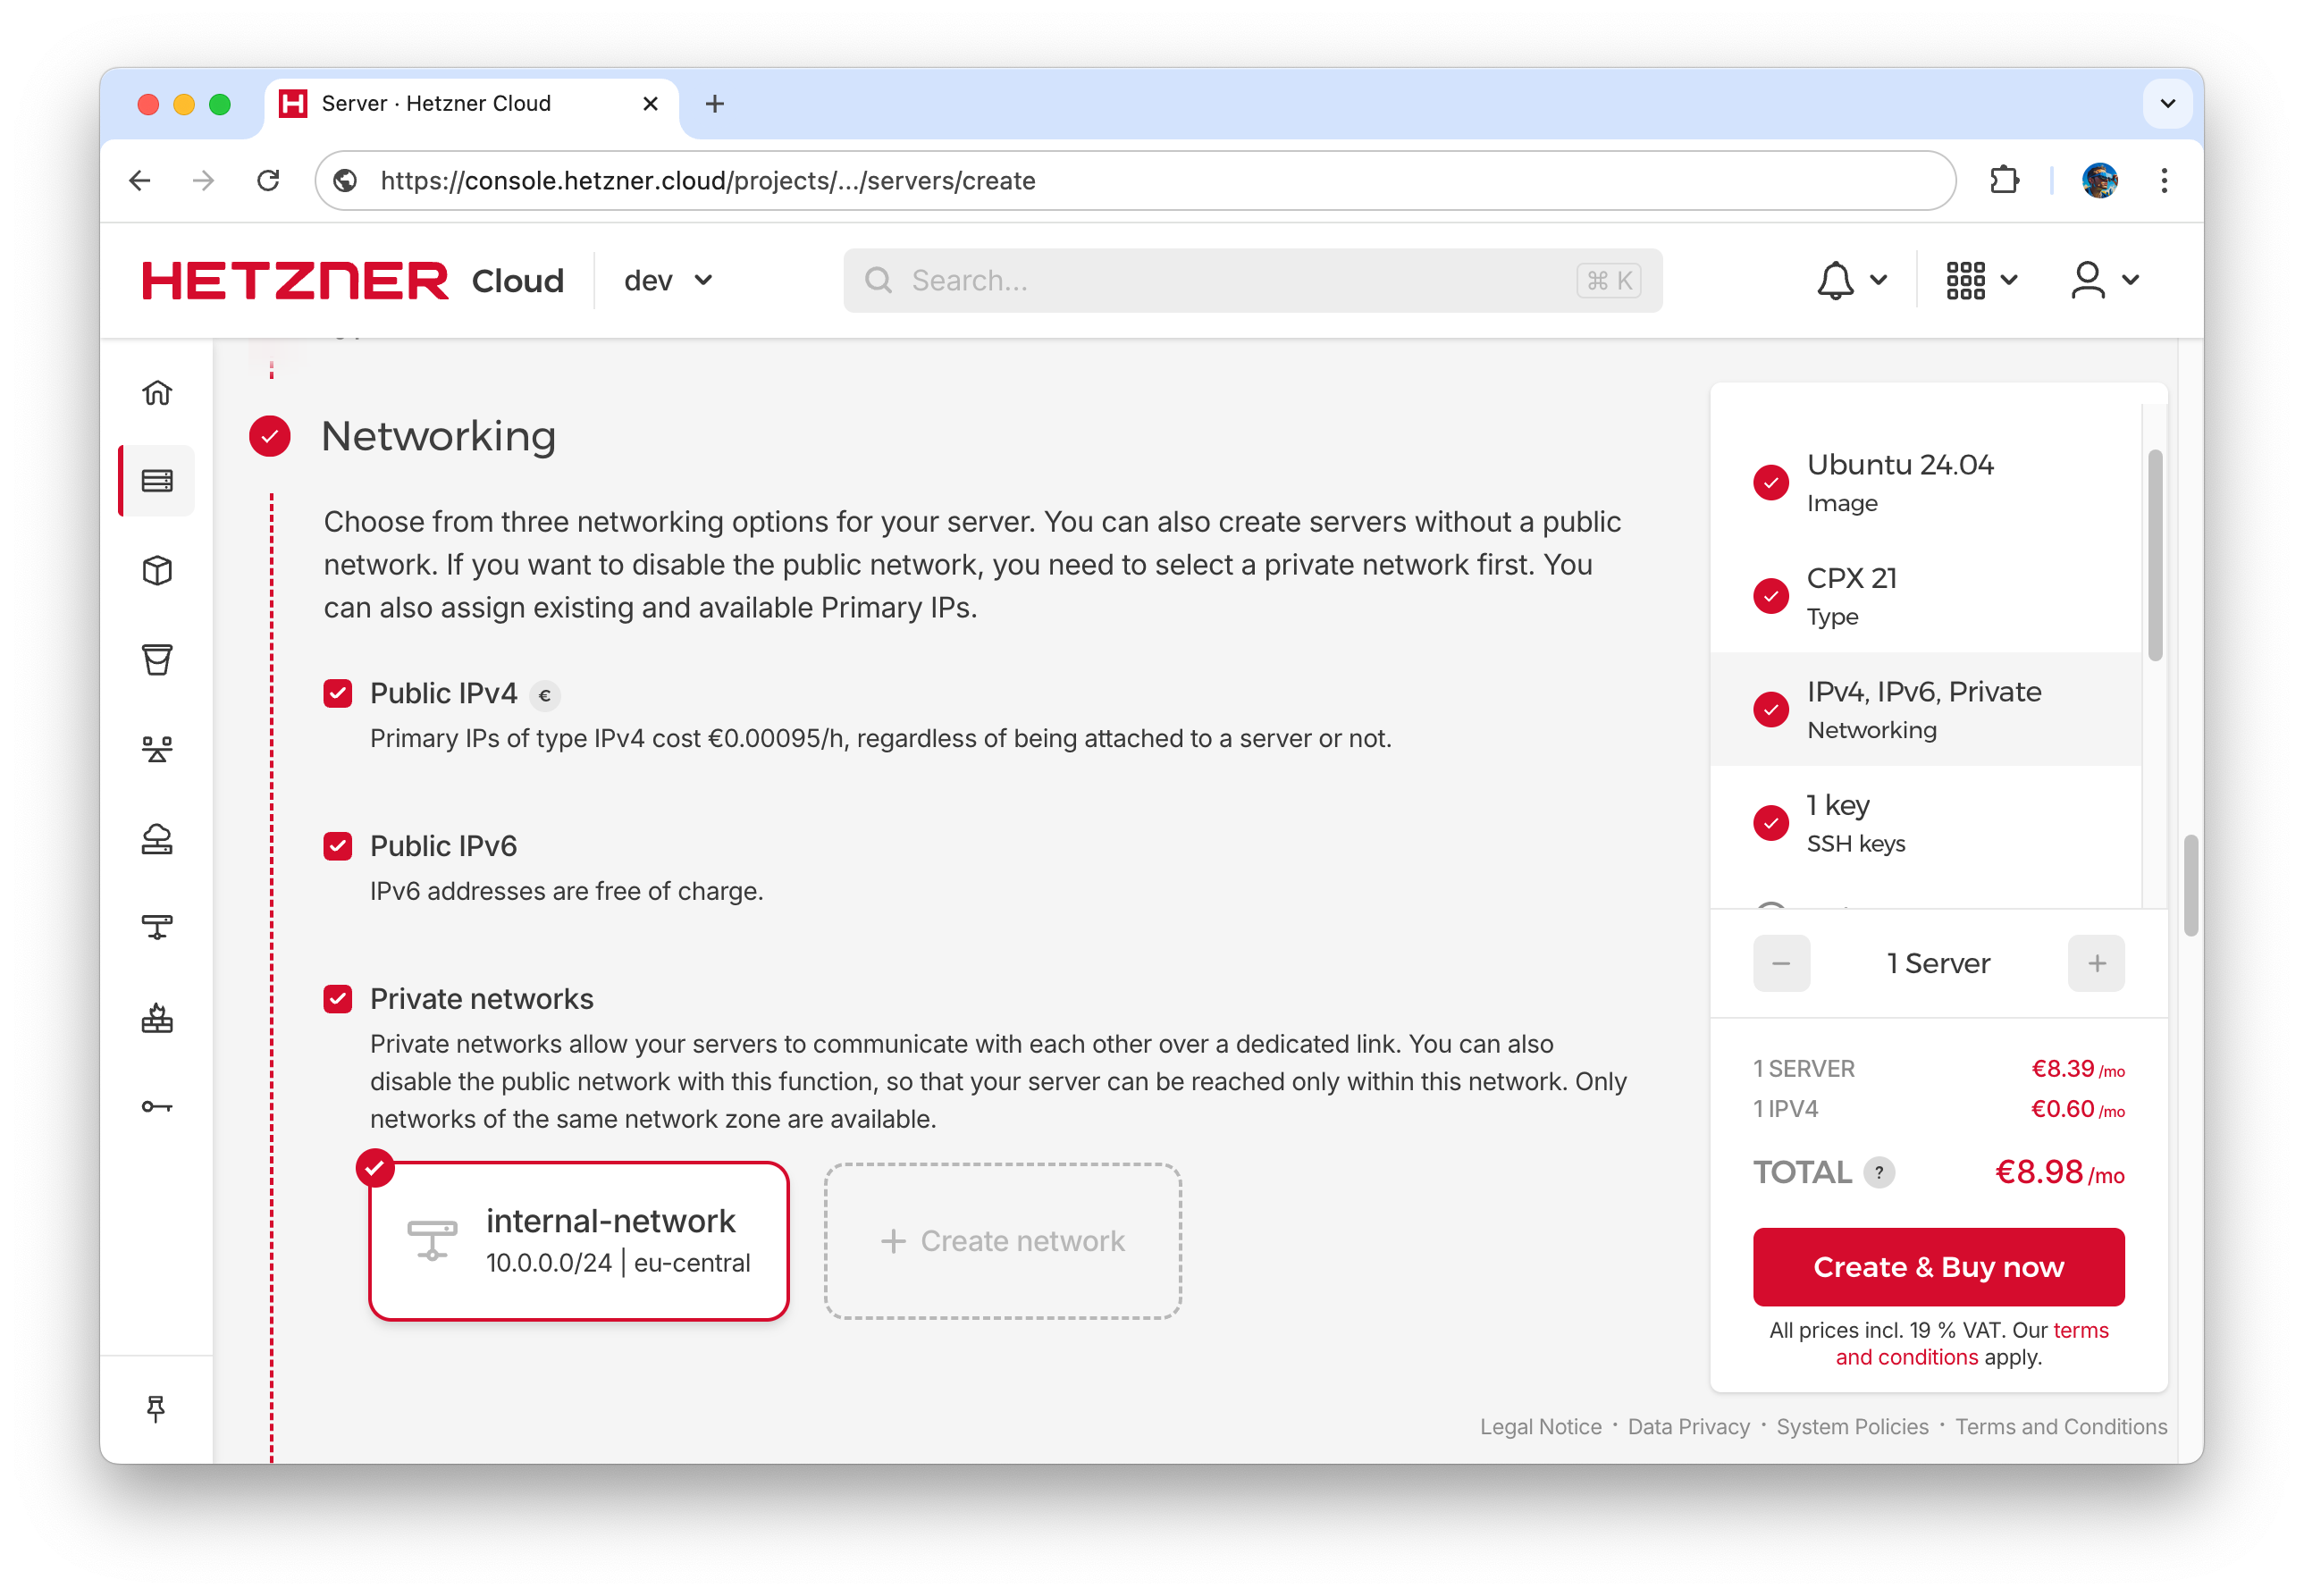
- Select previously uploaded SSH key for passwordless SSH access to avoid additional SSH service configuration later.
- For simplicity, we will also use this server as a gateway to provide Internet access to the internal network servers, so let’s name the server “gateway”.
This is the first server in our network, so once provisioned the internal network interface will be assigned the IP address 10.0.0.2.
Configure VPN access on the gateway server
We will use Wireguard as a VPN solution, I already described installation and configuration of Wireguard in another post, and it also will work for Hetzner. The only difference is that Hetzner servers use different layout for the network interfaces (eth0 for public network and enp7s0 for private network):
[gateway] ip a
1: lo: <LOOPBACK,UP,LOWER_UP> mtu 65536 qdisc noqueue state UNKNOWN group default qlen 1000
    link/loopback 00:00:00:00:00:00 brd 00:00:00:00:00:00
    inet 127.0.0.1/8 scope host lo
       valid_lft forever preferred_lft forever
    inet6 ::1/128 scope host noprefixroute
       valid_lft forever preferred_lft forever
2: eth0: <BROADCAST,MULTICAST,UP,LOWER_UP> mtu 1500 qdisc fq_codel state UP group default qlen 1000
    link/ether NN:NN:NN:NN:NN:NN brd ff:ff:ff:ff:ff:ff
    inet XXX.XXX.XXX.XXX/32 metric 100 scope global dynamic eth0
       valid_lft 85572sec preferred_lft 85572sec
    inet6 NNNN:NNNN:NNNN:NNNN::1/64 scope global
       valid_lft forever preferred_lft forever
    inet6 NNNN::NNNN:NNNN:NNNN:NNNN/64 scope link
       valid_lft forever preferred_lft forever
3: enp7s0: <BROADCAST,MULTICAST,UP,LOWER_UP> mtu 1450 qdisc fq_codel state UP group default qlen 1000
    link/ether NN:NN:NN:NN:NN:NN brd ff:ff:ff:ff:ff:ff
    inet 10.0.0.2/32 brd 10.0.0.2 scope global dynamic enp7s0
       valid_lft 85576sec preferred_lft 74776sec
    inet6 NNNN::NNNN:NN:NNNN:NNNN/64 scope link
       valid_lft forever preferred_lft forever
Let’s describe major steps:
- Find out and copy Gateway Public IP address in Hetzner Cloud Console
- ssh to the Gateway Server using Public IP address
ssh root@GATEWAY_PUBLIC_IP- Install Wireguard
[gateway] sudo apt update && sudo apt install wireguard- Enable routing between public and private network interfaces
[gateway] cat <<EOF | sudo tee /etc/sysctl.conf
net.bridge.bridge-nf-call-iptables  = 1
net.bridge.bridge-nf-call-ip6tables = 1
net.ipv4.ip_forward                 = 1
net.ipv6.conf.all.forwarding        = 1
EOF
# Apply sysctl params without reboot
[gateway] sudo sysctl --system- Download and untar WireGuard UI
[gateway] curl -sL https://github.com/ngoduykhanh/wireguard-ui/releases/download/v0.6.2/wireguard-ui-v0.6.2-linux-amd64.tar.gz | tar xz- Run WireGuard UI in Gateway
[gateway] BIND_ADDRESS=127.0.0.1:5000 ./wireguard-ui- Bind remote port localy using ssh port-forwarding (run on your workstation)
ssh -L 5000:localhost:5000 root@GATEWAY_PUBLIC_IP- Open WireGuard UI locally at http://localhost:5000/ , login as admin:admin (on your workstation)
- In Wireguard Server Settings set Post Up and Post Down Script using network interface name (enp7s0)
PostUp = iptables -A FORWARD -i wg0 -j ACCEPT; iptables -t nat -A POSTROUTING -o enp7s0 -j MASQUERADE;
PostDown = iptables -D FORWARD -i wg0 -j ACCEPT; iptables -t nat -D POSTROUTING -o enp7s0 -j MASQUERADE;
-
Create a WireGuard Client in WireGuard UI, IP Allocation for the client should be 10.252.1.1/32, 10.0.0.0/24
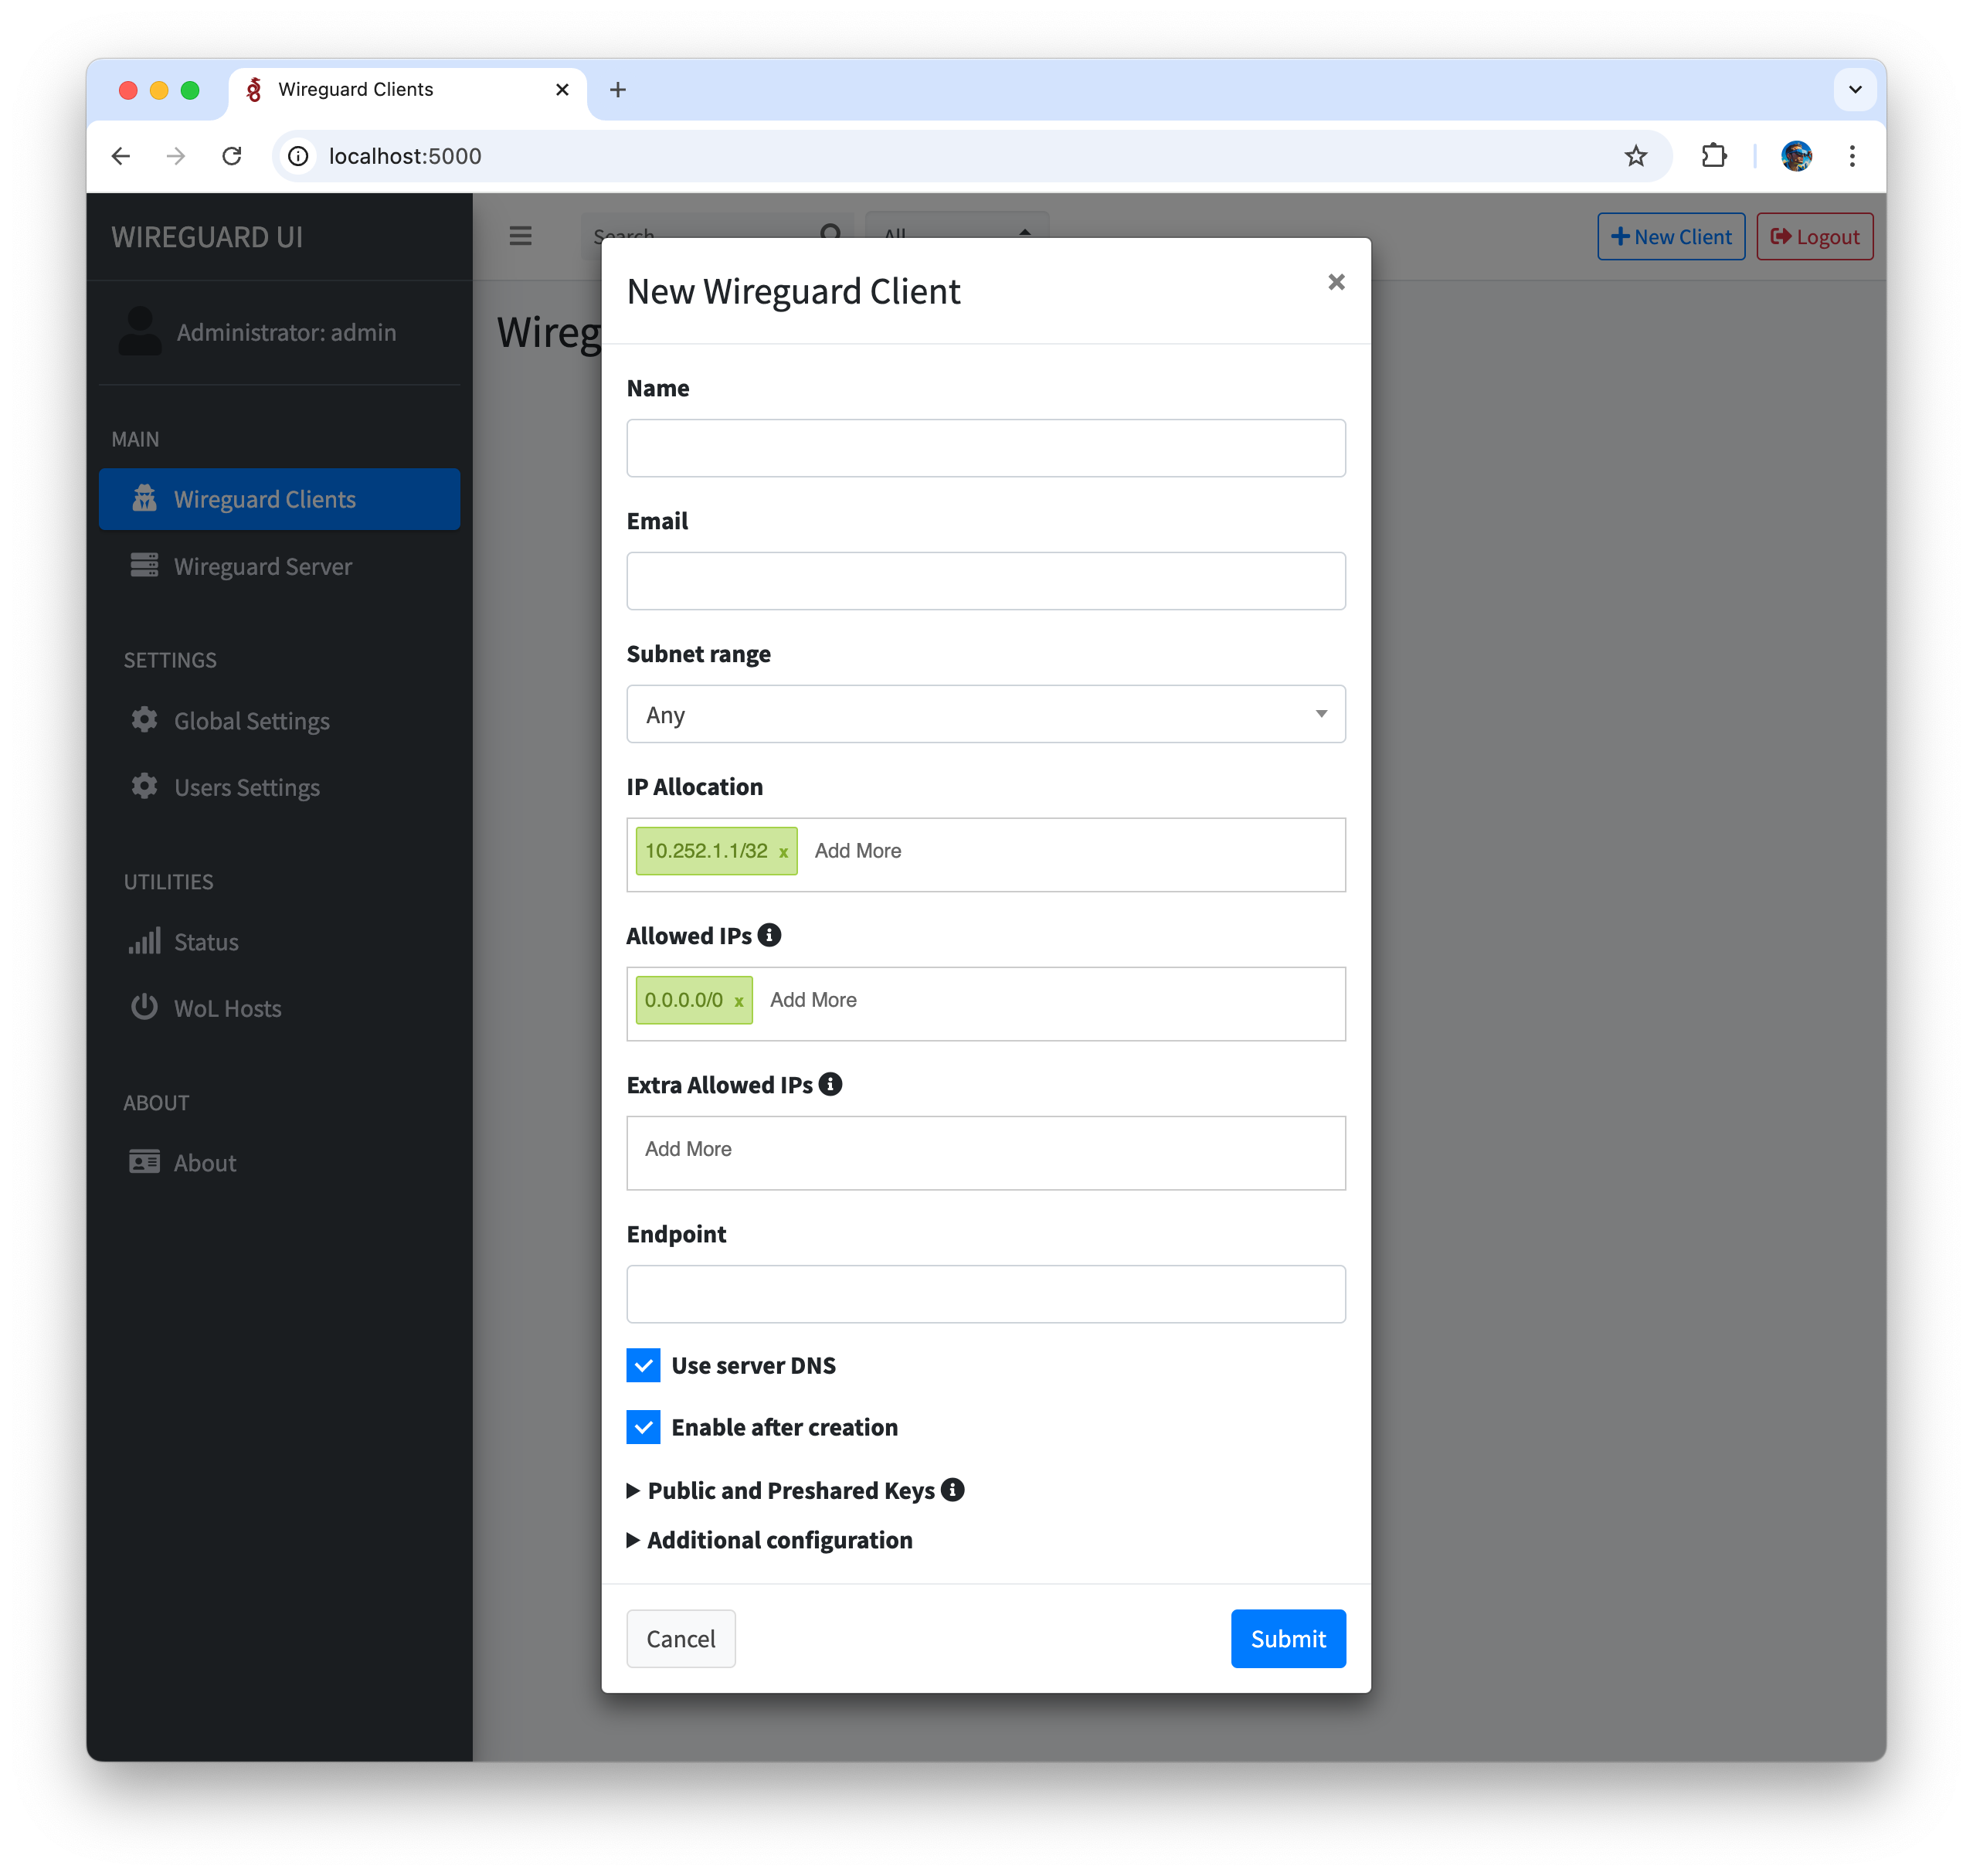
-
Apply configuration in WireGuard UI
-
Start and enable WireGuard service in gateway
[gateway] sudo systemctl start wg-quick@wg0
[gateway] sudo systemctl status wg-quick@wg0
[gateway] sudo systemctl enable wg-quick@wg0- Install latest version of Wireguard on your workstation, download client configuration file from WireGuard UI and add it to your local Wireguard
- Establish VPN connection from your local worstation and ping gateway internal IP:
ping 10.0.0.2Further it is assumed that the VPN connection is always on.
Configure private network routes for the gateway
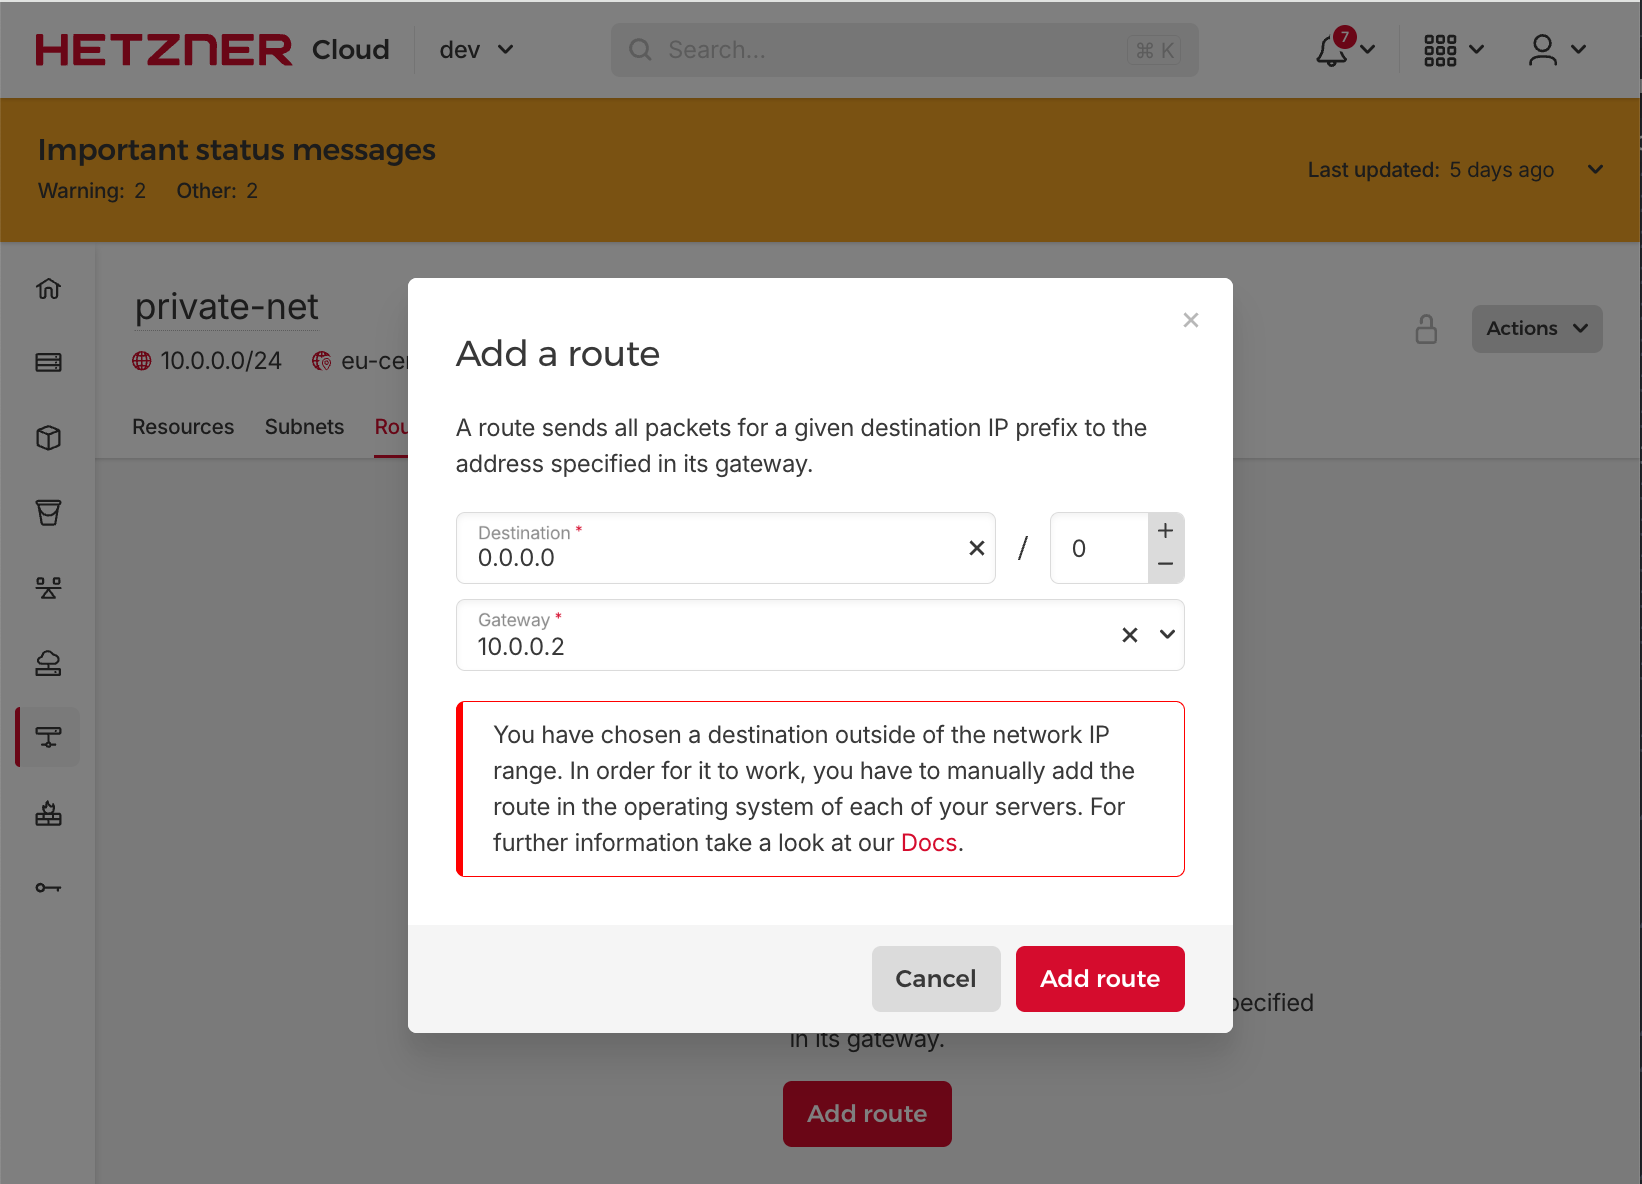
To route traffic from the internal network to the public Internet, we need to define a default route for the internal network that points to the IP address of the gateway server. You can add routes in the Routes submenu of internal-network. Add a route for 0.0.0.0/0 to 10.0.0.2.
Provision of Load Balancers
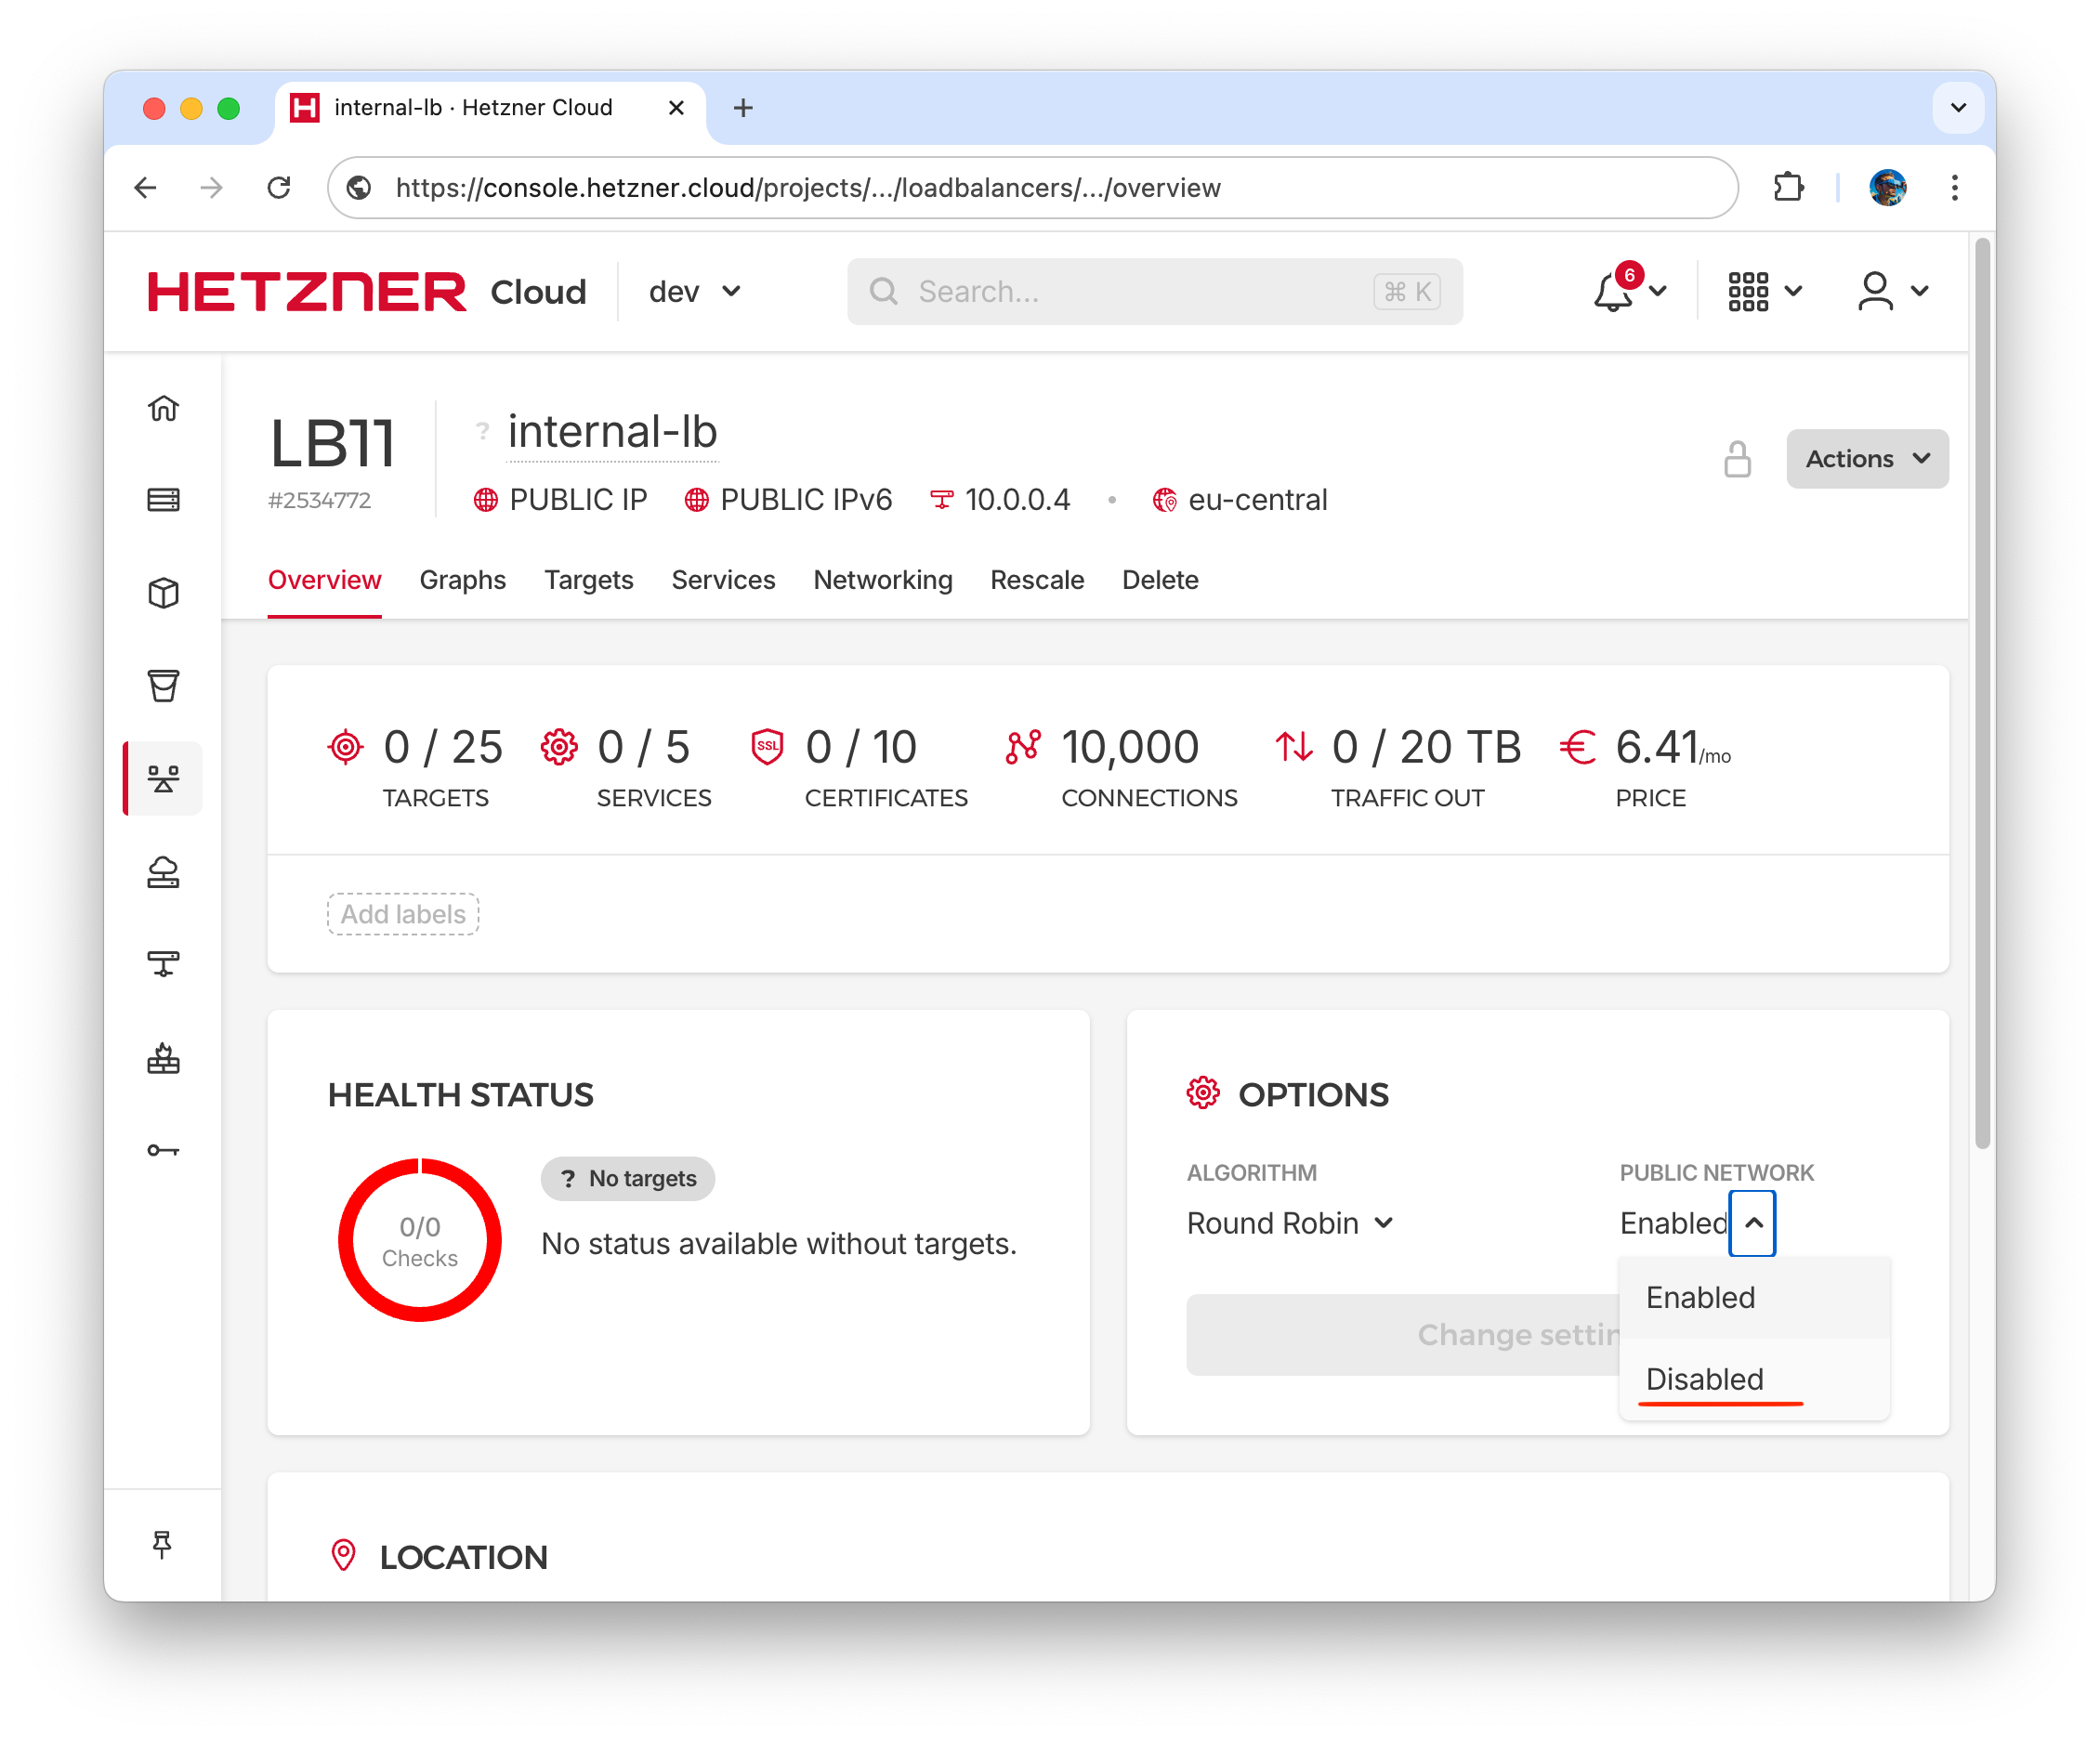
We need two Load Balancers: Public Load Balancer distributes incoming traffic from external sources across internal services, Internal Load Balancer will be entry point for private services. In this guide we will create Load Balancers manually, and after will configure Kubernetes to manage them.
- To create Public Load Balancer open menu Load Balancers in Cloud Console, click on “Create Load Balancer” button, select Location, LB11 instance as a Type (€6.41/mo), connect it to internal-network, remove Services definitions, and name it “public-lb”. Public network will be connected automatically and Internal IP will be 10.0.0.3.
- To create Internal Load Balancer do the same again, but name it “internal-lb”. For this load balancer we have to disable public network. You can do it in Overview menu/Options. Internal IP will be 10.0.0.4.
In fact, Hetzner operators for Kubernetes allow you to dynamically create load balancers using Ingress configurations, but in this case, the assigned IP addresses for the load balancers will be out of order. I prefer to provision Load Balancers first and have internal IP 10.0.0.3 for Public and 10.0.0.4 for Internal Load Balancer.
Provision main Kubernetes node
- Hetzner Cloud CPX41 server with 8 vCPUs, 16GB RAM and 240GB NVMe SSD is a good option for main Kubernetes node. Select the same location, Ubuntu 24.04, Shared CPX41 instance.
- All Kubernetes nodes including Main will be private and will have only internal-network interface, so uncheck all “Public network” checkboxes in the server configuration, and enable “Private networks” checkbox. For private network choose previously created internal-network.
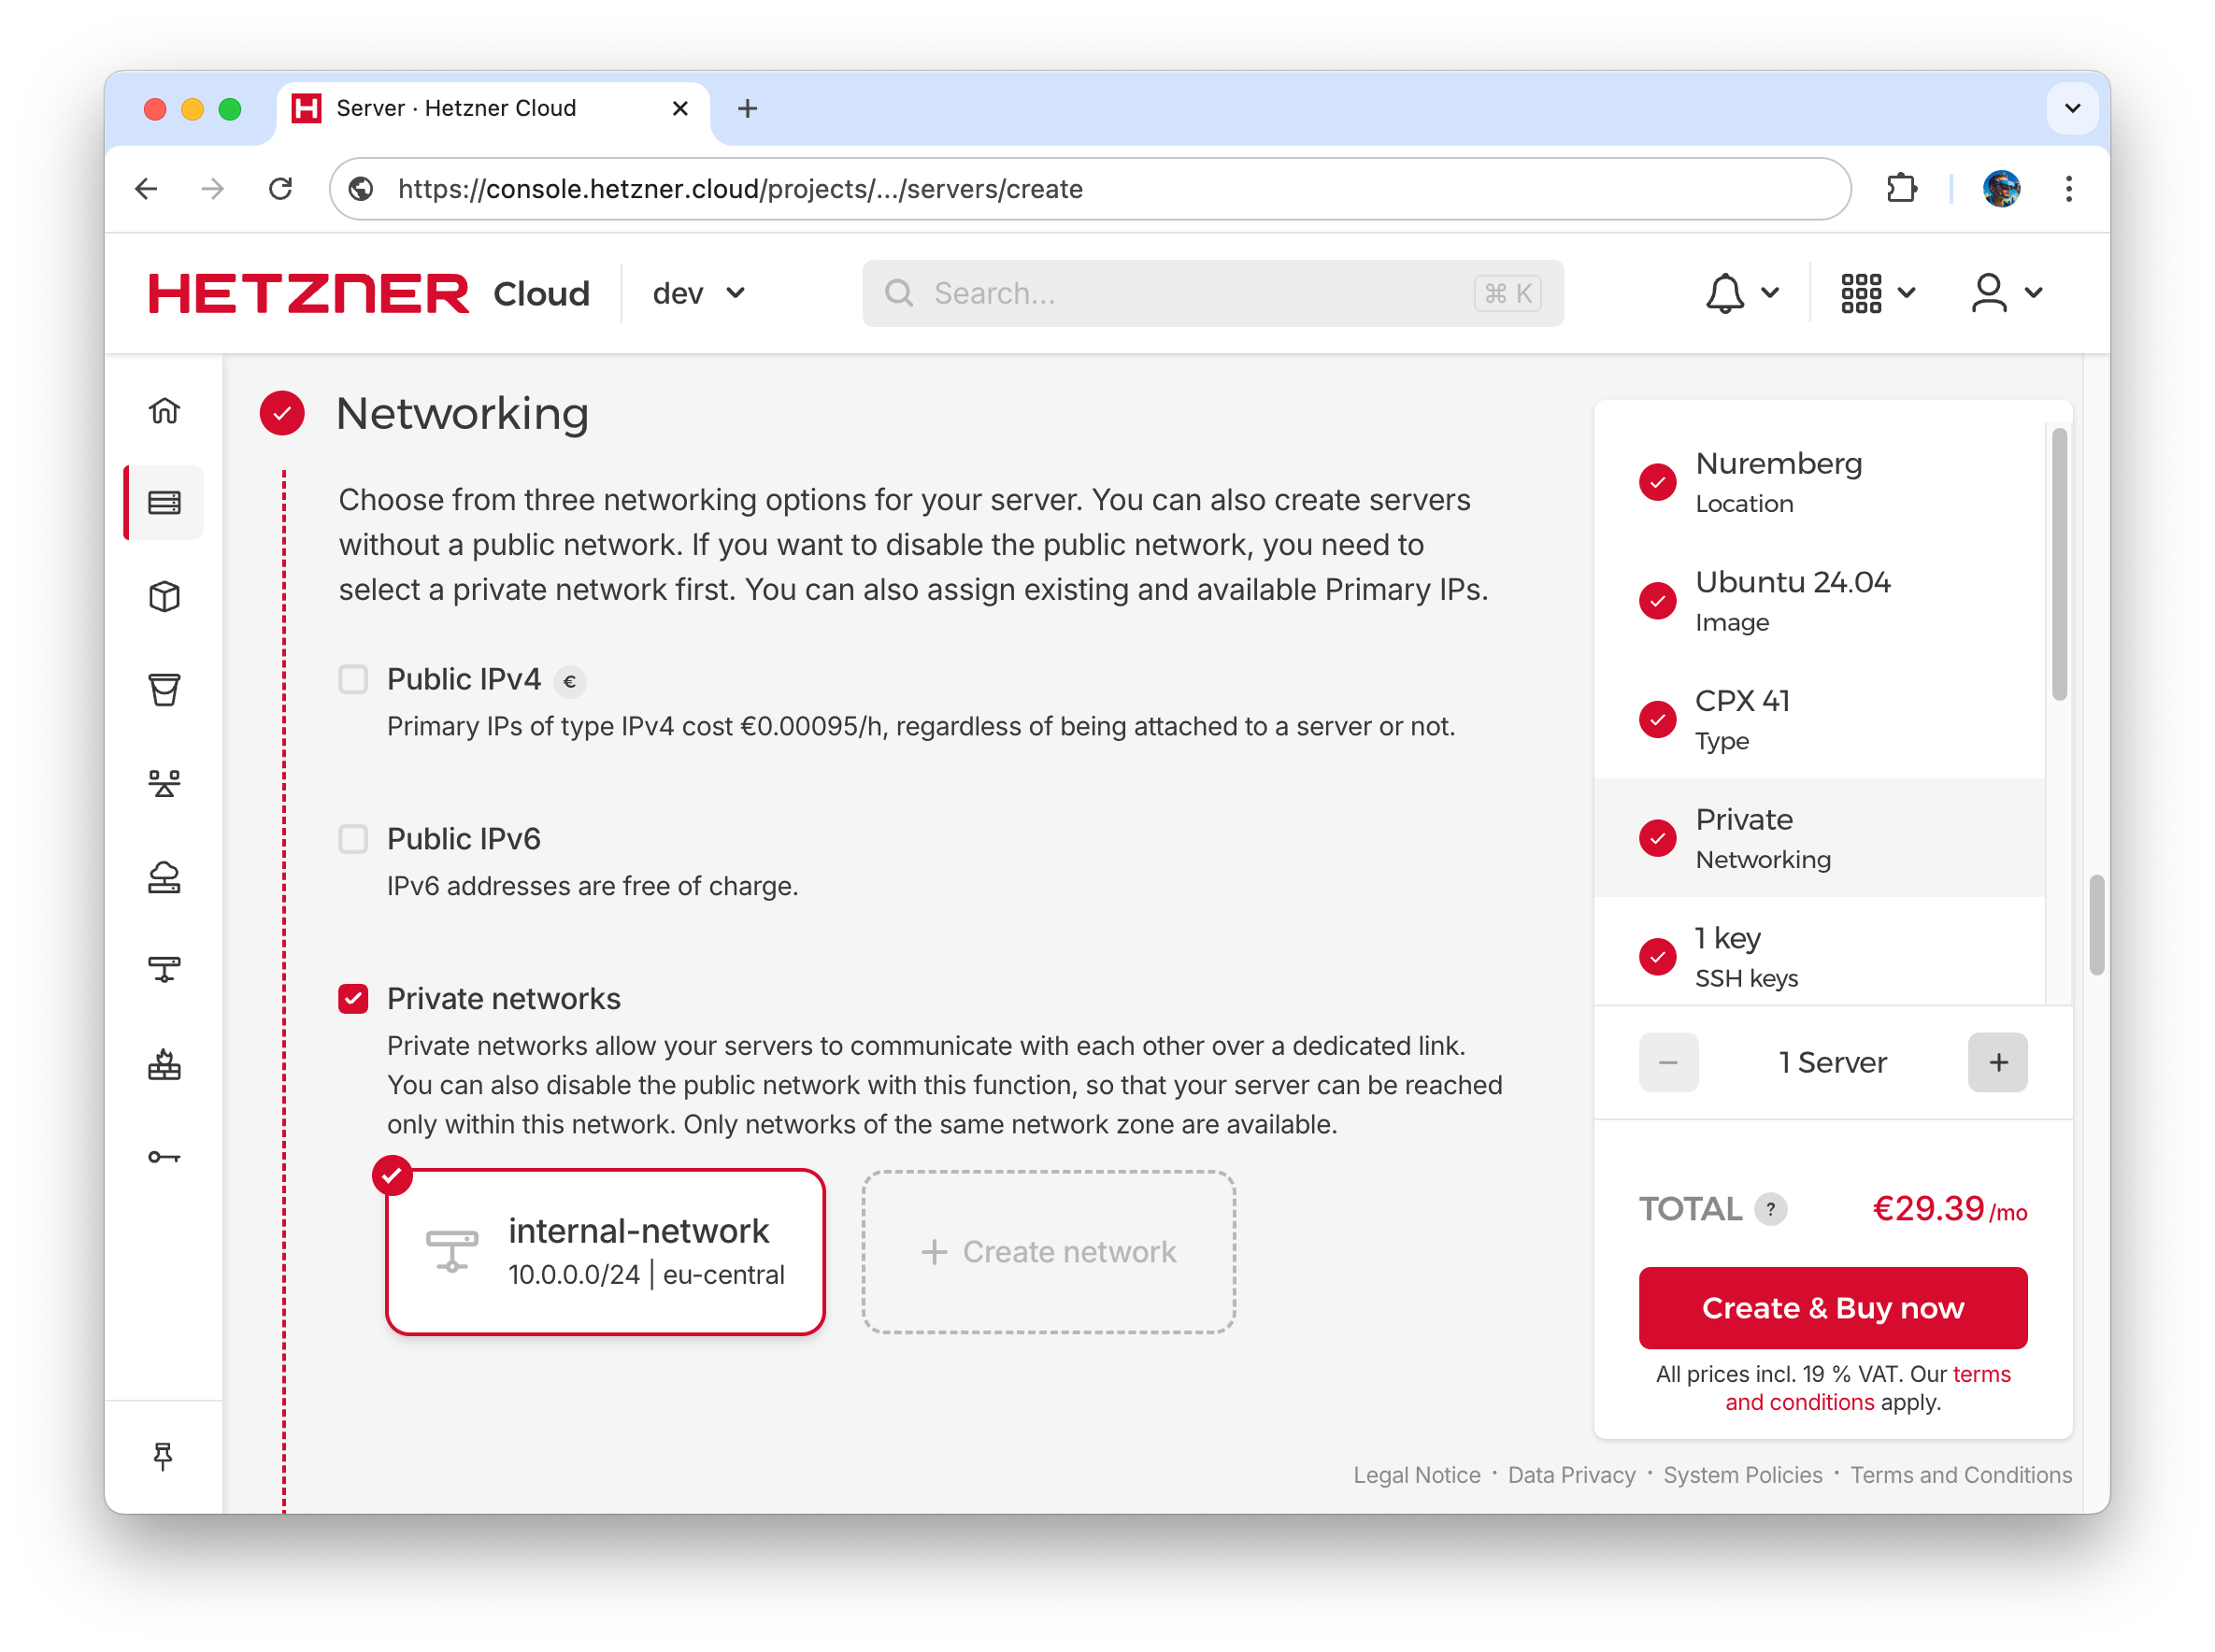
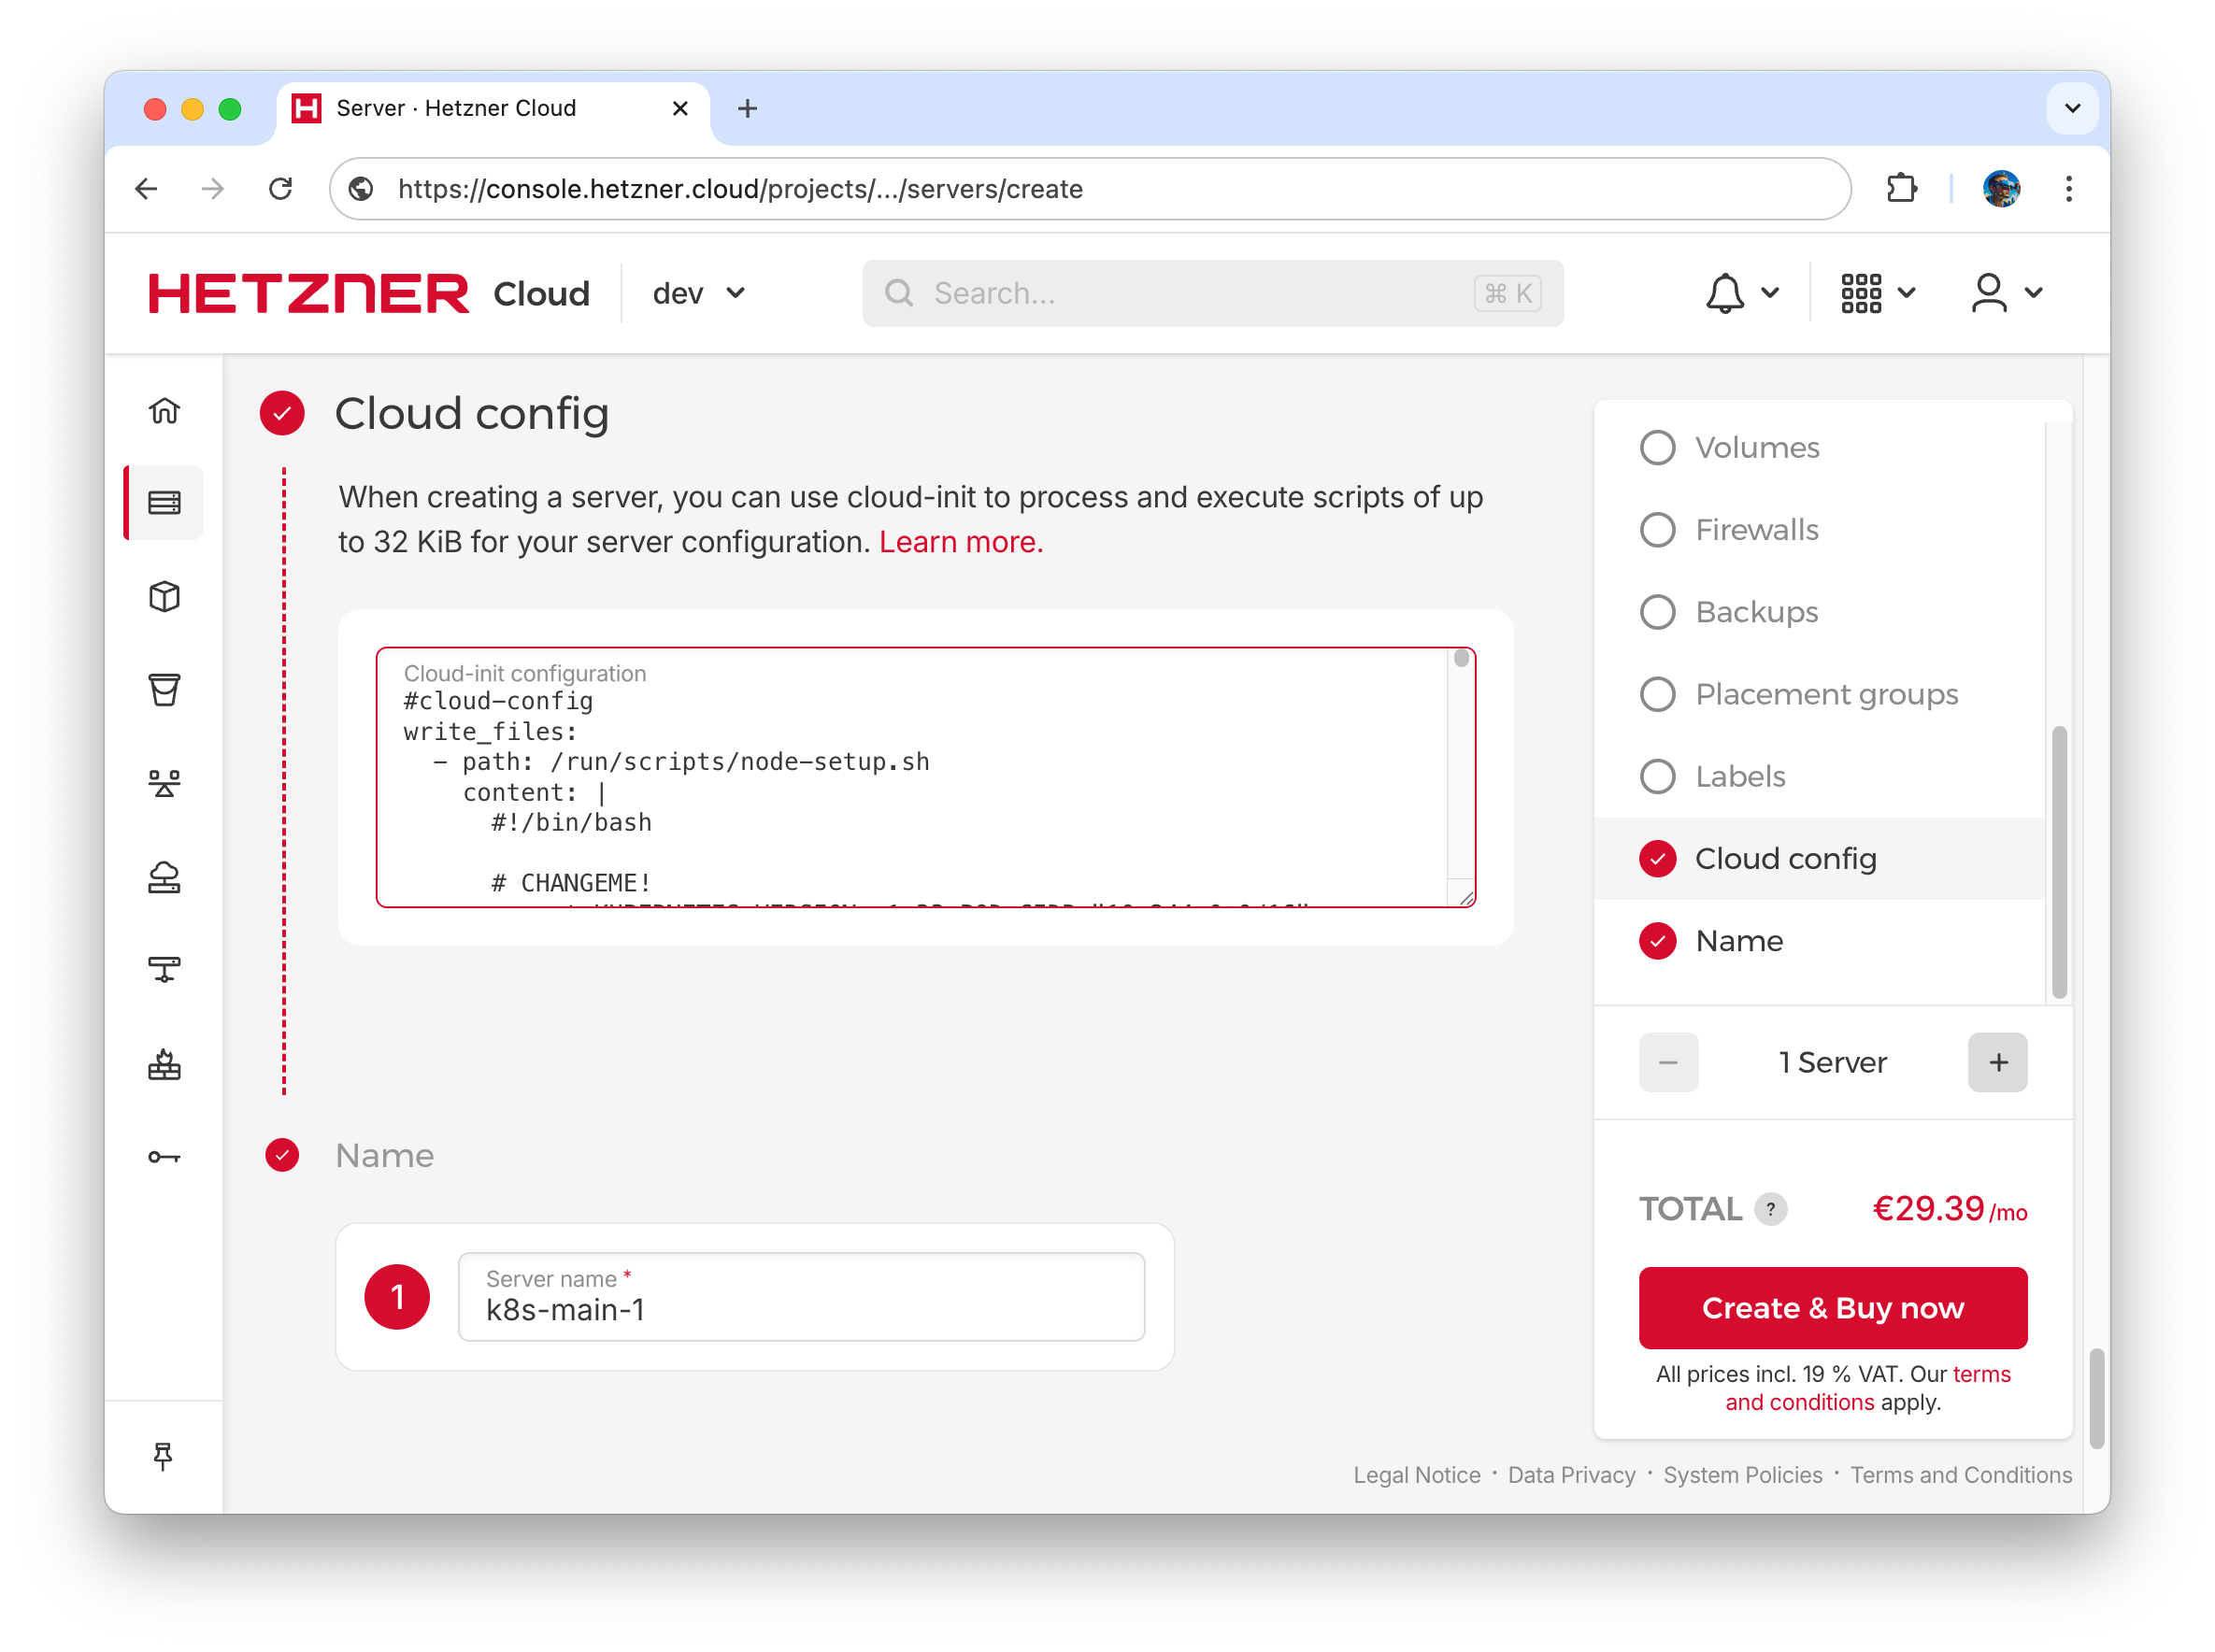
- We will configure and install Kubernetes main node automatically using the following cloud-init script, paste it in cloud-init section in the server configuration, make nessesary changes in KUBERNETES_VERSION, POD_CIDR, CRICTL_VERSION values before.
#cloud-config
write_files:
  - path: /run/scripts/node-setup.sh
    content: |
      #!/bin/bash

      # CHANGEME!
      export CLUSTER_NAME="k8s" KUBERNETES_VERSION=v1.33 POD_CIDR="10.244.0.0/16" CRICTL_VERSION=v1.33.0
      # export CLUSTER_NAME="k8s" KUBERNETES_VERSION=v1.32 POD_CIDR="10.244.0.0/16" CRICTL_VERSION=v1.32.0 # previous version

      # enp7s0 is internal network interface name, we define persistent configuration for enp7s0 with default gateway 10.0.0.1
      echo "cloud-init: configure enp7s0 default gateway"
      cat <<EOF > /etc/systemd/network/10-enp7s0.network
      # Custom network configuration added by cloud-init
      [Match]
      Name=enp7s0

      [Network]
      DHCP=yes
      Gateway=10.0.0.1
      EOF

      # sometimes assigning an internal IP takes time, we have to wait
      echo "cloud-init: waiting for enp7s0 network interface"
      /lib/systemd/systemd-networkd-wait-online --any -i enp7s0 --timeout=60

      # apply enp7s0 configuration
      echo "cloud-init: restart systemd-networkd"
      systemctl restart systemd-networkd

      # configure DNS
      echo "cloud-init: configure DNS"
      cat <<EOF > /etc/systemd/resolved.conf
      # Custom network configuration added by cloud-init
      [Resolve]
      DNS=185.12.64.2 185.12.64.1
      FallbackDNS=8.8.8.8
      EOF

      # apply DNS changes
      echo "cloud-init: restart systemd-resolved"
      systemctl restart systemd-resolved

      # Find IP of node
      export NODE_IP=$(ifconfig enp7s0 | grep 'inet ' | awk '{ print $2}')
      echo "cloud-init: NODE_IP=$NODE_IP"

      # Enable iptables Bridged Traffic
      echo "cloud-init: enable iptables Bridged Traffic"
      cat <<EOF | sudo tee /etc/modules-load.d/k8s.conf
      overlay
      br_netfilter
      EOF
      sudo modprobe overlay
      sudo modprobe br_netfilter
      # sysctl params required by setup, params persist across reboots
      cat <<EOF | sudo tee /etc/sysctl.d/k8s.conf
      net.bridge.bridge-nf-call-iptables  = 1
      net.ipv4.ip_forward                 = 1
      # To disable IPv6
      #net.ipv6.conf.all.disable_ipv6 = 1
      #net.ipv6.conf.default.disable_ipv6 = 1
      # To enable IPv6
      net.bridge.bridge-nf-call-ip6tables = 1
      EOF
      # Apply sysctl params without reboot
      sudo sysctl --system

      # Install CRI-O Runtime
      echo "cloud-init: install CRI-O Runtime"
      sudo apt-get update -y
      sudo apt-get install -y software-properties-common gpg curl apt-transport-https ca-certificates
      curl -fsSL https://pkgs.k8s.io/addons:/cri-o:/prerelease:/main/deb/Release.key |
          sudo gpg --yes --dearmor -o /etc/apt/keyrings/cri-o-apt-keyring.gpg
      echo "deb [signed-by=/etc/apt/keyrings/cri-o-apt-keyring.gpg] https://pkgs.k8s.io/addons:/cri-o:/prerelease:/main/deb/ /" |
          sudo tee /etc/apt/sources.list.d/cri-o.list
      sudo apt-get update -y
      sudo apt-get install -y cri-o
      wget https://github.com/kubernetes-sigs/cri-tools/releases/download/$CRICTL_VERSION/crictl-$CRICTL_VERSION-linux-amd64.tar.gz
      sudo tar zxvf crictl-$CRICTL_VERSION-linux-amd64.tar.gz -C /usr/local/bin
      rm -f crictl-$CRICTL_VERSION-linux-amd64.tar.gz

      # Start CRI-O Daemon
      echo "cloud-init: start CRI-O daemon"
      sudo systemctl daemon-reload
      sudo systemctl enable crio --now
      sudo systemctl start crio.service

      # Install Kubeadm & Kubelet & Kubectl
      echo "cloud-init: install Kubeadm & Kubelet & Kubectl"
      sudo mkdir -p /etc/apt/keyrings
      curl -fsSL https://pkgs.k8s.io/core:/stable:/$KUBERNETES_VERSION/deb/Release.key | sudo gpg --yes --dearmor -o /etc/apt/keyrings/kubernetes-apt-keyring.gpg
      echo "deb [signed-by=/etc/apt/keyrings/kubernetes-apt-keyring.gpg] https://pkgs.k8s.io/core:/stable:/$KUBERNETES_VERSION/deb/ /" |\
        sudo tee /etc/apt/sources.list.d/kubernetes.list
      sudo apt-get update -y
      sudo apt-get install -y kubelet kubeadm kubectl
      sudo apt-mark hold kubelet kubeadm kubectl

      # Configure Kubelet extra args to support Hetzner Cloud, read more https://github.com/hetznercloud/hcloud-cloud-controller-manager/issues/856#issuecomment-2631043985
      echo "cloud-init: configure Kubelet extra args to support Hetzner Cloud "
      export PROVIDER_ID=$(dmidecode -t system | awk '/Serial Number/ {print $3}')
      echo "KUBELET_EXTRA_ARGS=--cloud-provider=external --provider-id=hcloud://$PROVIDER_ID --node-ip=$NODE_IP" | tee /etc/default/kubelet

      # Install Kubernetes
      echo "cloud-init: install Kubernetes"
      export NODENAME=$(hostname -s)

      # Create kubeadm configuration file, original template from 'kubeadm config print init-defaults > ./kubeadm-config.yaml'
      cat <<EOF > ./kubeadm-config.yaml
      apiVersion: kubeadm.k8s.io/v1beta4
      bootstrapTokens:
        - groups:
          - system:bootstrappers:kubeadm:default-node-token
          token: $(kubeadm token generate)
          ttl: 24h0m0s
          usages:
          - signing
          - authentication
      kind: InitConfiguration
      localAPIEndpoint:
        advertiseAddress: $NODE_IP
        bindPort: 6443
      nodeRegistration:
        criSocket: unix:///var/run/crio/crio.sock
        imagePullPolicy: IfNotPresent
        imagePullSerial: true
        name: $NODENAME
        taints: null
      timeouts:
        controlPlaneComponentHealthCheck: 4m0s
        discovery: 5m0s
        etcdAPICall: 2m0s
        kubeletHealthCheck: 4m0s
        kubernetesAPICall: 1m0s
        tlsBootstrap: 5m0s
        upgradeManifests: 5m0s
      ---
      apiServer:
        certSANs:
        # Add here domain names or additional IP addresses that you want to use to access the API server
          - $NODE_IP
      apiVersion: kubeadm.k8s.io/v1beta4
      caCertificateValidityPeriod: 87600h0m0s
      certificateValidityPeriod: 8760h0m0s
      certificatesDir: /etc/kubernetes/pki
      clusterName: $CLUSTER_NAME
      controllerManager: {}
      dns: {}
      encryptionAlgorithm: RSA-2048
      etcd:
        local:
          dataDir: /var/lib/etcd
      imageRepository: registry.k8s.io
      kind: ClusterConfiguration
      networking:
        dnsDomain: cluster.local
        podSubnet: $POD_CIDR
        serviceSubnet: 10.96.0.0/12
      proxy: {}
      scheduler: {}
      EOF

      sudo kubeadm init --config ./kubeadm-config.yaml \
        --ignore-preflight-errors Swap
    permissions: '0755'

runcmd:
- [ sh, "/run/scripts/node-setup.sh" ]- Name node as “k8s-main-1”
 .
.
Internal IP of the main node should be 10.0.0.5, find it out in Cloud Console.
Troubleshooting of main Kubernetes node provision
If everything goes well, the main Kubernetes node will be available within 30 seconds.
ping 10.0.0.5If not, here are the troubleshooting steps:
- The node has only an internal IP address. If the network setup in cloud-init fails, the node will not be directly accessible via VPN connection. We can use “ssh jumping” via Gateway to reach the main node
ssh -J root@10.0.0.2 root@10.0.0.5- Check cloud-init logs to identify the issue
[k8s-main-1] cat /var/log/cloud-init-output.log- Fix the issue, rerun cloud-init script
[k8s-main-1] sh /run/scripts/node-setup.shConfigure local environment to work with Kubernetes
To access the cluster and deploy applications, we need to install kubectl and helm locally. Cluster configuration stored in /etc/kubernetes/admin.conf file in main node, let’s get it.
- Login to the Kubernetes main node using ssh
ssh root@10.0.0.5- Prepare kubeconfig file
[k8s-main-1] export KUBECONFIG=/etc/kubernetes/admin.conf
[k8s-main-1] mkdir -p $HOME/.kube
[k8s-main-1] kubectl config view --flatten >> $HOME/.kube/config- Copy kubeconfig to your local workstation (run on your local workstation)
scp root@10.0.0.5:/root/.kube/config $HOME/.kube/hetzner-dev.yaml
chmod go-r $HOME/.kube/hetzner-dev.yaml- Configure kubectl
export KUBECONFIG=$HOME/.kube/hetzner-dev.yaml- Check kubectl configuration
kubectl get nodes
NAME         STATUS     ROLES           AGE   VERSION
k8s-main-1 NotReady control-plane 17m v1.33.1- Install and configure additional tools like OpenLens (with OpenLens Node/Pod Menu Extension ) or k9s
Enable main Kuberntes node for scheduling (optional)
If you want to use the Kubernetes main node for your workload, you need to remove the default settings for the control plane:
kubectl taint nodes k8s-main-1 node.cloudprovider.kubernetes.io/uninitialized=true:NoSchedule-
kubectl taint nodes k8s-main-1 node-role.kubernetes.io/control-plane:NoSchedule-
kubectl label node k8s-main-1 node.kubernetes.io/exclude-from-external-load-balancers-
Install Flannel as a basic option for Container Network Interface (CNI) [Option 1]
Flannel it is a basic option for CNI.
- Add Flannel Helm repository
helm repo add flannel https://flannel-io.github.io/flannel/ && helm repo update flannel && helm search repo flannel- Creating a namespace for Flannel
kubectl create ns kube-flannel
kubectl label --overwrite ns kube-flannel pod-security.kubernetes.io/enforce=privileged- Deploy Flannel CNI
cat <<EOF | helm upgrade flannel flannel/flannel --install --create-namespace -n kube-flannel --version 0.26.7 -f -
podCidr: "10.244.0.0/16"
EOF- Patch CoreDNS after flannel installation to evade problems with CoreDNS Pods initialization
kubectl -n kube-system patch deployment coredns --type json -p '[{"op":"add","path":"/spec/template/spec/tolerations/-","value":{"key":"node.cloudprovider.kubernetes.io/uninitialized","value":"true","effect":"NoSchedule"}}]'Install Cilium as extended option for Container Network Interface (CNI) [Option 2]
Cilium is a more advanced CNI solution that provides additional features such as network security policies, load balancing, and observability. It is recommended for production environments or when advanced networking features are required.
- Add Cilium Helm repository
helm repo add cilium https://helm.cilium.io/ && helm repo update cilium && helm search repo cilium/cilium- Install Cilium CNI
cat <<EOF | helm upgrade cilium cilium/cilium --install --create-namespace -n kube-system --version 1.17.4 -f -
kubeProxyReplacement: true
enableIPv4Masquerade: true
routingMode: native
ipam:
  mode: kubernetes
ipv4NativeRoutingCIDR: "10.244.0.0/16"
encryption:
  enabled: true
  type: wireguard

operator:
  replicas: 1 # In case of one-node cluster

# Enable Hubble for observability (optional)
hubble:
  enabled: true
  relay:
    enabled: true
  ui:
    enabled: true

EOF- Patch CoreDNS to evade problems with CoreDNS Pods initialization
kubectl -n kube-system patch deployment coredns --type json -p '[{"op":"add","path":"/spec/template/spec/tolerations/-","value":{"key":"node.cloudprovider.kubernetes.io/uninitialized","value":"true","effect":"NoSchedule"}}]'Install Hetzner Cloud Controller
This controller allows Kubernetes to manage Hetzner Cloud resources such as load balancers.
- Create Hetzner Cloud API token HETZNER_API_TOKEN
 .
. - Identify HETZNER_NETWORK_ID of internal-network from Cloud Console url
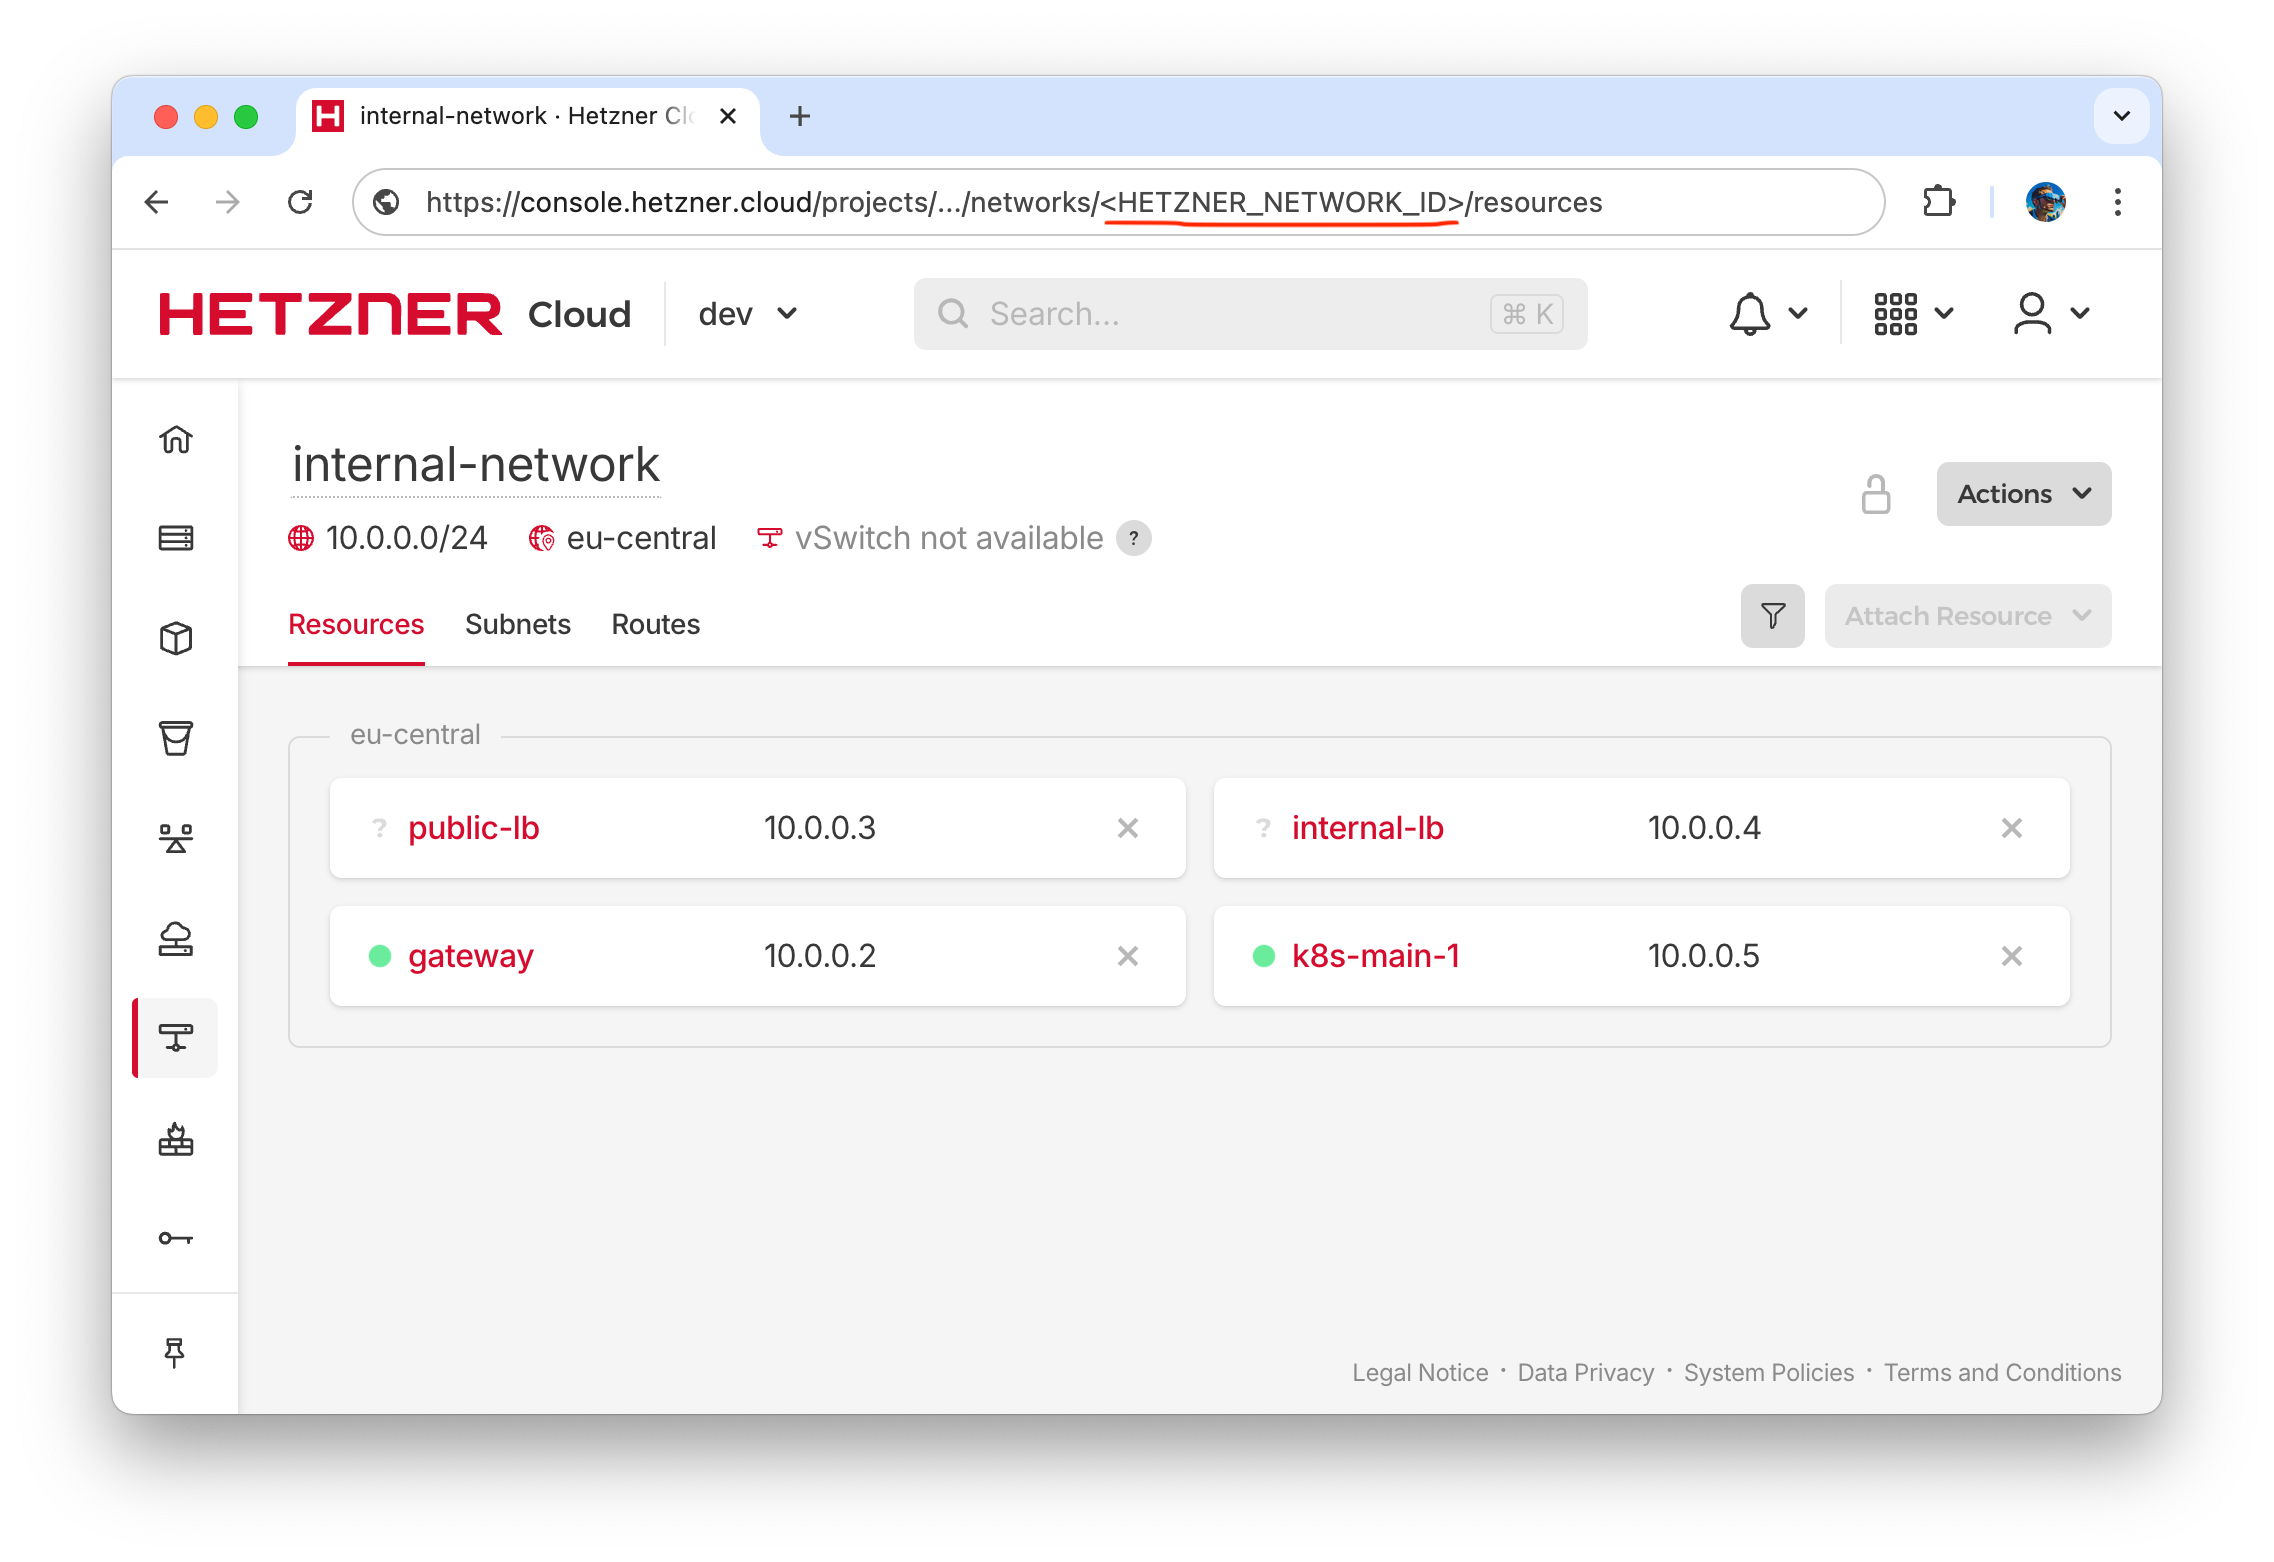 .
. - Create secret with Hetzner Cloud API token and network id
kubectl -n kube-system create secret generic hcloud --from-literal=token=<HETZNER_API_TOKEN> --from-literal=network=<HETZNER_NETWORK_ID>- Adding and updating Hetzner Cloud helm repository
helm repo add hcloud https://charts.hetzner.cloud && helm repo update hcloud && helm search repo hcloud- Install Hetzner Cloud Controller
cat <<EOF | helm upgrade hcloud-cloud-controller-manager hcloud/hcloud-cloud-controller-manager --install --create-namespace -n kube-system --version 1.25.1 -f -
env:
  HCLOUD_TOKEN:
    valueFrom:
      secretKeyRef:
        name: hcloud
        key: token
  HCLOUD_NETWORK:
    valueFrom:
      secretKeyRef:
        name: hcloud
        key: network
  HCLOUD_NETWORK_ROUTES_ENABLED:
    value: "false"
EOF
Install Hetzner Container Storage Interface (CSI) driver
This driver allows Kubernetes to use Hetzner Cloud Volumes.
- Install Hetzner CSI driver
cat <<EOF | helm upgrade hcloud-csi hcloud/hcloud-csi --install --create-namespace -n kube-system --version 2.14.0 -f -
EOF
Install Local Path Provisioner
This provisioner allows Kubernetes to dynamic provisioning of the local volumes using storageClass: local-path
- Install Local Path Provisioner
kubectl apply -f https://raw.githubusercontent.com/rancher/local-path-provisioner/v0.0.31/deploy/local-path-storage.yaml- Make it default storage class if needed
kubectl patch storageclass local-path -p '{"metadata": {"annotations":{"storageclass.kubernetes.io/is-default-class":"true"}}}'- Deploy additional local-path-test storage class for testing
cat <<EOF | kubectl apply -f -
apiVersion: storage.k8s.io/v1
kind: StorageClass
metadata:
  name: local-path-test
provisioner: rancher.io/local-path
volumeBindingMode: WaitForFirstConsumer
reclaimPolicy: Delete
EOF
Install and configure Node Autoscaler
This operator allows dynamically provision new Kubernetes nodes when there are insufficient resources for the workload on existing nodes.
- ssh to main Kubernetes node
ssh root@10.0.0.5- Create long-living (1 year = 8760h) kubeadm join token in the Kubernetes main node (kubeadm init creates an initial token with a 24-hour TTL only)
[k8s-main-1] kubeadm token create --ttl 8760h --description "token for autoscaler" --print-join-command
output:
kubeadm join 10.0.0.5:6443 --token xxxxxxx.xxxxxxxxxxxxxxx --discovery-token-ca-cert-hash sha256:xxxxxxxxxxxxxxxxxxxxxxxxxxxxxxxxxxxxxxxxxxxxxxxxxxxxxxxxxxxxxxx- Copy kubeadm join command and export it as KUBERNETES_JOIN_CMD env variable in your workstation
export KUBERNETES_JOIN_CMD="kubeadm join 10.0.0.5:6443 --token xxxxxxx.xxxxxxxxxxxxxxx --discovery-token-ca-cert-hash sha256:xxxxxxxxxxxxxxxxxxxxxxxxxxxxxxxxxxxxxxxxxxxxxxxxxxxxxxxxxxxxxxx"- Run the following command to prepare base64 encoded cloud-init script for Kubernetes worker nodes, and save it to the environment variable
HCLOUD_CLOUD_INIT:
cat <<EOFEOF | sed 's/$/\\n/g' | tr -d '\n' | sed 's/"/\\"/g' | read -r HCLOUD_CLOUD_INIT
#!/bin/bash
# CHANGEME!
export KUBERNETES_VERSION=v1.33 CRICTL_VERSION=v1.33.0
export KUBERNETES_JOIN_CMD="$KUBERNETES_JOIN_CMD"

echo "cloud-init: configure enp7s0 default gateway"
cat <<EOF > /etc/systemd/network/10-enp7s0.network
# Custom network configuration added by cloud-init
[Match]
Name=enp7s0

[Network]
DHCP=yes
Gateway=10.0.0.1
EOF

echo "cloud-init: waiting for enp7s0 network interface"
/lib/systemd/systemd-networkd-wait-online --any -i enp7s0 --timeout=60

echo "cloud-init: restart systemd-networkd"
systemctl restart systemd-networkd

echo "cloud-init: configure DNS"
cat <<EOF > /etc/systemd/resolved.conf
# Custom network configuration added by cloud-init
[Resolve]
DNS=185.12.64.2 185.12.64.1
FallbackDNS=8.8.8.8
EOF

echo "cloud-init: restart systemd-resolved"
systemctl restart systemd-resolved

export NODE_IP=\$(ifconfig enp7s0 | grep 'inet ' | awk '{ print \$2}')
echo "cloud-init: NODE_IP=\$NODE_IP"

echo "cloud-init: wait for connection to archive.ubuntu.com"
while ! nc -z archive.ubuntu.com 80; do echo "archive.ubuntu.com:80 is not responding"; done

echo "cloud-init: enable iptables Bridged Traffic"
cat <<EOF | sudo tee /etc/modules-load.d/k8s.conf
overlay
br_netfilter
EOF
sudo modprobe overlay
sudo modprobe br_netfilter
# sysctl params required by setup, params persist across reboots
cat <<EOF | sudo tee /etc/sysctl.d/k8s.conf
net.bridge.bridge-nf-call-iptables  = 1
net.ipv4.ip_forward                 = 1
# To disable IPv6
#net.ipv6.conf.all.disable_ipv6 = 1
#net.ipv6.conf.default.disable_ipv6 = 1
# To enable IPv6
net.bridge.bridge-nf-call-ip6tables = 1
EOF
# Apply sysctl params without reboot
sudo sysctl --system

echo "cloud-init: install CRI-O Runtime"
sudo apt-get update -y
sudo apt-get install -y software-properties-common gpg curl apt-transport-https ca-certificates
curl -fsSL https://pkgs.k8s.io/addons:/cri-o:/prerelease:/main/deb/Release.key |
    sudo gpg --dearmor -o /etc/apt/keyrings/cri-o-apt-keyring.gpg
echo "deb [signed-by=/etc/apt/keyrings/cri-o-apt-keyring.gpg] https://pkgs.k8s.io/addons:/cri-o:/prerelease:/main/deb/ /" |
    sudo tee /etc/apt/sources.list.d/cri-o.list
sudo apt-get update -y
sudo apt-get install -y cri-o
wget https://github.com/kubernetes-sigs/cri-tools/releases/download/\$CRICTL_VERSION/crictl-\$CRICTL_VERSION-linux-amd64.tar.gz
sudo tar zxvf crictl-\$CRICTL_VERSION-linux-amd64.tar.gz -C /usr/local/bin
rm -f crictl-\$CRICTL_VERSION-linux-amd64.tar.gz

echo "cloud-init: start CRI-O daemon"
sudo systemctl daemon-reload
sudo systemctl enable crio --now
sudo systemctl start crio.service

echo "cloud-init: install Kubeadm & Kubelet & Kubectl"
sudo mkdir -p /etc/apt/keyrings
curl -fsSL https://pkgs.k8s.io/core:/stable:/\$KUBERNETES_VERSION/deb/Release.key | sudo gpg --dearmor -o /etc/apt/keyrings/kubernetes-apt-keyring.gpg
echo "deb [signed-by=/etc/apt/keyrings/kubernetes-apt-keyring.gpg] https://pkgs.k8s.io/core:/stable:/\$KUBERNETES_VERSION/deb/ /" |\
  sudo tee /etc/apt/sources.list.d/kubernetes.list
sudo apt-get update -y
sudo apt-get install -y kubelet kubeadm kubectl
sudo apt-mark hold kubelet kubeadm kubectl

echo "cloud-init: configure Kubelet extra args to support Hetzner Cloud (https://github.com/hetznercloud/hcloud-cloud-controller-manager/issues/856#issuecomment-2631043985)"
export PROVIDER_ID=\$(dmidecode -t system | awk '/Serial Number/ {print \$3}')
# pool name in Autoscaler should be <role>-pool
export NODE_ROLE=\$(echo \$(hostname) | cut -d '-' -f1)
export POOL_NAME=\$(echo \$(hostname) | cut -d '-' -f1-2)
echo "KUBELET_EXTRA_ARGS=--cloud-provider=external --provider-id=hcloud://\$PROVIDER_ID --node-ip=\$NODE_IP --node-labels=node.kubernetes.io/role=\$NODE_ROLE,node.kubernetes.io/\$POOL_NAME=,node.kubernetes.io/autoscaler-pool=\$POOL_NAME" | tee /etc/default/kubelet

echo "cloud-init: join Kubernetes cluster"
\$KUBERNETES_JOIN_CMD

echo "cloud-init: done"
EOFEOF- Define HCLOUD_CLUSTER_CONFIG variable for 2 pools (one for stateless applications and one for stateful applications):
cat <<EOF | base64 -w 0 | read -r HCLOUD_CLUSTER_CONFIG
{
    "imagesForArch": {
        "arm64": "ubuntu-24.04",
        "amd64": "ubuntu-24.04"
    },
    "nodeConfigs": {
        "app-pool": {
            "cloudInit": "$HCLOUD_CLOUD_INIT"
        },
        "db-pool": {
            "cloudInit": "$HCLOUD_CLOUD_INIT"
        }
    }
}
EOF
Note: I assumed that nodeConfigs.pool_name.labels could be used to label nodes, but according to https://github.com/kubernetes/autoscaler/issues/6715 this doesn’t work and I implemented workaround using KUBELET_EXTRA_ARGS with —node-labels in init-script.
- Define HETZNER_NETWORK_ID variable, we have already identified it
export HETZNER_NETWORK_ID=<HETZNER_NETWORK_ID>- Define in HCLOUD_SSH_KEY name of your SSH key in Hetzner Console (Security section/SSH keys). Note that this is the name of the SSH key you uploaded in the beginning, not the key itself. In this guide it was defined as “hi@yourcompany.com”
export HCLOUD_SSH_KEY=<NAME_OF_YOUR_SSH_KEY_IN_HETZNER_CONSOLE>- Add autoscaler Helm repository
helm repo add autoscaler https://kubernetes.github.io/autoscaler && helm repo update autoscaler && helm search repo autoscaler/cluster-autoscaler- Install Node Autoscaler and automatically provision worker nodes
cat <<EOF | helm upgrade cluster-autoscaler autoscaler/cluster-autoscaler --install --create-namespace -n cluster-autoscaler --version 9.46.6 -f -
cloudProvider: hetzner
autoscalingGroups:
  - name: app-pool
    minSize: 1 ## CHANGEME!!
    maxSize: 2 ## CHANGEME!!
    instanceType: CPX41 # Uppercase!
    region: NBG1 # Uppercase!
extraEnv:
  HCLOUD_TOKEN: $(kubectl get secret hcloud -n kube-system -o jsonpath='{.data.token}' | base64 -d)
  HCLOUD_CLUSTER_CONFIG: "$HCLOUD_CLUSTER_CONFIG"
  HCLOUD_NETWORK: "$HETZNER_NETWORK_ID"
  HCLOUD_SSH_KEY: "$HCLOUD_SSH_KEY"
  HCLOUD_PUBLIC_IPV4: "false"
  HCLOUD_PUBLIC_IPV6: "false"
extraArgs:
  scale-down-enabled: true
  enforce-node-group-min-size: true
EOF- You can install multiple Node Autoscalers, for example one for stateless applications with agressive scaledown configuration and second for stateful applications (db, monitoring, etc.) without scaledown.
cat <<EOF | helm upgrade cluster-autoscaler-dbpool autoscaler/cluster-autoscaler --install --create-namespace -n cluster-autoscaler-dbpool --version 9.46.6 -f -
cloudProvider: hetzner
autoscalingGroups:
  - name: db-pool
    minSize: 0 ## CHANGEME!!
    maxSize: 5 ## CHANGEME!!
    instanceType: CPX41 # Uppercase!
    region: NBG1 # Uppercase!
extraEnv:
  HCLOUD_TOKEN: $(kubectl get secret hcloud -n kube-system -o jsonpath='{.data.token}' | base64 -d)
  HCLOUD_CLUSTER_CONFIG: "$HCLOUD_CLUSTER_CONFIG"
  HCLOUD_NETWORK: "$HETZNER_NETWORK_ID"
  HCLOUD_SSH_KEY: "$HCLOUD_SSH_KEY"
  HCLOUD_PUBLIC_IPV4: "false"
  HCLOUD_PUBLIC_IPV6: "false"
EOF
Once this configuration is deployed, an additional Kubernetes worker node will be provisioned to meet the specified minSize:
kubectl get nodes
NAME                     STATUS   ROLES           AGE     VERSION
k8s-main-1               Ready    control-plane   117m    v1.33.1
app-pool-NNNNNNNNNNNNN   Ready    <none>          4m33s   v1.33.1
Provisioned nodes will have labels node.kubernetes.io/role=<role> (e.g. node.kubernetes.io/role=app), node.kubernetes.io/<pool-name>= (e.g. node.kubernetes.io/app-pool=), node.kubernetes.io/autoscaler-pool=<pool-name> (e.g. node.kubernetes.io/autoscaler-pool=app-pool), which can be used for the nodeSelection in deployments.
Do not forget to add similar labels to all control-planes, if you also plan to deploy applications to the main node:
kubectl label nodes -l node-role.kubernetes.io/control-plane= node.kubernetes.io/app-pool= node.kubernetes.io/db-pool= --overwrite
kubectl get nodes --show-labels
To change the pool configuration, simply make changes to the command in step 9 and run the deployment again.
In case of the issues, use the approach from troubleshooting section. You can find init-config logs in /var/log/cloud-init-output.log and init-config file in /var/lib/cloud/instance/scripts/part-001.
Install Public and internal Ingress controller
- Add Ingress NGINX Helm repository
helm repo add ingress-nginx https://kubernetes.github.io/ingress-nginx && helm repo update ingress-nginx && helm search repo ingress-nginx- Install Public Ingress NGINX controller
cat <<EOF | helm upgrade ingress-nginx-public ingress-nginx/ingress-nginx --install --create-namespace -n ingress-nginx-public --version 4.12.2 -f -
controller:
  electionID: ingress-public-controller
  #kind: DaemonSet
  #dnsPolicy: ClusterFirstWithHostNet
  #hostNetwork: true
  service:
    annotations:
      load-balancer.hetzner.cloud/name: "public-lb"
      load-balancer.hetzner.cloud/location: "nbg1"
      load-balancer.hetzner.cloud/type: "lb11"
      load-balancer.hetzner.cloud/ipv6-disabled: "true"
      load-balancer.hetzner.cloud/use-private-ip: "true"
      # load-balancer.hetzner.cloud/protocol: "https"
      # load-balancer.hetzner.cloud/http-redirect-http: "true"
    enableHttp: true
    #targetPorts:
    #  https: http
EOF- Install Internal Ingress NGINX controller
cat <<EOF | helm upgrade ingress-nginx-internal ingress-nginx/ingress-nginx --install --create-namespace -n ingress-nginx-internal --version 4.12.2 -f -
controller:
  electionID: ingress-internal-controller
  #dnsPolicy: ClusterFirstWithHostNet
  #hostNetwork: true
  #kind: DaemonSet
  ingressClass: internal-nginx
  ingressClassResource:
    name: internal-nginx
    enabled: true
    default: false
    controllerValue: "k8s.io/internal-ingress-nginx"

  service:
    annotations:
      load-balancer.hetzner.cloud/name: "internal-lb"
      load-balancer.hetzner.cloud/location: "nbg1"
      load-balancer.hetzner.cloud/type: "lb11"
      load-balancer.hetzner.cloud/ipv6-disabled: "true"
      load-balancer.hetzner.cloud/use-private-ip: "true"
      load-balancer.hetzner.cloud/disable-public-network: "true"
      # load-balancer.hetzner.cloud/protocol: "https"
      # load-balancer.hetzner.cloud/http-redirect-http: "true"
    enableHttp: true
    #targetPorts:
    #  https: http
EOF
More about multiple Ingress controllers can be found in Ingress-nginx documentation .
- Check that Hetzner Cloud Public and Internal Load Balancers became healthy
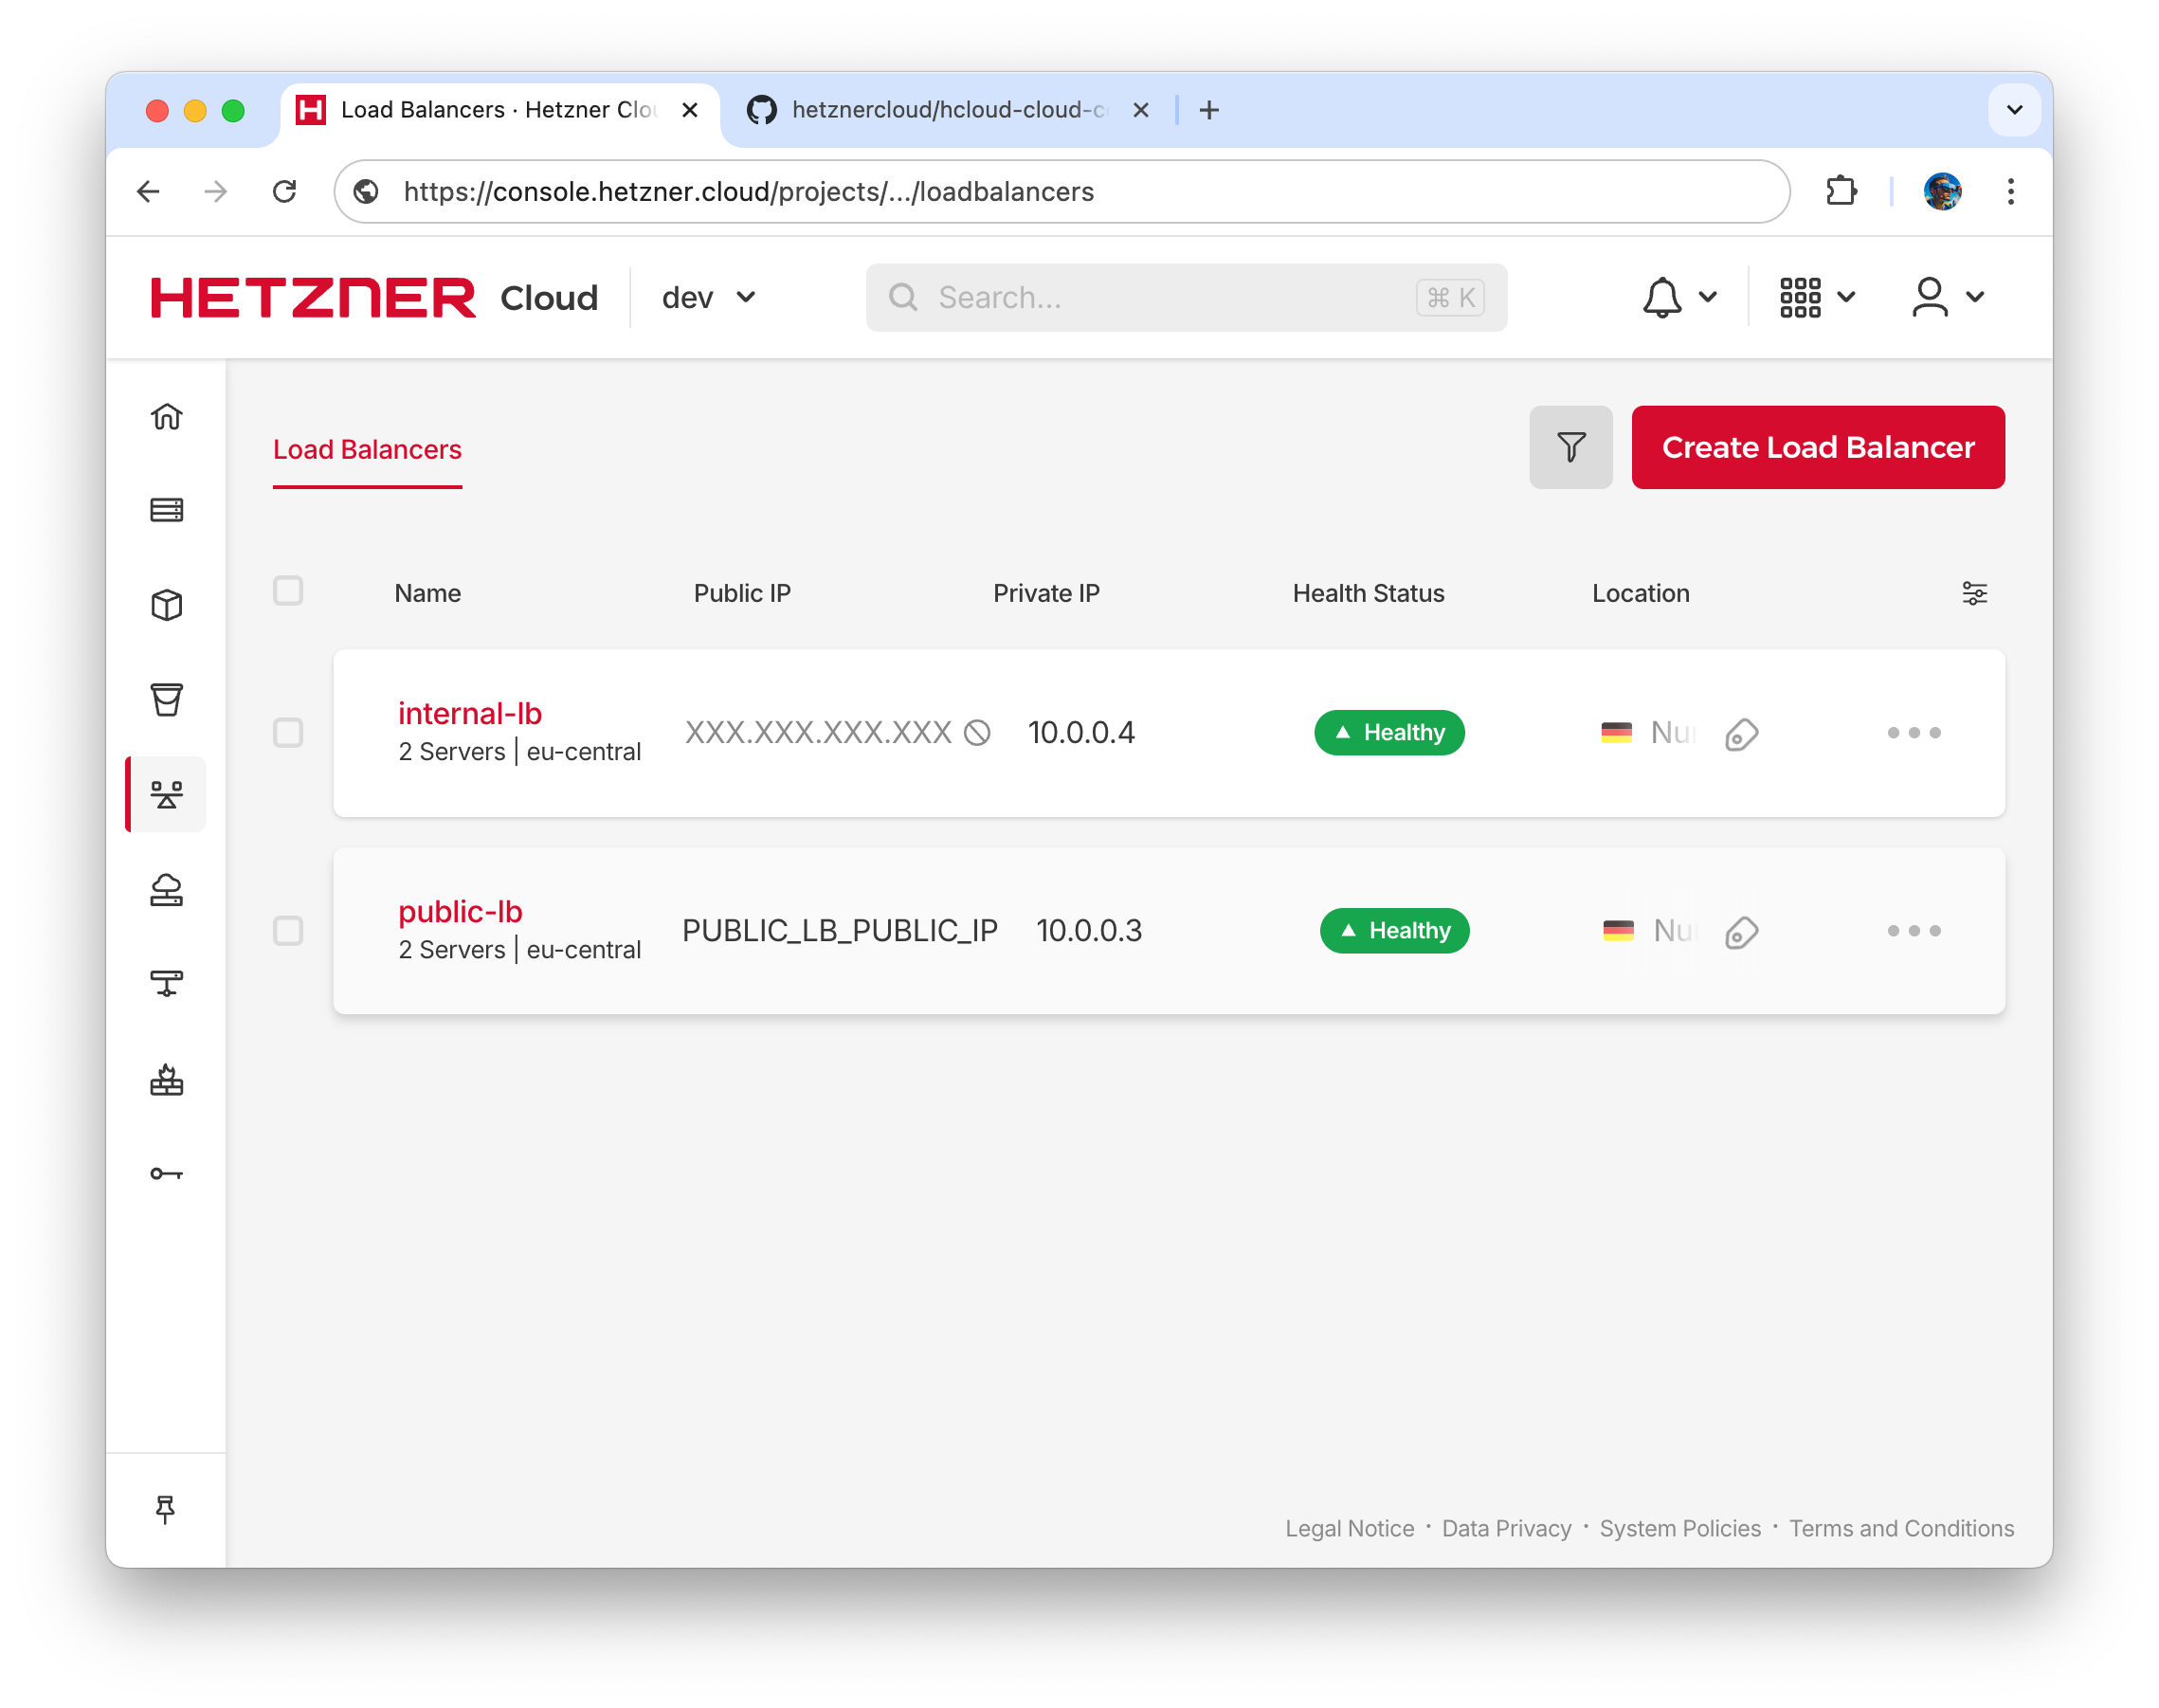 .
. - Note PUBLIC_LB_PUBLIC_IP IP address
Deploy multitool
Multitool is a simple web application that provides various network tools such as ping, traceroute, DNS lookup, etc. It can be used to test the connectivity and functionality of the Kubernetes cluster and the Ingress controllers.
- Deploy multitool application
cat <<EOF | kubectl apply -f -
apiVersion: v1
kind: Namespace
metadata:
  name: multitool
---
apiVersion: apps/v1
kind: Deployment
metadata:
  name: network-multitool
  namespace: multitool
  labels:
    app: network-multitool
spec:
  replicas: 1 # You might want more than one replica for redundancy
  selector:
    matchLabels:
      app: network-multitool
  template:
    metadata:
      labels:
        app: network-multitool
    spec:
      containers:
      - name: network-multitool
        image: wbitt/network-multitool:latest # Use a specific tag if you need a specific version
        ports:
        - containerPort: 80
        - containerPort: 443
        # Add resource requests and limits for better resource management
        resources:
          requests:
            memory: "64Mi"
            cpu: "100m"
          limits:
            memory: "128Mi"
            cpu: "200m"
        # Optional: Add liveness and readiness probes
        livenessProbe:
          httpGet:
            path: /
            port: 80
          initialDelaySeconds: 5
          periodSeconds: 5
        readinessProbe:
          httpGet:
            path: /
            port: 80
          initialDelaySeconds: 5
          periodSeconds: 5
EOF- Exec into the Pod
kubectl exec -it -n multitool $(kubectl get pods -n multitool -l app=network-multitool -o jsonpath='{.items[0].metadata.name}') -- /bin/shDeploy example application (without) TLS externally
- Add example application Helm repository
helm repo add bitnami https://charts.bitnami.com/bitnami && helm repo update bitnami && helm search repo bitnami/nginx- Install example application
cat <<EOF | helm upgrade helloworld bitnami/nginx --install --create-namespace -n helloworld --version 20.0.3 -f -
ingress:
  enabled: true
  ingressClassName: nginx
  hostname: hello.yourcompany.com
service:
  type: ClusterIP
EOF- Check that example application is availabile at PUBLIC_LB_PUBLIC_IP, you should see Welcome to nginx! html page.
curl http://hello.yourcompany.com --connect-to hello.yourcompany.com:80:<PUBLIC_LB_PUBLIC_IP>Install KubeVPN
KubeVPN is a better version of port-forwarding with cluster name resolving.
- Add KubeVPN helm chart
helm repo add kubevpn https://raw.githubusercontent.com/kubenetworks/kubevpn/master/charts && helm repo update kubevpn && helm search repo kubevpn/kubevpn- Install KubeVPN
cat <<EOF | helm upgrade kubevpn kubevpn/kubevpn --install --create-namespace -n kubevpn --version 2.7.12 -f -
EOF- Connect to cluster, now you can connect to the services using cluster dns <service name>.<namespace>.svc.cluster.local
kubevpn connect
curl helloworld-nginx.helloworld.svc.cluster.local
curl helloworld-nginx.helloworld
Install cert-manager
Certificate Manager allows you to automatically and freely obtain valid TLS certificates from Let’s Encrypt
- Add cert-manager Helm repository
helm repo add jetstack https://charts.jetstack.io --force-update && helm repo update jetstack && helm search repo jetstack/cert-manager- Install cert-manager
cat <<EOF | helm upgrade cert-manager jetstack/cert-manager --install --create-namespace -n cert-manager --version v1.17.2 -f -
crds:
  enabled: true
EOF
Configure DNS in Cloudflare
To obtain valid TLS certificates for private services hosted internally (in the 10.0.0.0/16 network) and published at Internal Load Balancer, we have to use Let’s Encrypt DNS-01 challenge for certificate validation. This challenge asks you to prove that you control the DNS for your domain name by putting a specific value in a TXT record under that domain name. The most efficient and automated way to leverage the DNS-01 challenge is to use API-based DNS providers. Cert-manager supports various API-driven DNS providers , and in this guide, we will use Cloudflare DNS.
- Create Cloudflare account and add your domain
yourcompany.comto it. - Configure Cloudflare DNS for the domain
yourcompany.comand create A record for the domainhello.yourcompany.compointing to the external IP address of the Public Load Balancer (public-lb).
Type: A
Name: hello
IPv4 address: <PUBLIC_LB_PUBLIC_IP>
Proxy status: Proxied
TTL: Auto- Configure Cloudflare DNS for the domain
yourcompany.comand create A record for the domain*.int.yourcompany.compointing to the internal(!) IP address of the Internal Load Balancer (internal-lb).
Type: A
Name: *.int
IPv4 address: 10.0.0.4
Proxy status: DNS only
TTL: Auto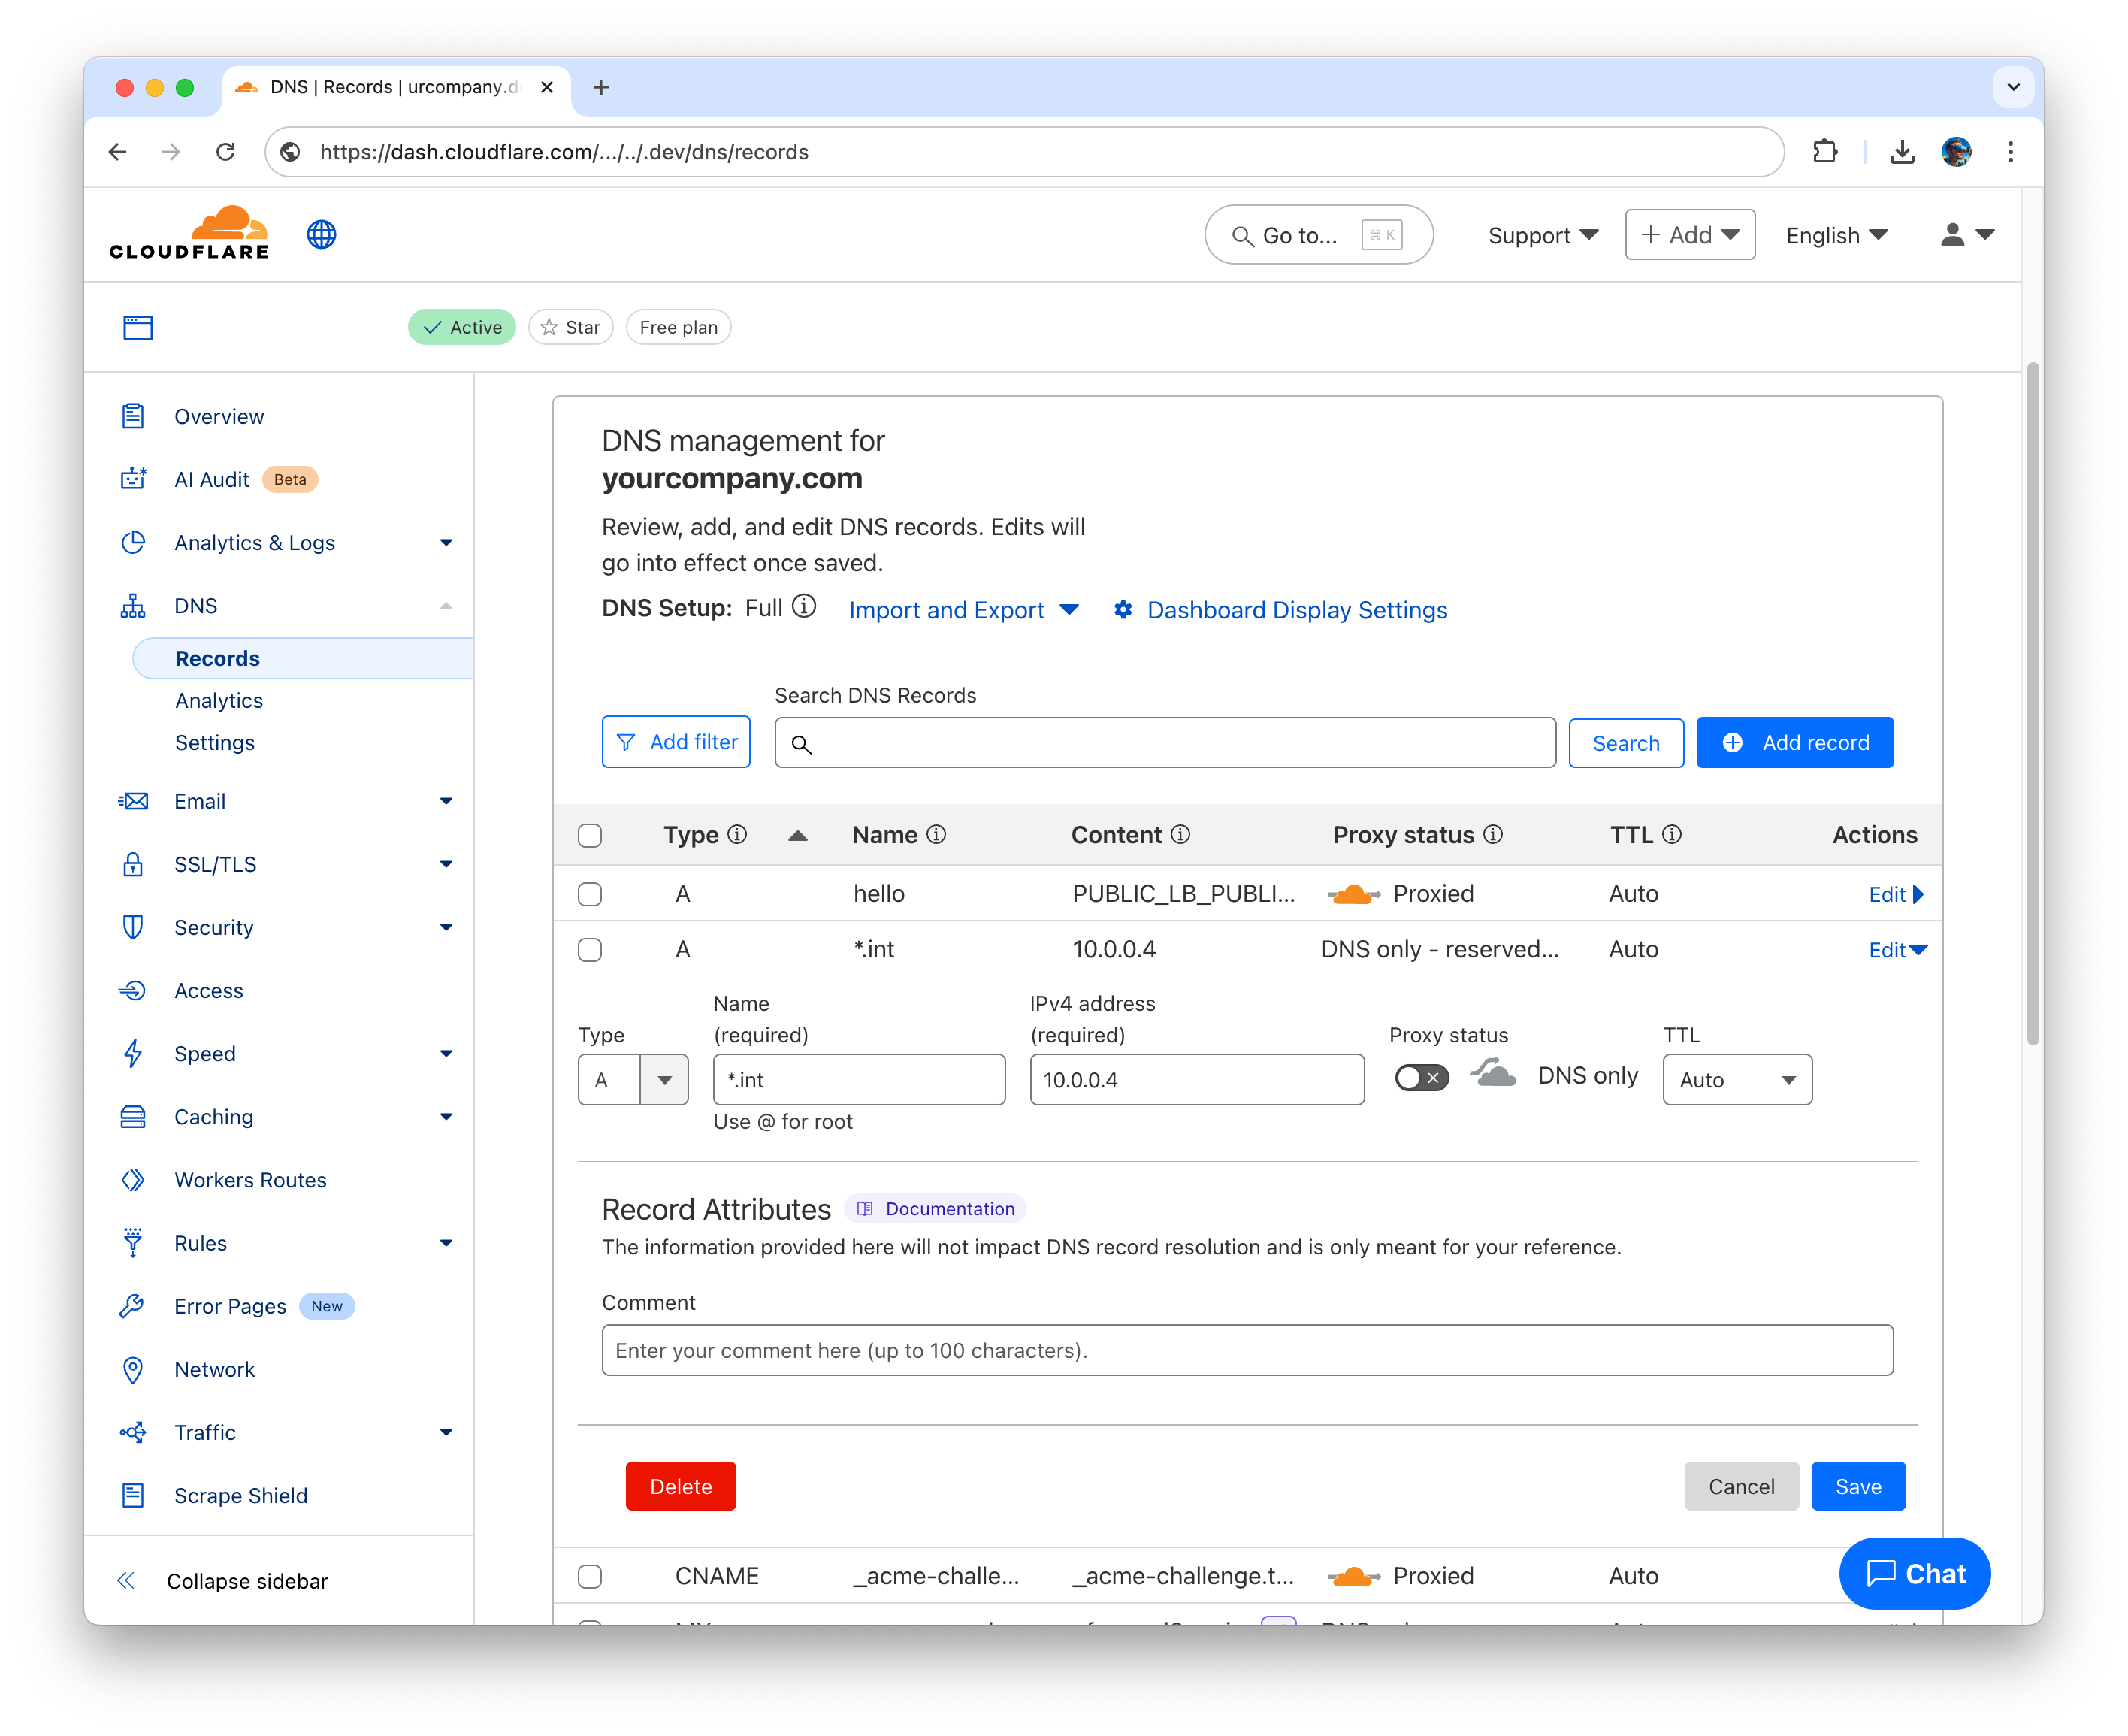 .
.
- Create API token in Cloudflare with permissions to manage DNS records for the domain
yourcompany.com. .
. - Create a secret in Kubernetes with Cloudflare API token:
kubectl -n cert-manager create secret generic cloudflare-dns --from-literal=api-token=<YOUR_CLOUDFLARE_API_TOKEN>- Create ClusterIssuer for Let’s Encrypt using Cloudflare DNS:
cat <<EOF | kubectl apply -f -
apiVersion: cert-manager.io/v1
kind: ClusterIssuer
metadata:
  name: letsencrypt-cloudflare
spec:
  acme:
    email: hi@yourcompany.com # CHANGEME!
    server: https://acme-v02.api.letsencrypt.org/directory
    privateKeySecretRef:
      name: letsencrypt-cloudflare
    solvers:
    - dns01:
        cloudflare:
          email: hi@yourcompany.com # CHANGEME!
          apiTokenSecretRef:
            name: cloudflare-dns
            key: api-token
EOF
Redeploy public example application with TLS configuration
- To enable TLS certificate for example application, we need to update the Helm chart values to use the ClusterIssuer we just created.
cat <<EOF | helm upgrade helloworld bitnami/nginx --install --create-namespace -n helloworld --version 20.0.3 -f -
ingress:
  enabled: true
  ingressClassName: nginx
  hostname: hello.yourcompany.com
  annotations:
    cert-manager.io/cluster-issuer: letsencrypt-cloudflare
  tls: true
  selfSigned: false
service:
  type: ClusterIP
EOF- Check logs of cert-manager
kubectl get pods -n cert-manager
cert-manager-xxxxx-xyzum              1/1     Running   0          31m
cert-manager-cainjector-xxxxxx-xzp7f   1/1     Running   0          4h35m
cert-manager-webhook-xxxxxx-78tvv      1/1     Running   0          4h35m
kubectl logs -f cert-manager-xxxxx-xyzum -n cert-manager
19:19:06.145704 1 acme.go:236] "certificate issued" logger="cert-manager.controller.sign" resource_name="hello.yourcompany.com-tls-1" resource_namespace="helloworld" resource_kind="CertificateRequest" resource_version="v1" related_resource_name="hello.yourcompany.com-tls-1-2578369879" related_resource_namespace="helloworld" related_resource_kind="Order" related_resource_version="v1"- Check that example application is availabile with valid TLS certificate
curl https://hello.yourcompany.comDeploy example application with TLS configuration internally
- Deploy example application with ingressClassName: internal-nginx
cat <<EOF | helm upgrade helloworld-internal bitnami/nginx --install --create-namespace -n helloworld-internal --version 20.0.3 -f -
ingress:
  enabled: true
  ingressClassName: internal-nginx
  hostname: hello.int.yourcompany.com
  annotations:
    cert-manager.io/cluster-issuer: letsencrypt-cloudflare
  tls: true
  selfSigned: false
EOF- Check logs of cert-manager
kubectl get pods -n cert-manager
cert-manager-xxxxx-xyzum              1/1     Running   0          31m
cert-manager-cainjector-xxxxxx-xzp7f   1/1     Running   0          4h35m
cert-manager-webhook-xxxxxx-78tvv      1/1     Running   0          4h35m
kubectl logs -f cert-manager-xxxxx-xyzum -n cert-manager
19:19:06.145704 1 acme.go:236] "certificate issued" logger="cert-manager.controller.sign" resource_name="hello.int.yourcompany.com-tls-1" resource_namespace="helloworld" resource_kind="CertificateRequest" resource_version="v1" related_resource_name="hello.int.yourcompany.com-tls-1-2578369879" related_resource_namespace="helloworld" related_resource_kind="Order" related_resource_version="v1"- Check that private example application is availabile with valid TLS certificate
curl https://hello.int.yourcompany.comInstall kube-prometheus-stack
This prometheus/grafana stack provides performance metrics. After installation the metrics will appear in k8s management tools also (OpenLens). More information about used dashboards avaliable here
- Add kube-prometheus-stack helm chart
helm repo add prometheus-community https://prometheus-community.github.io/helm-charts && helm repo update prometheus-community && helm search repo prometheus-community/kube-prometheus-stack- Install kube-prometheus-stack
cat <<EOF | helm upgrade kube-prometheus-stack prometheus-community/kube-prometheus-stack --install --create-namespace -n kube-prometheus-stack --version 72.8.0 -f -
grafana:
  ingress:
    enabled: true
    annotations:
      cert-manager.io/cluster-issuer: letsencrypt-cloudflare
      nginx.ingress.kubernetes.io/backend-protocol: "HTTP"
    hosts:
      - grafana.int.yourcompany.com ## CHANGEME!
    ingressClassName: internal-nginx
    tls:
      - secretName: grafana.int.yourcompany.com-tls ## CHANGEME!
        hosts:
          - grafana.int.yourcompany.com ## CHANGEME!
  grafana.ini:
    server:
      root_url: https://grafana.int.yourcompany.com ## CHANGEME!
  # Provision grafana-dashboards-kubernetes
  dashboardProviders:
    dashboardproviders.yaml:
      apiVersion: 1
      providers:
      - name: 'grafana-dashboards-kubernetes'
        orgId: 1
        folder: 'Kubernetes'
        type: file
        disableDeletion: true
        editable: true
        options:
          path: /var/lib/grafana/dashboards/grafana-dashboards-kubernetes
  dashboards:
    grafana-dashboards-kubernetes:
      k8s-system-api-server:
        url: https://raw.githubusercontent.com/dotdc/grafana-dashboards-kubernetes/master/dashboards/k8s-system-api-server.json
        token: ''
      k8s-system-coredns:
        url: https://raw.githubusercontent.com/dotdc/grafana-dashboards-kubernetes/master/dashboards/k8s-system-coredns.json
        token: ''
      k8s-views-global:
        url: https://raw.githubusercontent.com/dotdc/grafana-dashboards-kubernetes/master/dashboards/k8s-views-global.json
        token: ''
      k8s-views-namespaces:
        url: https://raw.githubusercontent.com/dotdc/grafana-dashboards-kubernetes/master/dashboards/k8s-views-namespaces.json
        token: ''
      k8s-views-nodes:
        url: https://raw.githubusercontent.com/dotdc/grafana-dashboards-kubernetes/master/dashboards/k8s-views-nodes.json
        token: ''
      k8s-views-pods:
        url: https://raw.githubusercontent.com/dotdc/grafana-dashboards-kubernetes/master/dashboards/k8s-views-pods.json
        token: ''
EOF- Get admin password
kubectl --namespace kube-prometheus-stack get secrets kube-prometheus-stack-grafana -o jsonpath="{.data.admin-password}" | base64 -d ; echo- Open https://grafana.int.yourcompany.com and loging using user admin and password from previous step.
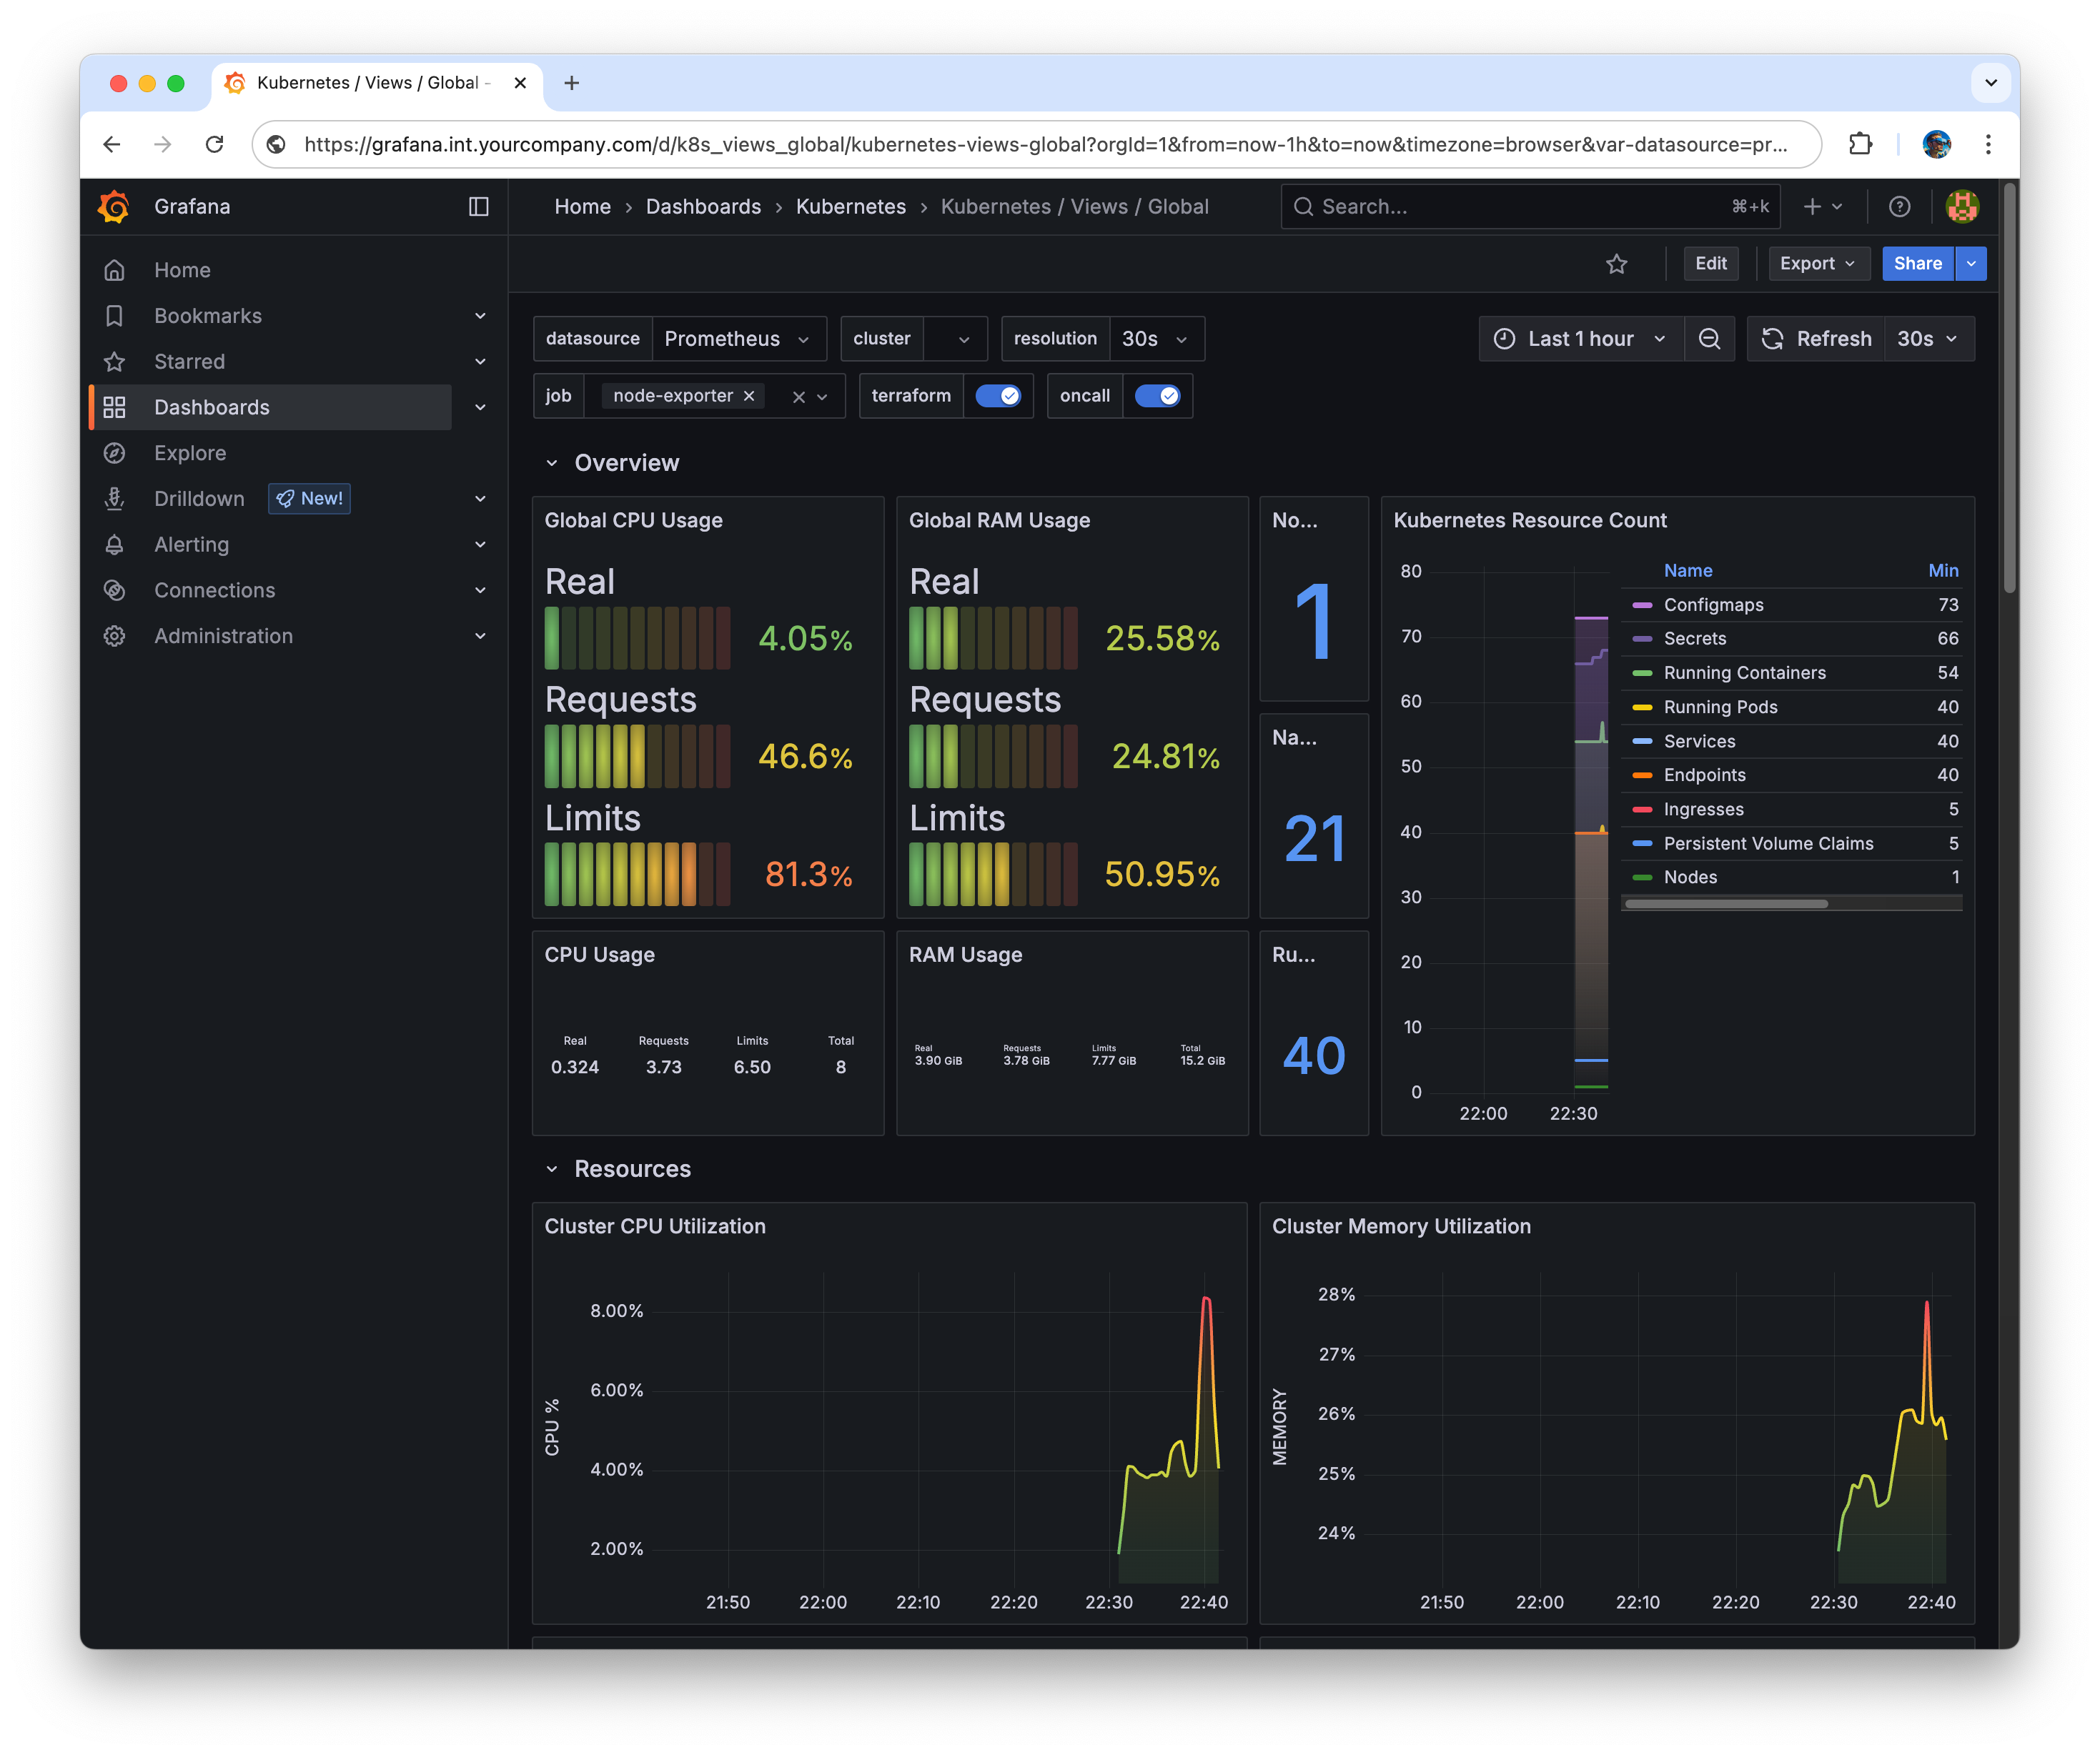 .
. - Performance charts will also available in OpenLens
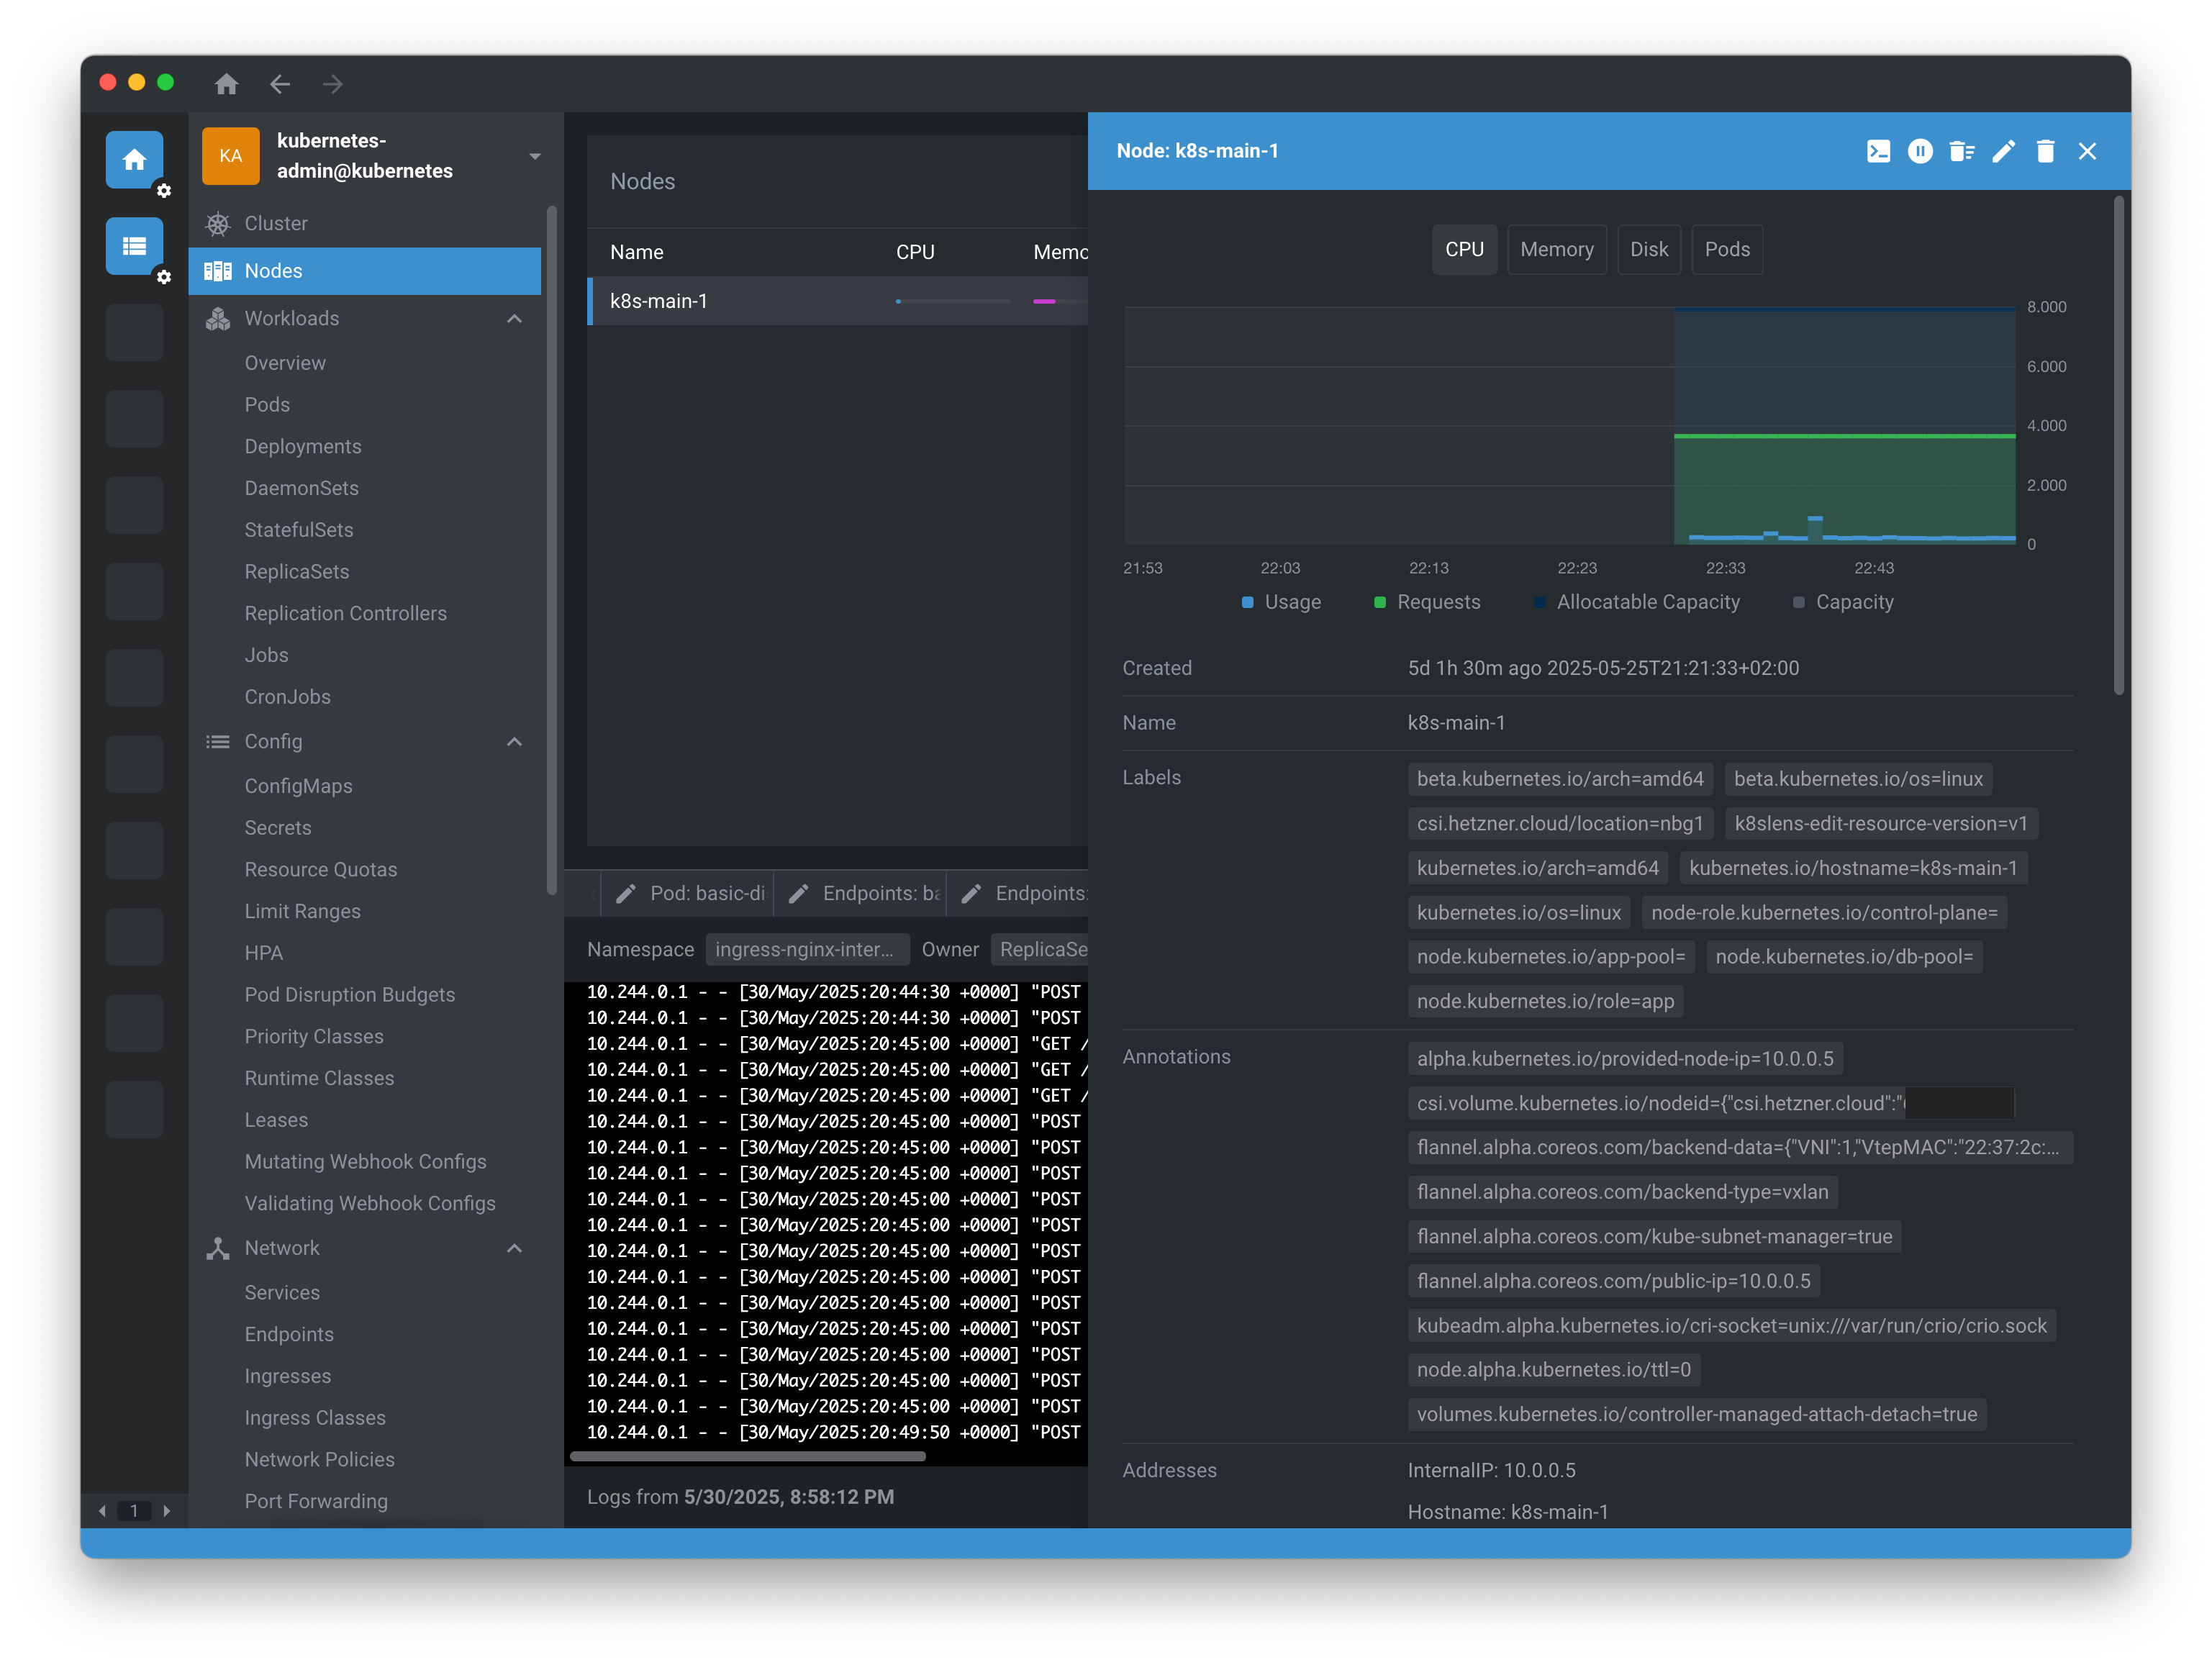 .
.
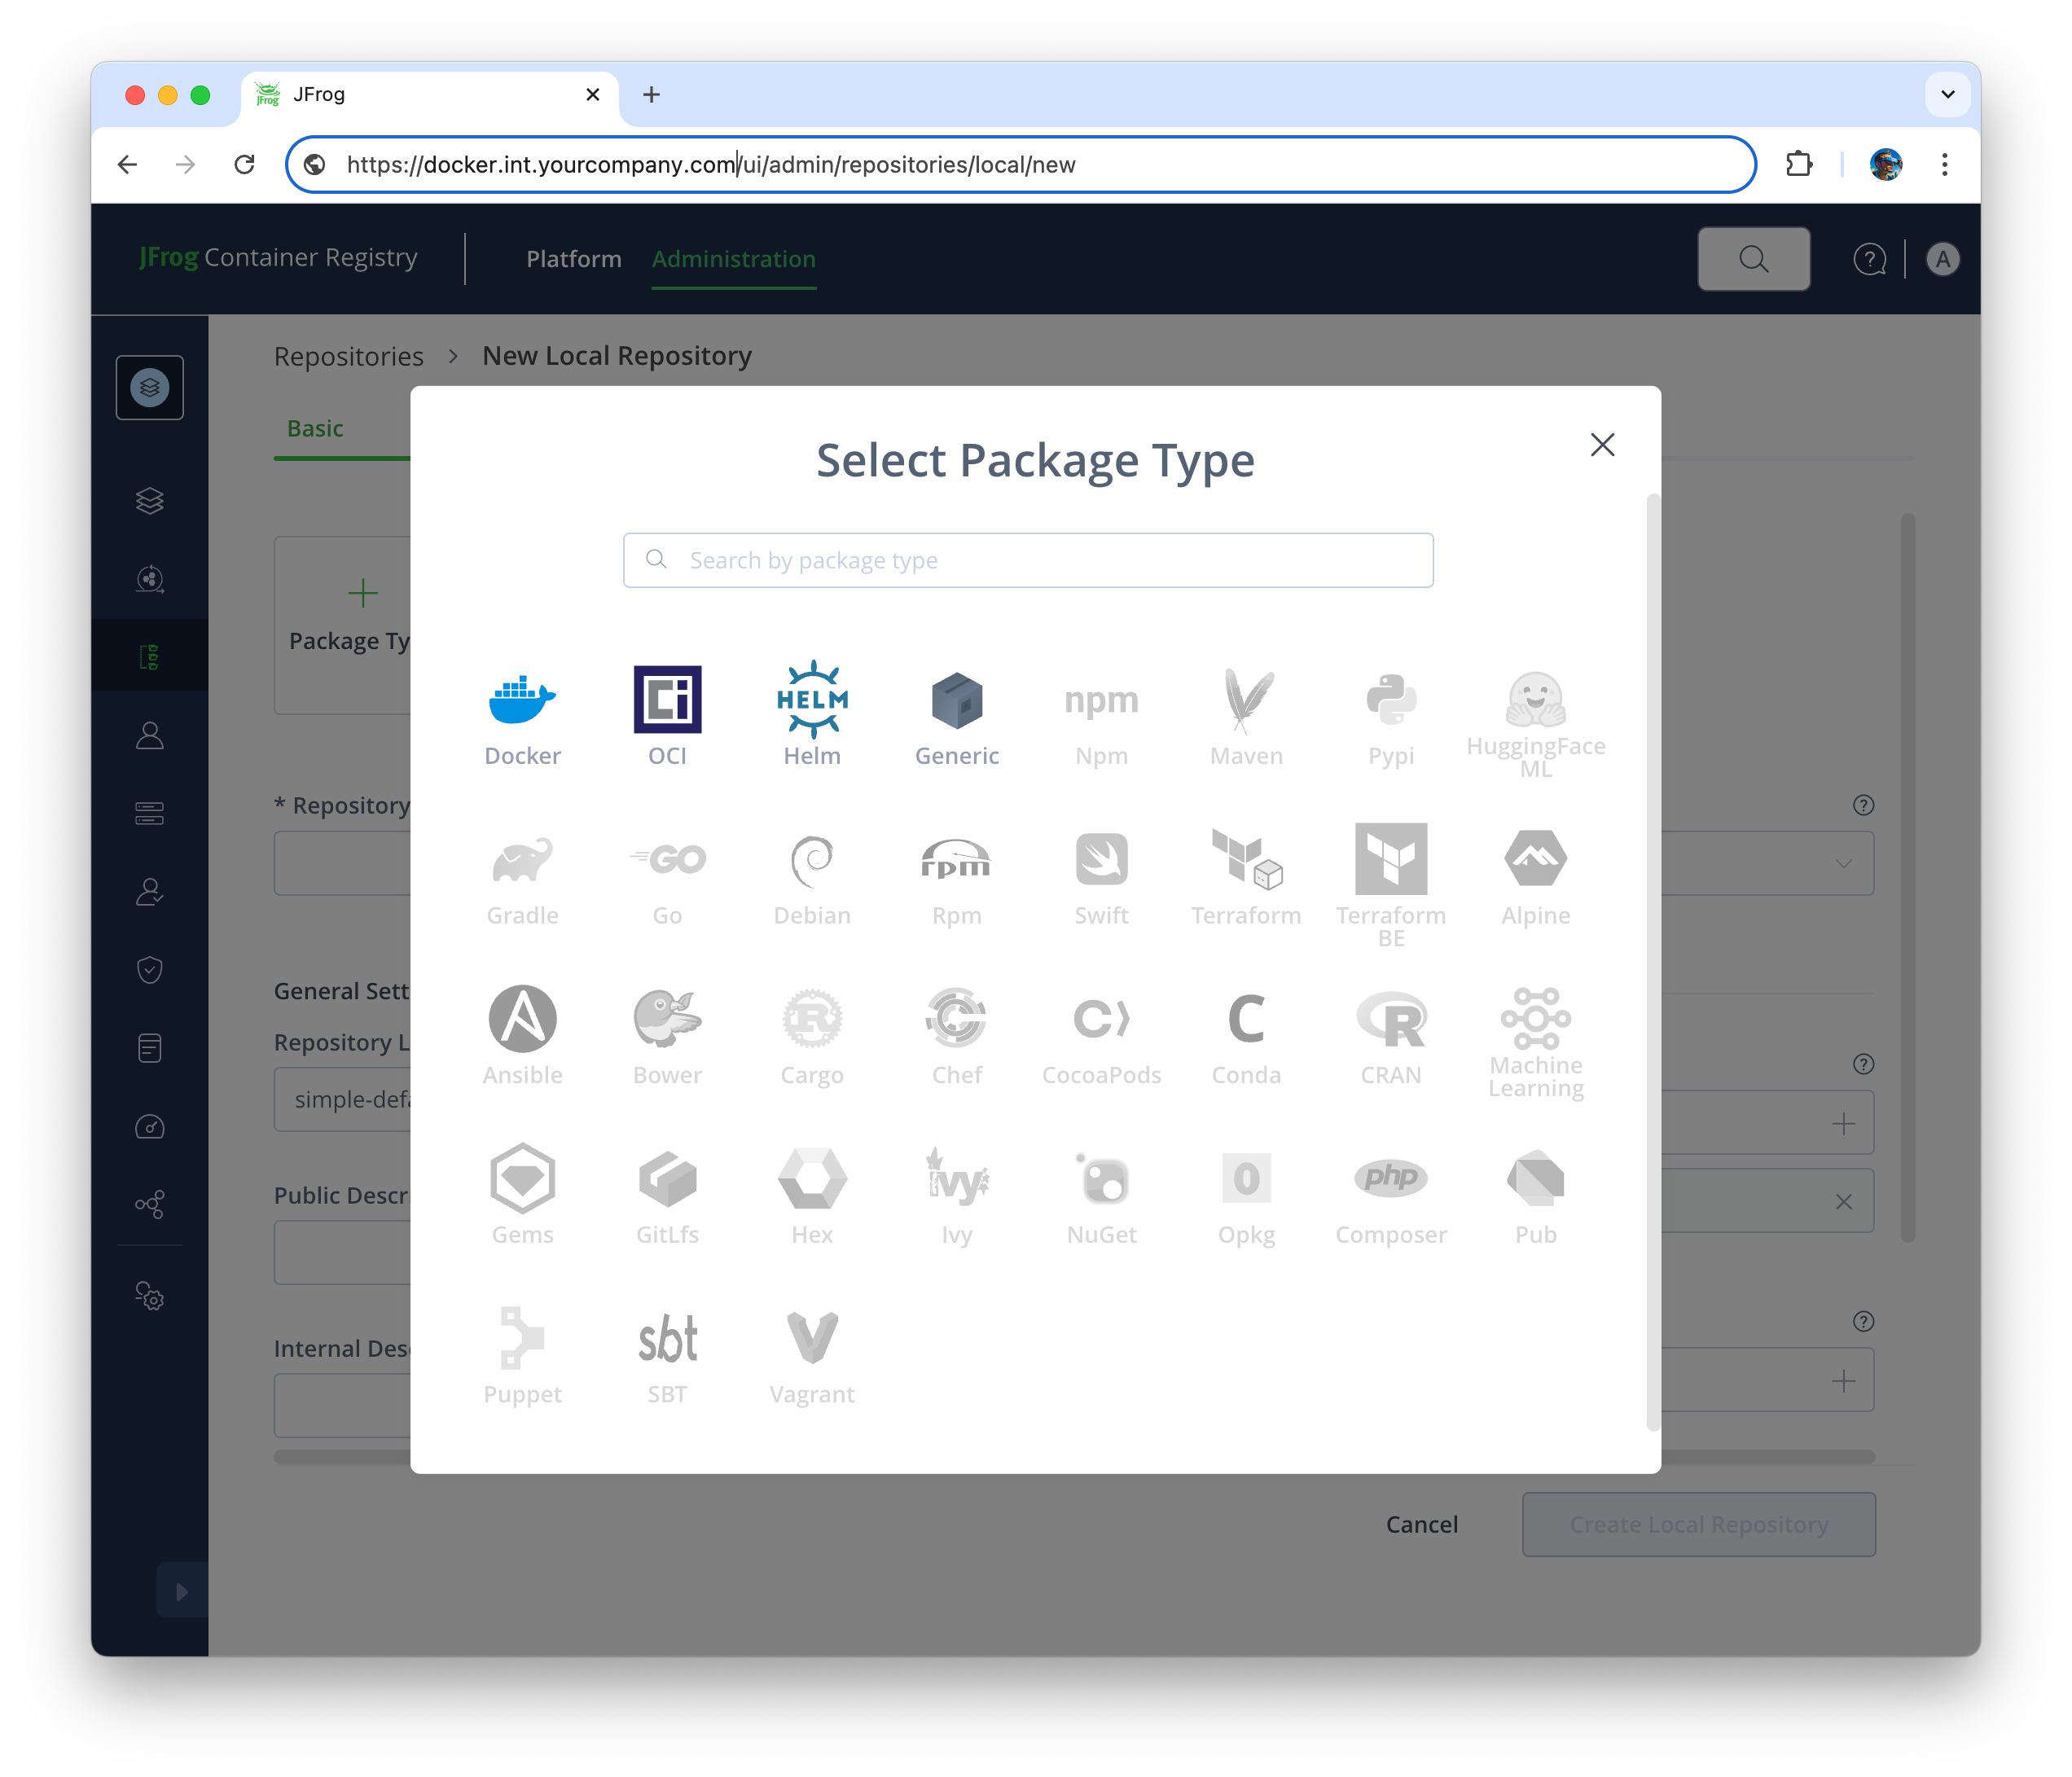
Install JFrog Container Registry
JFrog Container Registry (jfrog/artifactory-jcr) allows to host docker images and helm charts. For Pro version where all type of repositories are allowed use jfrog/artifactory helm chart.
- Add JFrog Helm repositories
helm repo add jfrog https://charts.jfrog.io && helm repo update jfrog && helm search repo jfrog/artifactory- Generate master and join keys for JFrog Container Registry
export MASTER_KEY=$(openssl rand -hex 32) JOIN_KEY=$(openssl rand -hex 32)
kubectl create namespace artifactory-container-registry
kubectl create secret generic artifactory-master-key -n artifactory-container-registry --from-literal=master-key=${MASTER_KEY}
kubectl create secret generic artifactory-join-key -n artifactory-container-registry --from-literal=join-key=${JOIN_KEY}- Install JFrog Container Registry
cat <<EOF | helm upgrade artifactory-container-registry jfrog/artifactory-jcr --install --create-namespace -n artifactory-container-registry --version 107.111.8 -f -
global:
  masterKeySecretName: artifactory-master-key
  joinKeySecretName: artifactory-join-key

artifactory:
  # Configure storage
  artifactory:
    persistence:
      enabled: true
      size: 50Gi
      storageClass: hcloud-volumes
  postgresql:
    enabled: true
    primary:
      persistence:
        enabled: true
        storageClass: hcloud-volumes
        size: 20Gi

  # Resource requests and limits
  resources:
    requests:
      memory: "2Gi"
      cpu: "1000m"
    limits:
      memory: "8Gi"
      cpu: "4000m"

  nginx:
    enabled: false

  ingress:
    enabled: true
    className: internal-nginx
    annotations:
      cert-manager.io/cluster-issuer: letsencrypt-cloudflare
      nginx.ingress.kubernetes.io/backend-protocol: "HTTP"
      nginx.ingress.kubernetes.io/proxy-body-size: "1024m"  # upload size limit
    hosts:
      - registry.int.yourcompany.com ## CHANGEME!
    tls:
      - secretName: registry.int.yourcompany.com-tls ## CHANGEME!
        hosts:
          - registry.int.yourcompany.com ## CHANGEME!
EOF- Open https://registry.int.yourcompany.com , login as admin:password and change the password
2025-06-01, jfrog/artifactory-jcr version 107.111.8: JFrog Container Registry supports OCI and legacy index.yaml-based helm charts (non-OCI), you can read more about both types here . In bref, in OCI helm repositories, you can’t use command like “helm repo add” to add a repository, instead you have to use “helm install <DEPLOYMENT_NAME> oci://<YOUR_DOMAIN>/<REPOSITORY_KEY>/<CHART_NAME>” Also, full management of OCI Helm charts appears to be disabled in jfrog/artifactory-jcr, at least I’m unable to delete OCI Helm repositories in JFrog UI. However, basic functionality is available:
helm registry login registry.int.yourcompany.com
helm package ./<your-helm-chart>
helm push ./<your-helm-chart>-0.1.0.tgz oci://registry.int.yourcompany.com/<your-helm-repo>
helm pull oci://registry.int.yourcompany.com/<your-helm-repo>
helm install <your-helm-repo> https://registry.int.yourcompany.com/<your-helm-repo>/<your-helm-chart>
Install JFrog Artifactory Open Source Software (OSS)
JFrog Artifactory OSS (jfrog/artifactory-oss) allows to host maven, gradle packages and generic binaries.
- Generate master and join keys for JFrog Artifactory OSS
export MASTER_KEY=$(openssl rand -hex 32) JOIN_KEY=$(openssl rand -hex 32)
kubectl create namespace artifactory-artefact-registry
kubectl create secret generic artifactory-master-key -n artifactory-artefact-registry --from-literal=master-key=${MASTER_KEY}
kubectl create secret generic artifactory-join-key -n artifactory-artefact-registry --from-literal=join-key=${JOIN_KEY}- Install JFrog Artifactory OSS
cat <<EOF | helm upgrade artifactory jfrog/artifactory-oss --install --create-namespace -n artifactory-artefact-registry --version 107.111.8 -f -
global:
  masterKeySecretName: artifactory-master-key
  joinKeySecretName: artifactory-join-key
postgresql:
  primary:
    persistence:
      enabled: true
      size: 100Gi
artifactory:

  # Configure storage
  persistence:
    storageClass: hcloud-volumes

  # Resource requests and limits
  resources:
    requests:
      memory: "2Gi"
      cpu: "1000m"
    limits:
      memory: "8Gi"
      cpu: "4000m"

  nginx:
    enabled: false

  ingress:
    enabled: true
    className: internal-nginx
    annotations:
      cert-manager.io/cluster-issuer: letsencrypt-cloudflare
      nginx.ingress.kubernetes.io/backend-protocol: "HTTP"
    hosts:
      - artifactory.int.yourcompany.com ## CHANGEME!
    tls:
      - secretName: artifactory.int.yourcompany.com-tls ## CHANGEME!
        hosts:
          - artifactory.int.yourcompany.com ## CHANGEME!

EOF- Open https://artifactory.int.yourcompany.com , login as admin:password and change the password
Install Gitea internally
- Add Gitea Helm repository
helm repo add gitea-charts https://dl.gitea.io/charts && helm repo update gitea-charts && helm search repo gitea-charts- Install Gitea
cat <<EOF | helm upgrade gitea gitea-charts/gitea --install --create-namespace -n gitea --version 12.0.0 -f -
gitea:
  config:
    APP_NAME: "Gitea"
    repository:
      ROOT: "~/gitea-repositories"
    repository.pull-request:
      WORK_IN_PROGRESS_PREFIXES: "WIP:,[WIP]:"
ingress:
  enabled: true
  className: internal-nginx
  annotations:
    cert-manager.io/cluster-issuer: letsencrypt-cloudflare
    nginx.ingress.kubernetes.io/proxy-body-size: "1024m"  # upload size limit
    nginx.ingress.kubernetes.io/client_max_body_size: "100m" # maximum allowed size of the client request body
  hosts:
  - host: git.int.yourcompany.com ## CHANGEME!
    paths:
      - path: /
  tls:
    - hosts:
        - git.int.yourcompany.com ## CHANGEME!
      secretName: yourcompany.com-tls ## CHANGEME!
# Storage
persistence:
  enabled: true
  storageClass: hcloud-volumes
  size: 50Gi
# DB
postgresql:
  enabled: true
  primary:
    persistence:
      storageClass: hcloud-volumes
      size: 15Gi
postgresql-ha:
  enabled: false
valkey-cluster:
  enabled: true
  persistence:
    enabled: true
    size: 8Gi
    storageClass: local-path
memcached:
  enabled: false
EOF- Login in Gitea, create new account, upload ssh public key, create new repo
Install Gitea runner internally
Unfortunately, Gitea Actions helm chart still not released, we will deploy runner from custom manifest
- Get registration token for Gitea
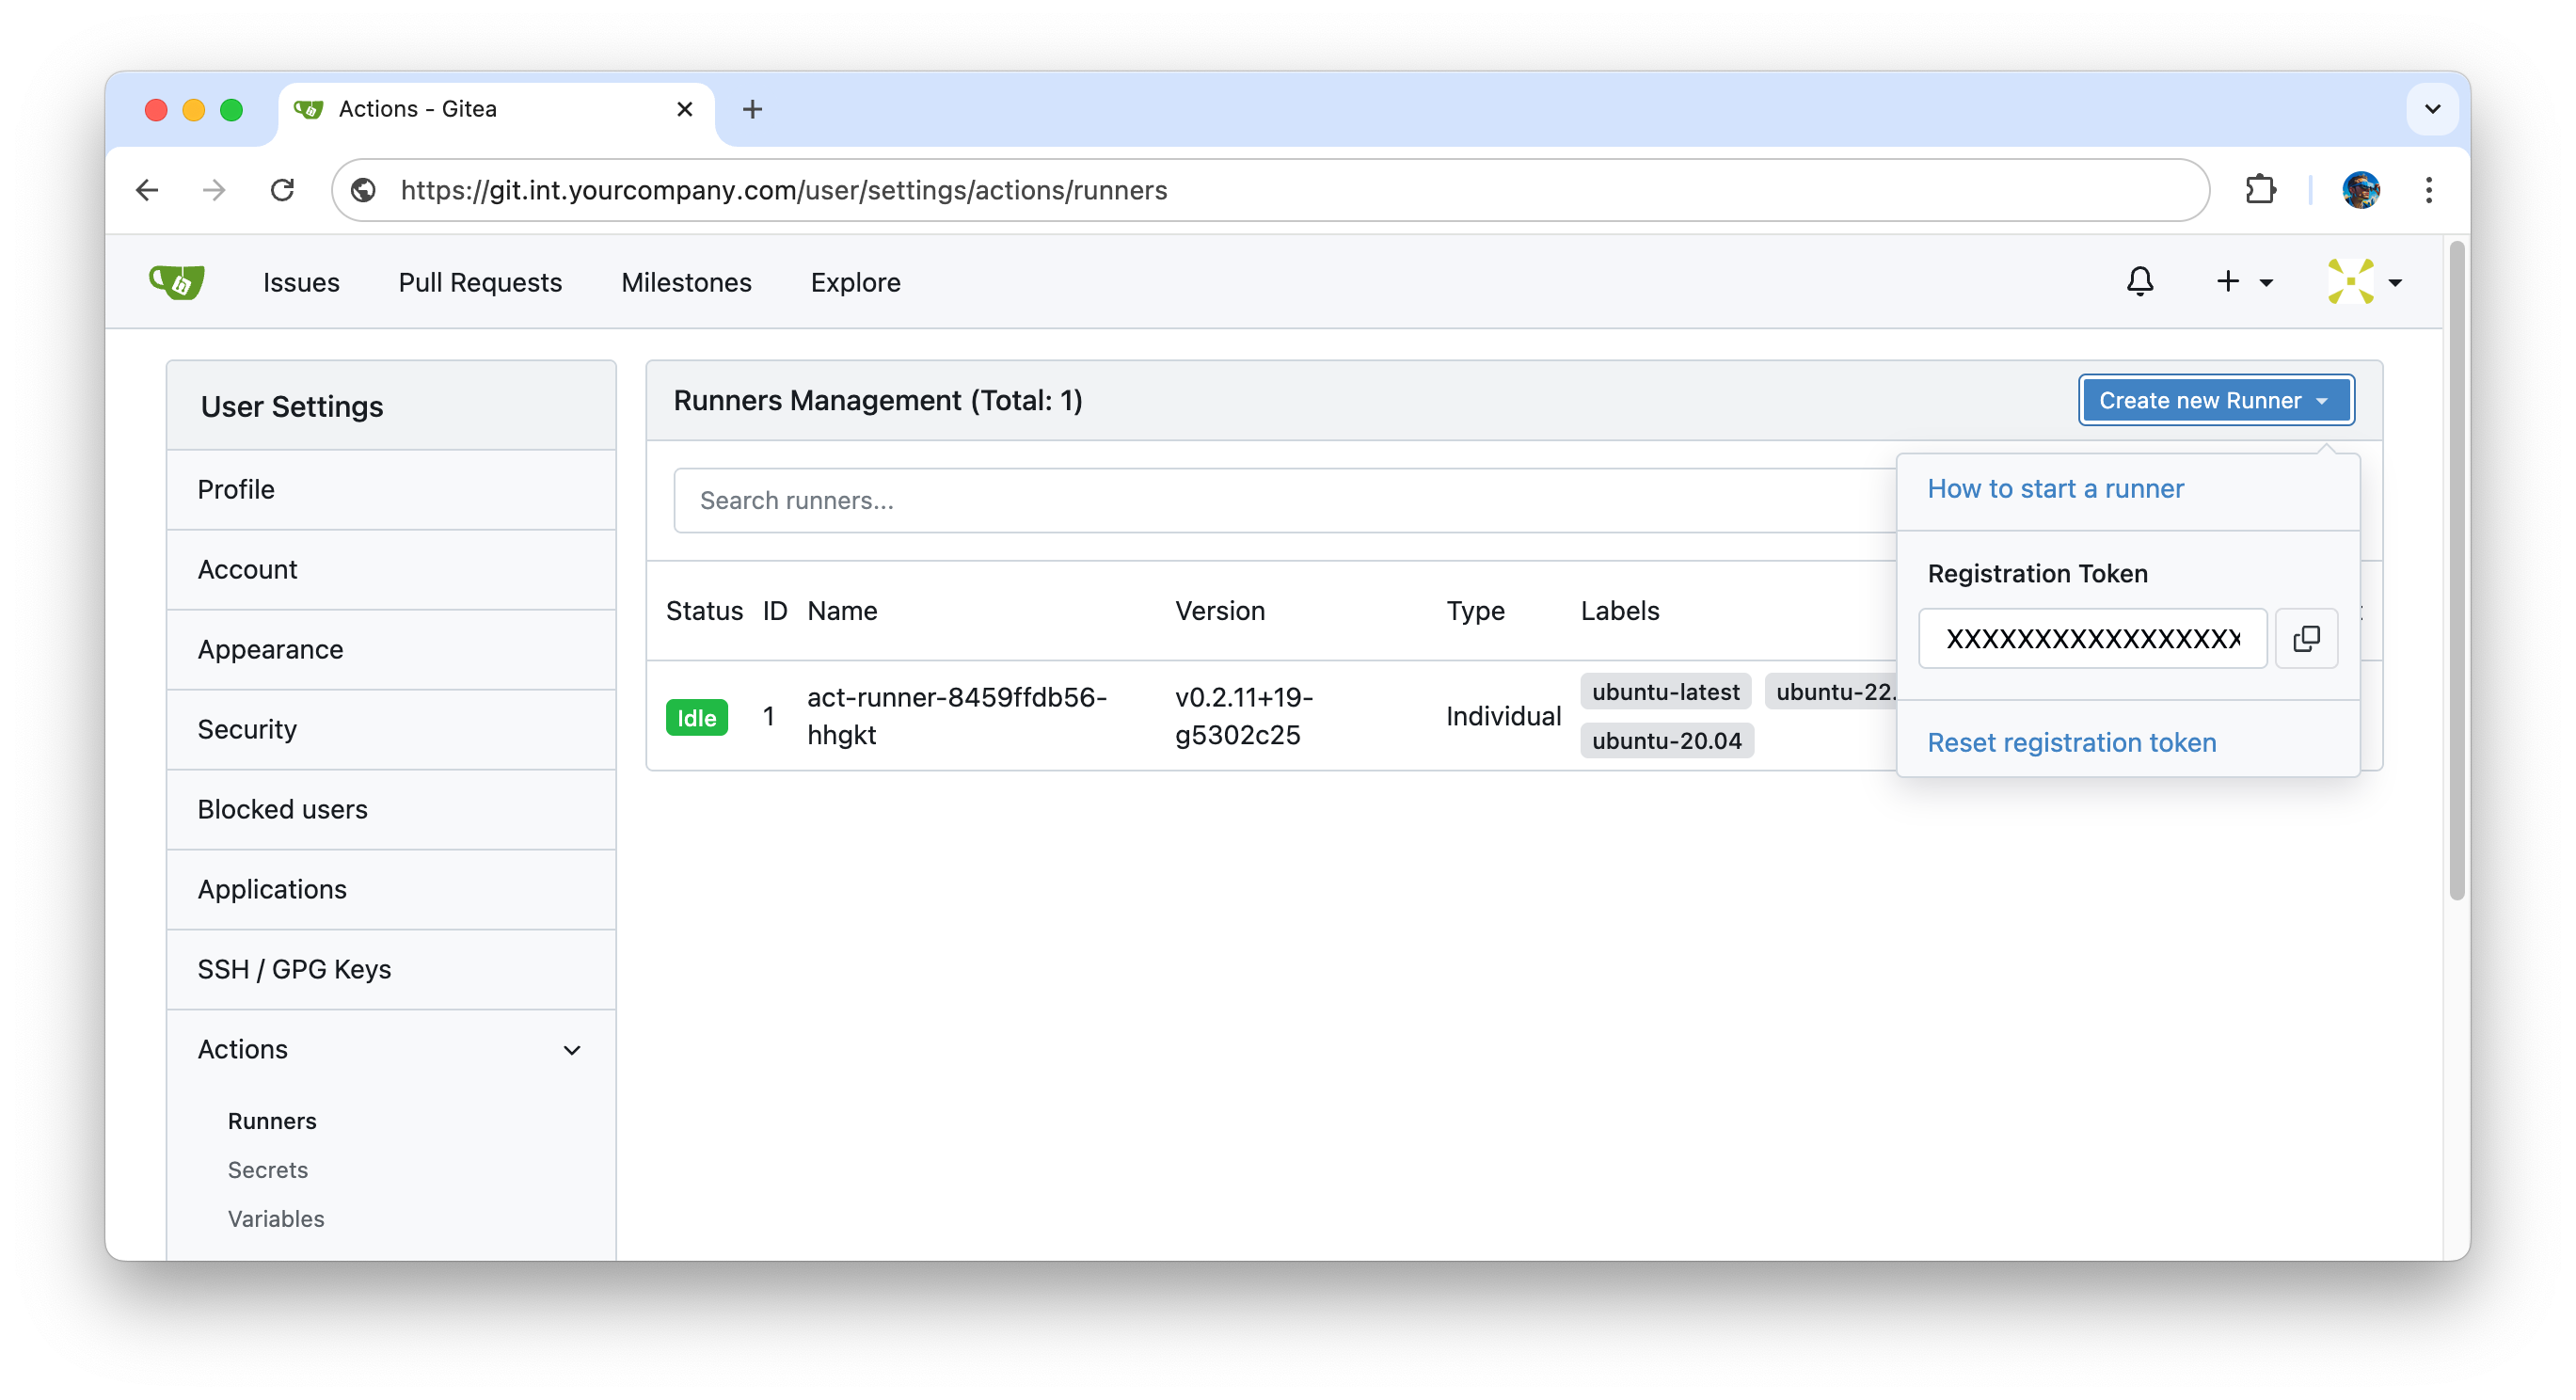 .
. - Define it as GITEA_ACTIONS_TOKEN variable:
export GITEA_ACTIONS_TOKEN=$(echo <registration token from gitea UI> | base64)- Deploy Gitea runner
cat <<EOF | kubectl create -f -
apiVersion: v1
kind: Namespace
metadata:
  name: gitea-runner
  labels:
    name: gitea-runner
---
apiVersion: v1
data:
  token: $GITEA_ACTIONS_TOKEN
kind: Secret
metadata:
  name: gitea-runner-secret
  namespace: gitea-runner
type: Opaque
---
apiVersion: v1
kind: ConfigMap
metadata:
  name: gitea-act-runner-config
  namespace: gitea-runner
  annotations:
    reloader.stakater.com/auto: "true"
data:
  config.yaml: |
    # More information about the configuration can be found at:
    # https://gitea.com/gitea/act_runner/src/branch/main/internal/pkg/config/config.example.yaml

    log:
      # The level of logging, can be trace, debug, info, warn, error, fatal
      level: debug

    runner:
      # Where to store the registration result.
      file: .runner
      # Execute how many tasks concurrently at the same time.
      capacity: 1
      # Extra environment variables to run jobs.
      envs:
        A_TEST_ENV_NAME_1: a_test_env_value_1
      # Extra environment variables to run jobs from a file.
      env_file: .env
      # The timeout for a job to be finished.
      timeout: 30m
      # Whether skip verifying the TLS certificate of the Gitea instance.
      insecure: false
      # The timeout for fetching the job from the Gitea instance.
      fetch_timeout: 5s
      # The interval for fetching the job from the Gitea instance.
      fetch_interval: 2s
      # The labels of a runner are used to determine which jobs the runner can run, and how to run them.
      labels:
        - "ubuntu-latest:docker://gitea/runner-images:ubuntu-latest"
        - "ubuntu-22.04:docker://gitea/runner-images:ubuntu-22.04"
        - "ubuntu-20.04:docker://gitea/runner-images:ubuntu-20.04"

    cache:
      # Enable cache server to use actions/cache.
      enabled: true
      # The directory to store the cache data.
      # If it's empty, the cache data will be stored in $HOME/.cache/actcache.
      dir: ""
      # The host of the cache server.
      # It's not for the address to listen, but the address to connect from job containers.
      # So 0.0.0.0 is a bad choice, leave it empty to detect automatically.
      host: ""
      # The port of the cache server.
      # 0 means to use a random available port.
      port: 0
      # The external cache server URL. Valid only when enable is true.
      # If it's specified, act_runner will use this URL as the ACTIONS_CACHE_URL rather than start a server by itself.
      # The URL should generally end with "/".
      external_server: ""

    container:
      # Specifies the network to which the container will connect.
      network: ""
      # Whether to use privileged mode or not when launching task containers (privileged mode is required for Docker-in-Docker).
      privileged: false
      # And other options to be used when the container is started (eg, --add-host=my.gitea.url:host-gateway).
      options: "--add-host=docker:host-gateway -v /certs:/certs -e DOCKER_HOST=tcp://docker:2376 -e DOCKER_CERT_PATH=/certs/client -e DOCKER_TLS_CERTDIR=/certs -e DOCKER_TLS_VERIFY=1"
      # Volumes (including bind mounts) can be mounted to containers. Glob syntax is supported, see https://github.com/gobwas/glob
      valid_volumes:
        - /certs
    host:
    # The parent directory of a job's working directory.
    # If it's empty, $HOME/.cache/act/ will be used.
    # workdir_parent:
---
apiVersion: apps/v1
kind: StatefulSet
metadata:
  labels:
    app: gitea-act-runner-dind
  name: gitea-act-runner-dind
  namespace: gitea-runner
  annotations:
    reloader.stakater.com/auto: "true"
spec:
  replicas: 1
  selector:
    matchLabels:
      app: gitea-act-runner-dind
  serviceName: gitea-act-runner-dind
  template:
    metadata:
      labels:
        app: gitea-act-runner-dind
    spec:
      restartPolicy: Always
      containers:
        - name: runner
          image: gitea/act_runner:nightly
          command: ["sh", "-c", "while ! nc -z localhost 2376 </dev/null; do echo 'waiting for docker daemon...'; sleep 5; done; /sbin/tini -- run.sh"]

          env:
            - name: DOCKER_HOST
              value: tcp://localhost:2376
            - name: DOCKER_CERT_PATH
              value: /certs/client
            - name: DOCKER_TLS_VERIFY
              value: "1"
            - name: CONFIG_FILE
              value: /config.yaml
            - name: GITEA_INSTANCE_URL
              value: https://git.int.yourcompany.com ## CHANGEME!
            - name: GITEA_RUNNER_NAME
              valueFrom:
                fieldRef:
                  fieldPath: spec.nodeName
            - name: GITEA_RUNNER_REGISTRATION_TOKEN
              valueFrom:
                secretKeyRef:
                  name: gitea-runner-secret
                  key: token

          volumeMounts:
            - name: docker-certs
              mountPath: /certs
            - name: gitea-runner-storage
              mountPath: /data
            - name: config
              mountPath: /config.yaml
              subPath: config.yaml

        - name: daemon
          image: docker:dind
          env:
            - name: DOCKER_TLS_CERTDIR
              value: /certs
          securityContext:
            privileged: true
          volumeMounts:
            - name: docker-certs
              mountPath: /certs

      volumes:
        - name: docker-certs
          emptyDir: {}
        - name: config
          configMap:
            name: gitea-act-runner-config

  volumeClaimTemplates:
    - apiVersion: v1
      kind: PersistentVolumeClaim
      metadata:
        name: gitea-runner-storage
        namespace: gitea-runner
      spec:
        storageClassName: local-path
        accessModes:
          - ReadWriteOnce
        resources:
          requests:
            storage: "50Gi"
EOF- Check that Gitea runner is registred
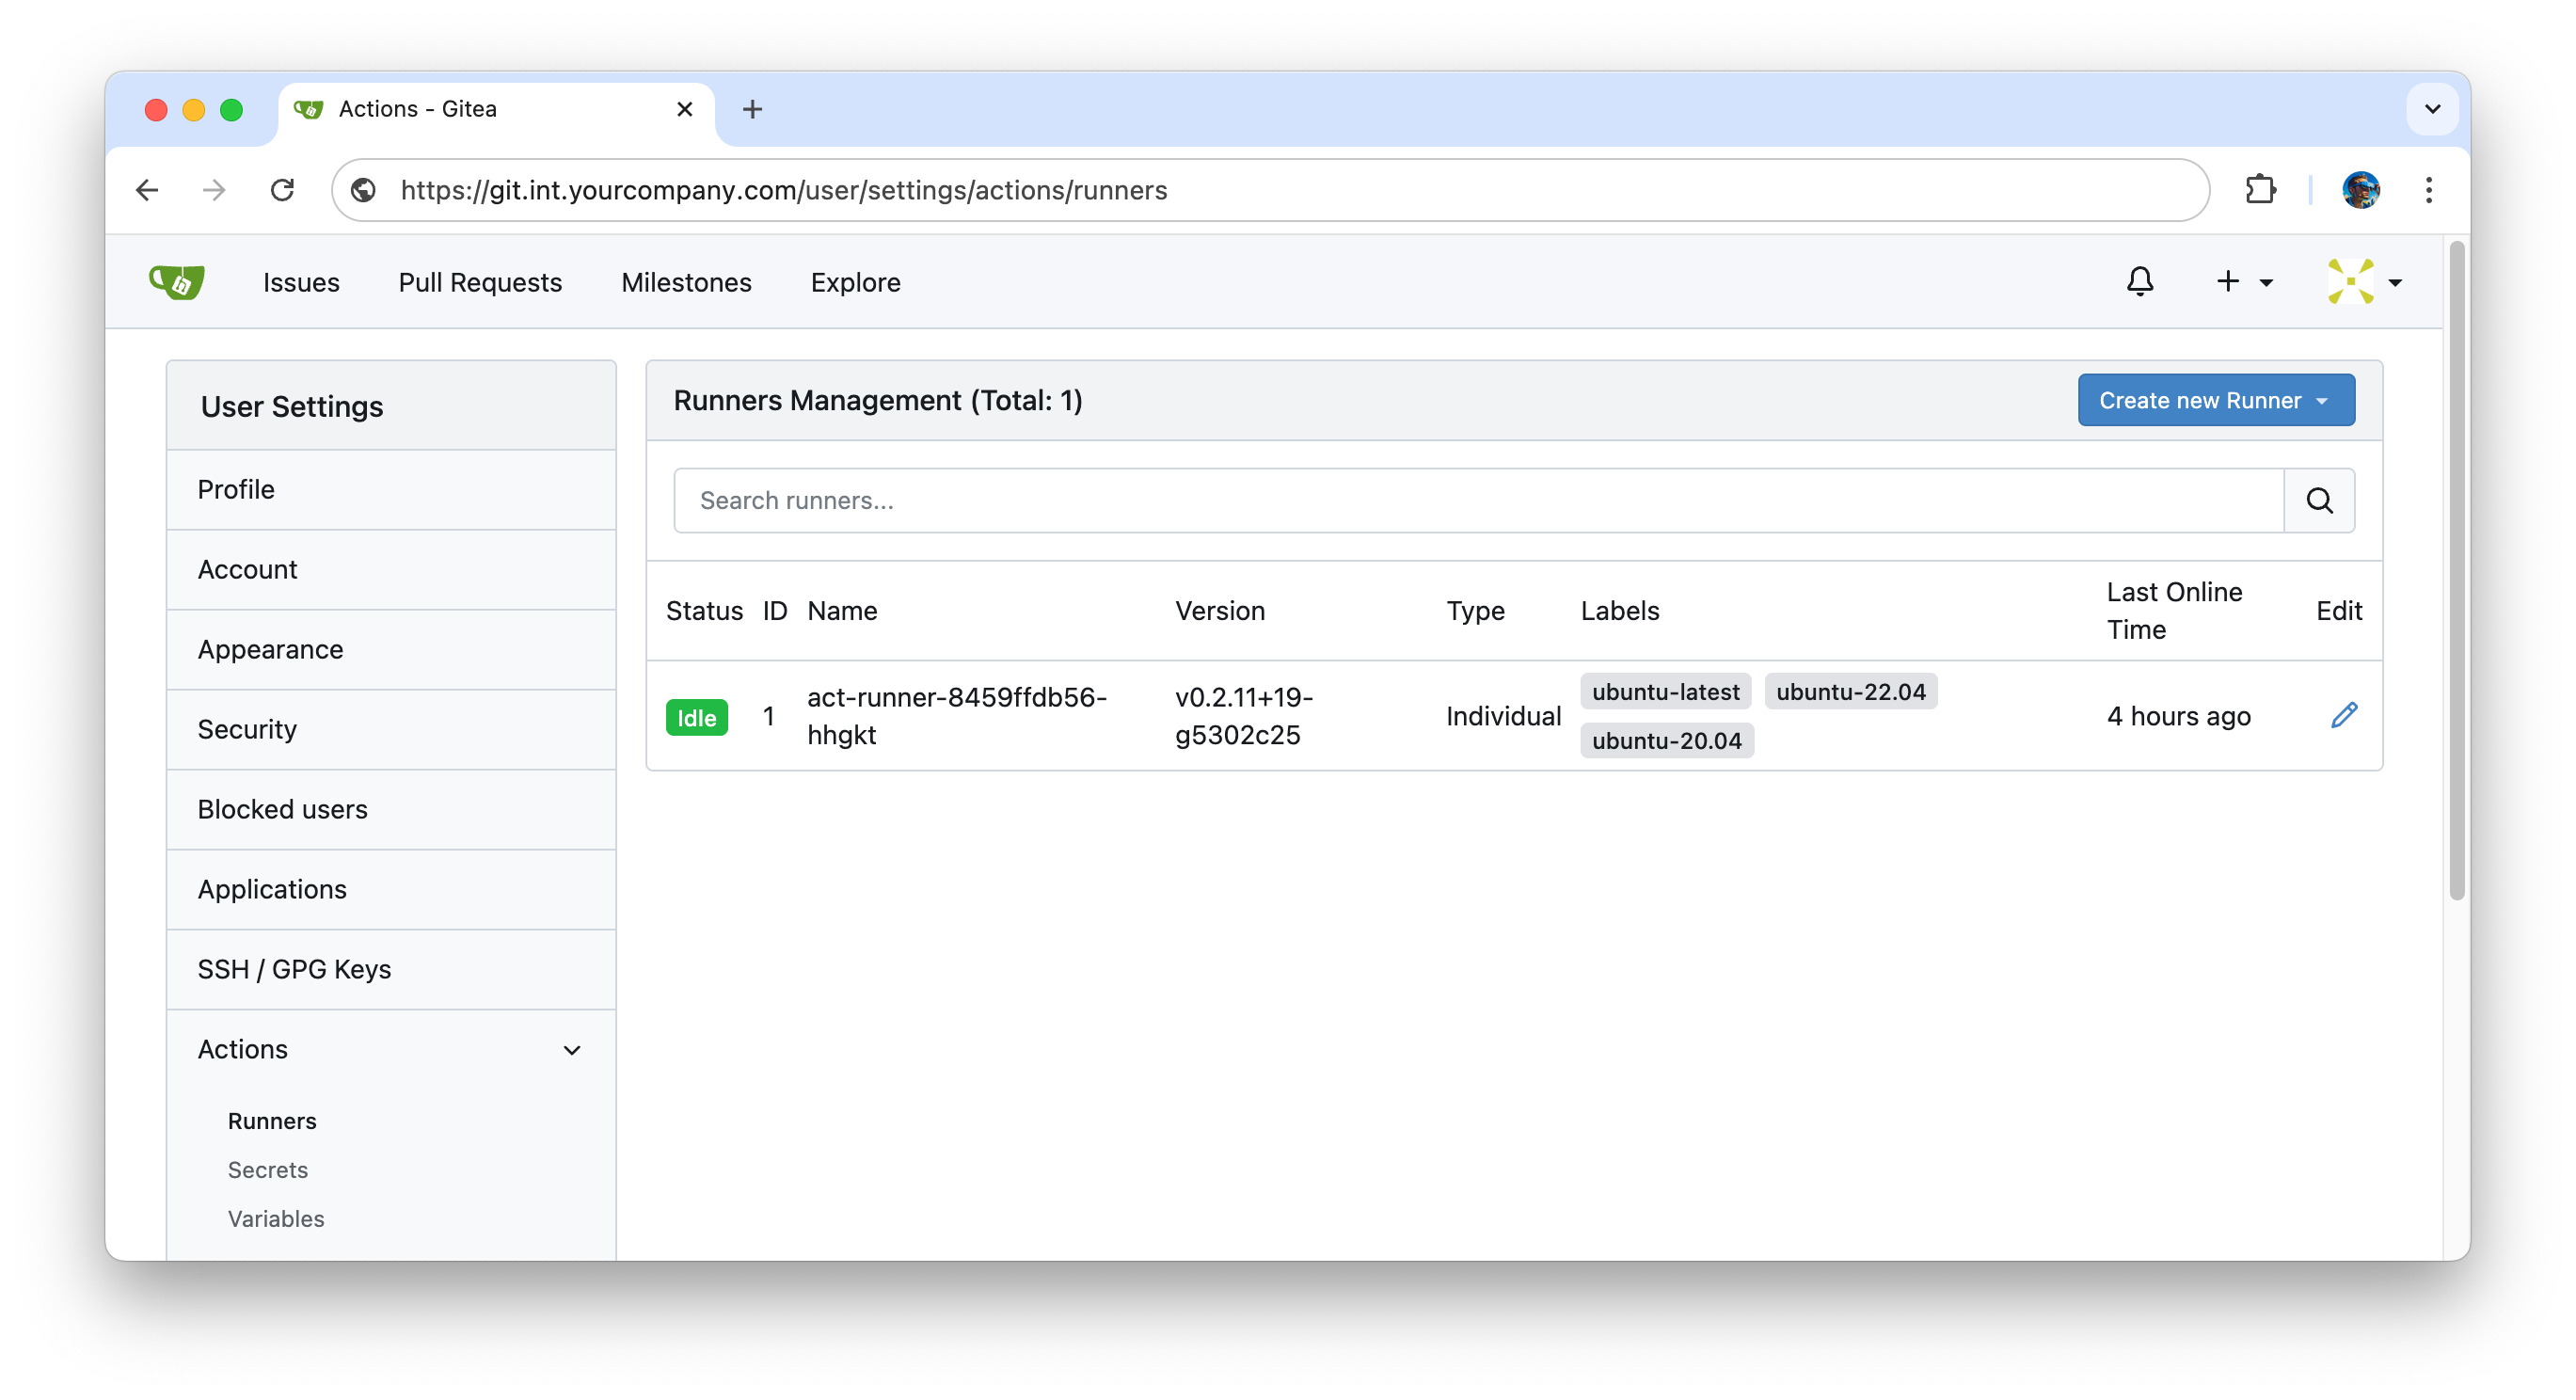 .
.
Install ArgoCD internally
- Add ArgoCD Helm repository
helm repo add argo https://argoproj.github.io/argo-helm && helm repo update argo && helm search repo argo/argo-cd- Install ArgoCD
cat <<EOF | helm upgrade argocd argo/argo-cd --install --create-namespace -n argocd --version 8.0.9 -f -
global:
  domain: argocd.int.yourcompany.com ## CHANGEME!
configs:
  params:
    server.insecure: true
server:
  ingress:
    enabled: true
    ingressClassName: internal-nginx
    annotations:
      cert-manager.io/cluster-issuer: letsencrypt-cloudflare
      nginx.ingress.kubernetes.io/backend-protocol: "HTTP"
    extraTls:
      - hosts:
        - argocd.int.yourcompany.com ## CHANGEME!
        # Based on the ingress controller used secret might be optional
        secretName: argocd.int.yourcompany.com-tls
EOF- Check that ArgoCD is available at
https://argocd.int.yourcompany.com - Get admin password
kubectl get secret argocd-initial-admin-secret -n argocd -o jsonpath="{.data.password}" | base64 -d; echo- Login to ArgoCD using username
adminand password from the previous step
Install Kubernetes Dashboard internally
- Add Kubernetes dashboard helm chart
helm repo add kubernetes-dashboard https://kubernetes.github.io/dashboard/ && helm repo update kubernetes-dashboard && helm search repo kubernetes-dashboard/kubernetes-dashboard- Install Kubernetes dashboard
cat <<EOF | helm upgrade kubernetes-dashboard kubernetes-dashboard/kubernetes-dashboard --install --create-namespace -n kubernetes-dashboard --version 7.12.0 -f -
app:
  ingress:
    enabled: true
    hosts:
      - k8s-dashboard.int.yourcompany.com ## CHANGEME!
    ingressClassName: internal-nginx
    issuer:
      name: letsencrypt-cloudflare
      scope: cluster
EOF- Generate bearer token
kubectl create serviceaccount dashboard-sa -n kubernetes-dashboard
kubectl create clusterrolebinding dashboard-sa-cluster-admin-binding --clusterrole=cluster-admin --serviceaccount=kubernetes-dashboard:dashboard-sa
kubectl create token dashboard-sa -n kubernetes-dashboard- Use token to login in Kubernetes dashboard at https://k8s-dashboard.int.yourcompany.com
Install Sonarqube with Sonarqube Community Branch Plugin
Sonarqube is a static code analysis tool. Sonarqube Community Branch Plugin allows run analysis of the PR branch for Sonarqube Community Edition.
- Add Sonarqube Helm repository
helm repo add sonarqube https://SonarSource.github.io/helm-chart-sonarqube && helm repo update sonarqube && helm search repo sonarqube- Install Sonarqube
export SONARQUBE_BRANCH_PLUGIN_VERSION=1.23.0 SONAR_WEB_SYSTEMPASSCODE="CHANGEME"
cat <<EOF | helm upgrade sonarqube sonarqube/sonarqube --install --create-namespace -n sonarqube --version 2025.3.0 -f -
community:
  enabled: true
monitoringPasscode: "$SONAR_WEB_SYSTEMPASSCODE"
plugins:
  install:
    - https://github.com/mc1arke/sonarqube-community-branch-plugin/releases/download/$SONARQUBE_BRANCH_PLUGIN_VERSION/sonarqube-community-branch-plugin-$SONARQUBE_BRANCH_PLUGIN_VERSION.jar
sonarProperties:
  sonar.web.javaAdditionalOpts: "-javaagent:/opt/sonarqube/extensions/plugins/sonarqube-community-branch-plugin-$SONARQUBE_BRANCH_PLUGIN_VERSION.jar=web"
  sonar.ce.javaAdditionalOpts: "-javaagent:/opt/sonarqube/extensions/plugins/sonarqube-community-branch-plugin-$SONARQUBE_BRANCH_PLUGIN_VERSION.jar=ce"

ingress:
  enabled: true
  ingressClassName: internal-nginx
  annotations:
    cert-manager.io/cluster-issuer: letsencrypt-cloudflare
    nginx.ingress.kubernetes.io/backend-protocol: "HTTP"
  hosts:
    - name: sonarqube.int.yourcompany.com ## CHANGEME!
  tls:
    - secretName: sonarqube.int.yourcompany.com-tls ## CHANGEME!
      hosts:
        - sonarqube.int.yourcompany.com ## CHANGEME!
EOF- Open sonarqube.int.yourcompany.com, login as admin:admin, change the password
Conclusion
This guide illustrates how to deploy a scalable, cost-effective development environment for cloud-native, Kubernetes-based workloads using Hetzner Cloud services. While advanced infrastructure provisioning tools like Terraform are not used here, this approach offers an approachable introduction to configuring Hetzner Cloud. Future guides can cover additional topics, including hybrid environments with cloud and dedicated servers, enhanced secret management, implementing single sign-on (SSO) across all services, etc.