Introduction
Modern LLMs can be categorized into four levels based on their complexity and data volume:
- Budget-effective LLMs (7-8b parameters): These models, such as qwen2.5-coder:7b (4.7GB), can be run on readily available hardware, including GPUs with more than 8GB VRAM or even extended VMs with 32GB RAM without a dedicated GPU.
- Lower mid-sized LLMs (30b parameters): Such models, for example qwen2.5-coder:32b, deliver better quality compared to budget-oriented models. They can be effectively run on a single GPU with 24GB of VRAM, like an NVIDIA A30.
- Mid-sized LLMs (70b parameters): Models like llama3.3:70b (43GB) offer a balance between performance and resource requirements, but to achieve reasonable processing speeds, these models typically require a single high-performance GPU, such as an H100 with 80GB of VRAM.
- State-of-the-art LLMs (over 200b parameters): These cutting-edge models, exemplified by deepseek-r1:671b (404GB), provide the best quality, but their size requires multiple high-end GPUs like the H200 (e.g., a configuration of 2x8H200 with 512GB of VRAM).
Higher output quality generally correlates with increased costs. Architects must therefore balance quality, cost, and speed when designing solutions. For tasks like text extraction and aggregation, 7-8b parameter models are typically adequate. Coding support benefits from models with 30b+ parameters. Complex reasoning tasks require state-of-the-art models.
The most demanded self-hosted LLM models at the moment are:
| Model Type | Names | Reason |
|---|---|---|
| Budget-effective | deepseek-r1:8b llama3.1:8b qwen2.5:7b mistral:7b | easy for finetuning, sufficient for usual agentic usage - text extraction and aggregation |
| Lower mid-sized | qwq:32b deepseek-r1:32b qwen2.5-coder:32b gemma2:27b | + suitable for coding, agentic flow code generation |
| Mid-sized | deepseek-r1:70b llama3.3:70b | + better quality for extra budget |
Provider selection
To find cost-effective cloud GPU providers for self-hosted LLMs, I utilize cloud GPU price comparison services such as GetDeploying and Primeintellect.ai . At first glance, these services offer comprehensive reviews of different GPU vendors and configurations. As of March 2025, the following minimal prices are observed:
| Type | vCPUs | Memory | VRAM | Current Market Price |
|---|---|---|---|---|
| Nvidia A30 | 8 | 31GB | 24GB | $0.22 / per hour |
| Nvidia A40 | 9 | 50GB | 48GB | $0.39 / per hour |
| Nvidia RTX 6000 | 12 | 64GB | 48GB | $0.97 / per hour |
| Nvidia A100 | 15 | 200GB | 40GB | $1.05 / per hour |
| Nvidia A100 | 15 | 120GB | 80GB | $1.35 / per hour |
| Nvidia H100 | 28 | 180GB | 80GB | $1.90 / per hour |
| Nvidia H200 | 44 | 185GB | 141GB | $2.49 / per hour |
After a quick googling, it became clear that these comparisons are incomplete. For example, spot instances are not fully addressed, well-known options like GCP Spot H100 instances are omitted, and the most cost-efficient alternatives are not emphasized.
A month ago I assessed A30 and H100 GPUs-powered Kubernetes nodes from Rackspace Spot, in this guide I’ll do the same for A100, RTX A6000, H100 and H200 from DataCrunch .
DataCrunch, a Finnish cloud provider, specializes in Machine Learning (ML) services, offering GPU-powered Virtual Machines at competitive prices:
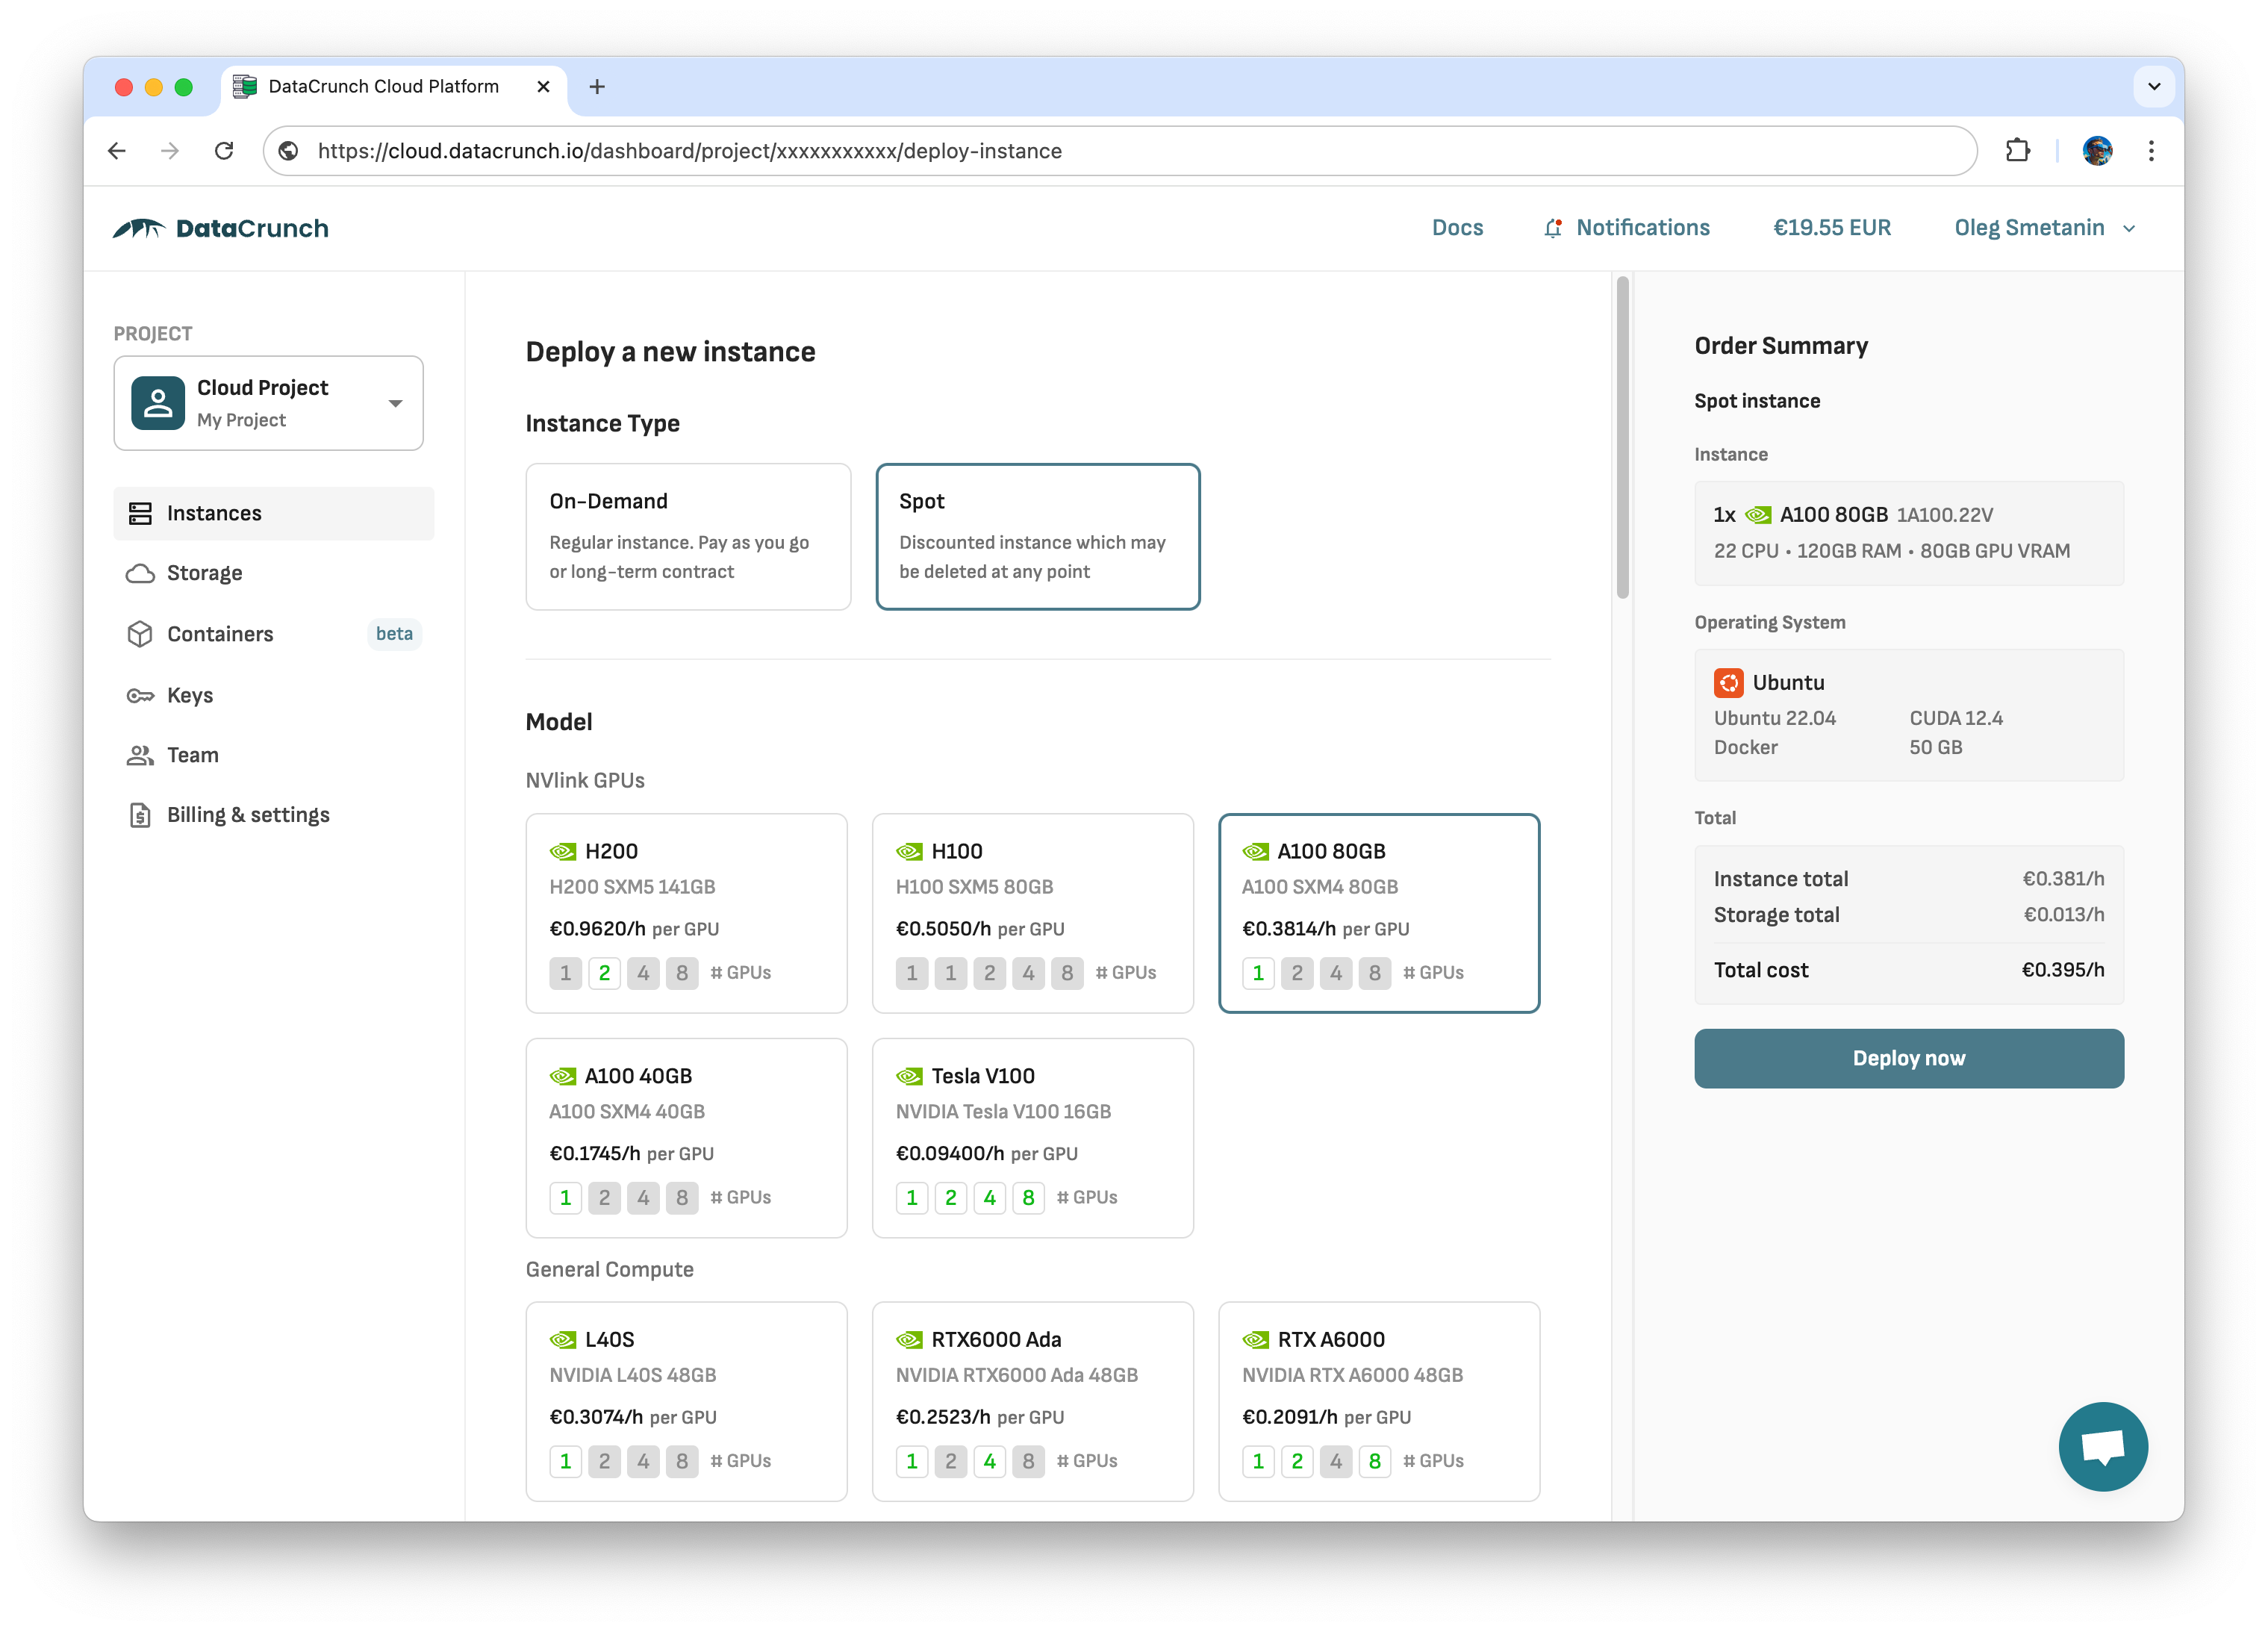
Full range of GPU instances to host 7-8b (Tesla V100 16GB VRAM), 30b (A100 40GB VRAM), 70b (A100 80GB VRAM, H100 80GB VRAM), up to 671b (4xH200 564GB VRAM) are offered.
Installing Kubernetes
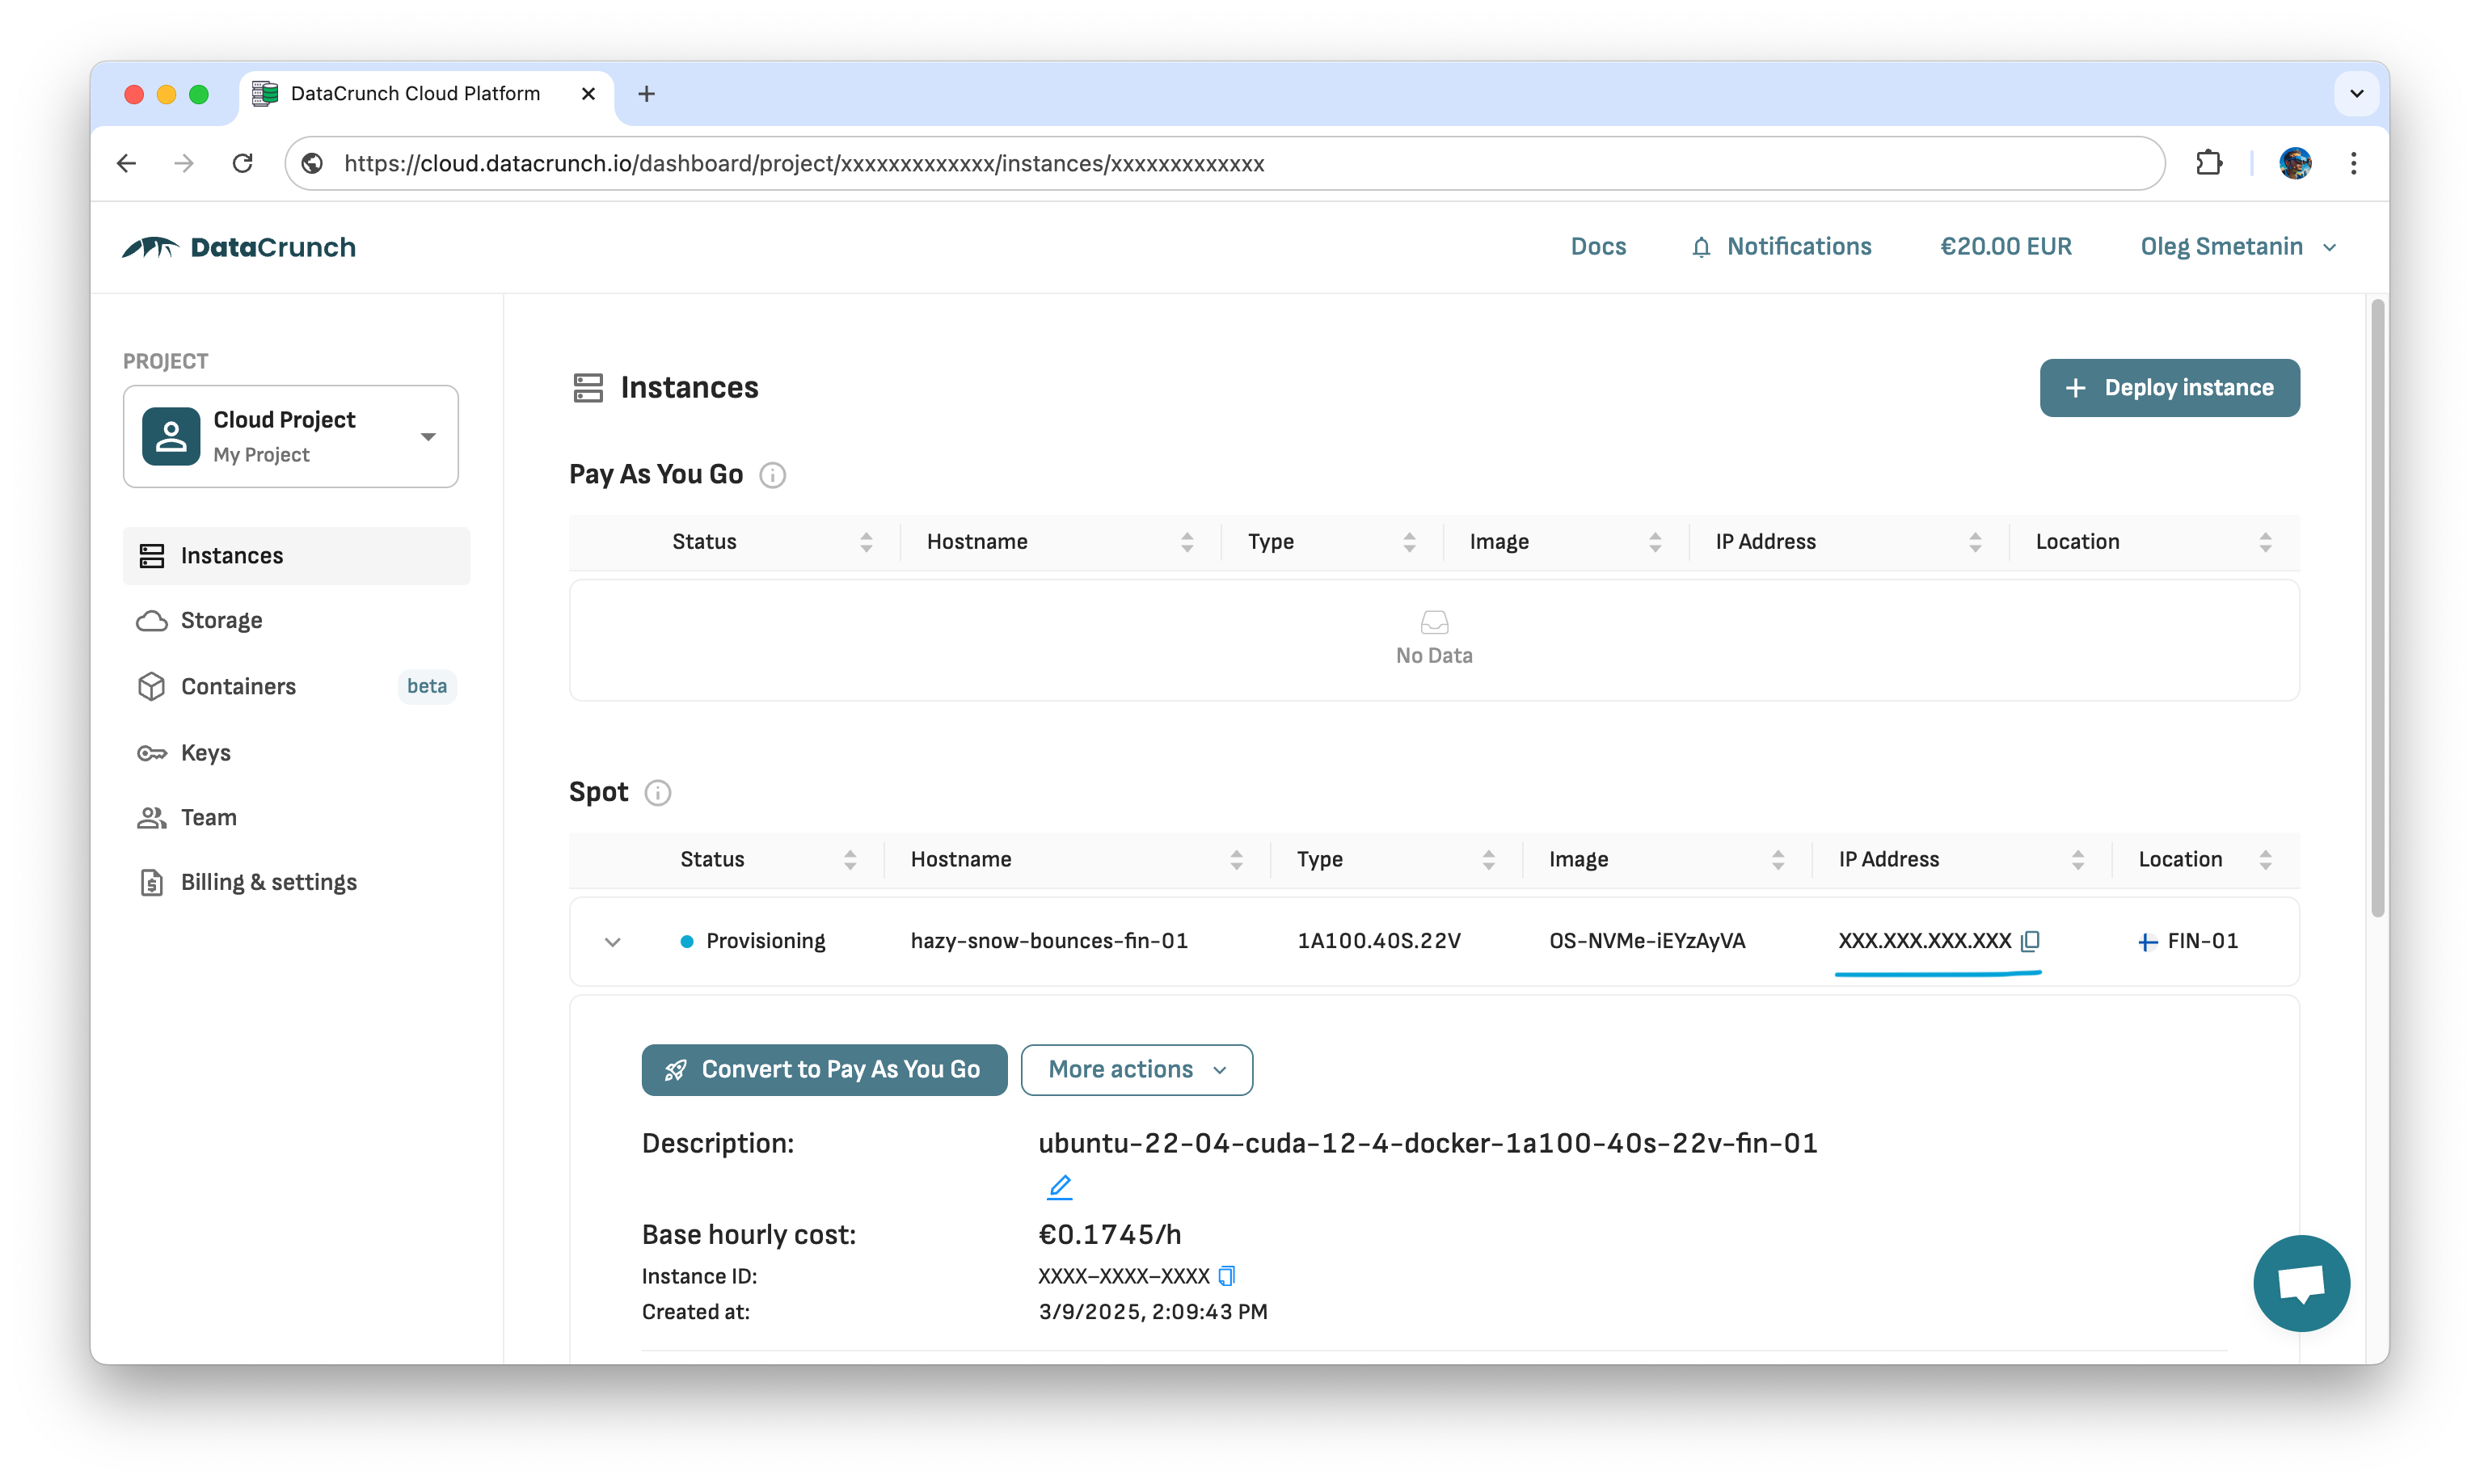
DataCrunch deploys GPU-powered Virtual Machines, and we have to install Kubernetes ourselves. Let’s use lightweight Kubernetes K3s distribution from Rancher in this case.
-
Get your server IP from the DataCrunch control panel (YOUR_SERVER_IP)
-
Login to the node using ssh
$ ssh root@YOUR_SERVER_IP- Install K3s
$ curl -sfL https://get.k3s.io | K3S_KUBECONFIG_MODE=644 sh -s - --default-runtime=nvidia
...
[INFO]  Finding release for channel stable
[INFO]  Using v1.31.6+k3s1 as release
[INFO]  Downloading hash https://github.com/k3s-io/k3s/releases/download/v1.31.6+k3s1/sha256sum-amd64.txt
[INFO]  Downloading binary https://github.com/k3s-io/k3s/releases/download/v1.31.6+k3s1/k3s
[INFO]  Verifying binary download
[INFO]  Installing k3s to /usr/local/bin/k3s
[INFO]  Skipping installation of SELinux RPM
[INFO]  Creating /usr/local/bin/kubectl symlink to k3s
[INFO]  Creating /usr/local/bin/crictl symlink to k3s
[INFO]  Skipping /usr/local/bin/ctr symlink to k3s, command exists in PATH at /usr/bin/ctr
[INFO]  Creating killall script /usr/local/bin/k3s-killall.sh
[INFO]  Creating uninstall script /usr/local/bin/k3s-uninstall.sh
[INFO]  env: Creating environment file /etc/systemd/system/k3s.service.env
[INFO]  systemd: Creating service file /etc/systemd/system/k3s.service
[INFO]  systemd: Enabling k3s unit
Created symlink /etc/systemd/system/multi-user.target.wants/k3s.service → /etc/systemd/system/k3s.service.
[INFO] systemd: Starting k3s- Get kubeconfig
$ cat /etc/rancher/k3s/k3s.yamlConfigure kubectl on your local workstation
- To save the kubeconfig locally, copy the content from the output of the previous step, replace 127.0.0.1 with your server’s IP address (YOUR_SERVER_IP) in the server configuration, and run the following command on your local workstation:
$ cat <<EOF > $(pwd)/kube/datacrunch-a100-80-kubeconfig.yaml
apiVersion: v1
clusters:
- cluster:
    certificate-authority-data: XXXXXXXXXXXXXXXXXYYYYYYYYYYYYYYYYZZZZZZZZZZZZZZZZXXXXXXXXXXXXXXXXXYYYYYYYYYYYYYYYYZZZZZZZZZZZZZZZZXXXXXXXXXXXXXXXXXYYYYYYYYYYYYYYYYZZZZZZZZZZZZZZZZXXXXXXXXXXXXXXXXXYYYYYYYYYYYYYYYYZZZZZZZZZZZZZZZZXXXXXXXXXXXXXXXXXYYYYYYYYYYYYYYYYZZZZZZZZZZZZZZZZXXXXXXXXXXXXXXXXXYYYYYYYYYYYYYYYYZZZZZZZZZZZZZZZZ
    server: https://65.109.80.4X:6443
  name: default
contexts:
- context:
    cluster: default
    user: default
  name: default
current-context: default
kind: Config
preferences: {}
users:
- name: default
  user:
    client-certificate-data: XXXXXXXXXXXXXXXXXYYYYYYYYYYYYYYYYZZZZZZZZZZZZZZZZXXXXXXXXXXXXXXXXXYYYYYYYYYYYYYYYYZZZZZZZZZZZZZZZZXXXXXXXXXXXXXXXXXYYYYYYYYYYYYYYYYZZZZZZZZZZZZZZZZXXXXXXXXXXXXXXXXXYYYYYYYYYYYYYYYYZZZZZZZZZZZZZZZZXXXXXXXXXXXXXXXXXYYYYYYYYYYYYYYYYZZZZZZZZZZZZZZZZXXXXXXXXXXXXXXXXXYYYYYYYYYYYYYYYYZZZZZZZZZZZZZZZZ==
    client-key-data: XXXXXXXXXXXXXXXXXYYYYYYYYYYYYYYYYZZZZZZZZZZZZZZZZXXXXXXXXXXXXXXXXXYYYYYYYYYYYYYYYYZZZZZZZZZZZZZZZZXXXXXXXXXXXXXXXXXYYYYYYYYYYYYYYYYZZZZZZZZZZZZZZZZXXXXXXXXXXXXXXXXXYYYYYYYYYYYYYYYYZZZZZZZZZZZZZZZZXXXXXXXXXXXXXXXXXYYYYYYYYYYYYYYYYZZZZZZZZZZZZZZZZXXXXXXXXXXXXXXXXXYYYYYYYYYYYYYYYYZZZZZZZZZZZZZZZZ=
EOF- Configure kubectl
$ export KUBECONFIG=$(pwd)/kube/datacrunch-a100-80-kubeconfig.yaml

$ kubectl get nodes
...
NAME                       STATUS   ROLES                  AGE     VERSION
loud-ball-rustles-fin-01   Ready    control-plane,master   4m15s   v1.31.6+k3s1
Kubernetes node GPU configuration
A freshly installed Kubernetes is not ready to serve GPU workloads by default. If you check node capabilities, you won’t find any nvidia.com capabilities:
$ kubectl describe node -A | grep nvidia.com/cuda | uniqTo fix the issue, you have to install NVIDIA GPU Operator and NVIDIA device plugin for Kubernetes . Basically, it installs nvidia drivers and libraries on kubernetes nodes using Kubernetes DaemonSets. Installation may also take up to 10 minutes. If you skip this step, your cluster will be fully functional, but GPU capabilities will not be available for the workload.
$ helm repo add nvidia https://helm.ngc.nvidia.com/nvidia && helm repo update
$ helm upgrade gpu-operator nvidia/gpu-operator \
  --install --create-namespace -n gpu-operator --version=v24.9.2 --wait
Wait until new capabilities appear
$ kubectl describe node -A | grep nvidia.com/gpu.present | uniq
...
                    nvidia.com/gpu.present=true
Install NVIDIA device plugin for Kubernetes
$ helm repo add nvdp https://nvidia.github.io/k8s-device-plugin && helm repo update
$ helm upgrade nvdp nvdp/nvidia-device-plugin \
  --install --create-namespace -n nvidia-device-plugin --version 0.17.0 --wait
Wait until new capabilities appear
$ kubectl describe node -A | grep nvidia.com/cuda | uniq
...
    nvidia.com/cuda.driver-version.full=550.144.03
    nvidia.com/cuda.driver-version.major=550
    nvidia.com/cuda.driver-version.minor=144
    nvidia.com/cuda.driver-version.revision=03
    nvidia.com/cuda.driver.major=550
    nvidia.com/cuda.driver.minor=144
    nvidia.com/cuda.driver.rev=03
    nvidia.com/cuda.runtime-version.full=12.4
    nvidia.com/cuda.runtime-version.major=12
    nvidia.com/cuda.runtime-version.minor=4
    nvidia.com/cuda.runtime.major=12
    nvidia.com/cuda.runtime.minor=4
Self-hosted LLM
We will use ollama to run self-hosted LLM models. You can find all the models available in ollama library . Also, there are options to run models from HuggingFace .
In our case, we will deploy the qwen2.5-coder:32b model, which takes 20GB of disk space:
$ helm repo add ollama-helm https://otwld.github.io/ollama-helm/ && helm repo update
$ cat <<EOF | helm upgrade ollama ollama-helm/ollama --install --create-namespace -n ollama --version 1.8.0 -f -
persistentVolume:
  enabled: true
  size: 50Gi
ollama:
  gpu:
    enabled: true
  models:
    pull:
      - qwen2.5-coder:32b
    run:
      - qwen2.5-coder:32b
extraEnv:
  - name: OLLAMA_KEEP_ALIVE
    value: 24h
EOF
Wait until the pod is ready
$ kubectl wait --for=condition=ready pod -n ollama -l app.kubernetes.io/name=ollama
...
pod/ollama-aaaaaaa-bbbb condition met
In case of lower mid-sized models like llama3.3:70b (43GB) I suggest to increase VM disk space to 90GB and track model downloading progress using ncdu utility in ssh-session at the server node.
$ ssh root@YOUR_INSTANCE_IP
$ apt install ncdu
$ ncdu
go to /var/lib/rancher/k3s/storage folder, press “r” to refresh file sizes and “d” to delete downloaded models if you need to free up disk space.

After starting the pod, you can check if the model is fully loaded into VRAM:
# Check logs
$ kubectl logs -n ollama -l app.kubernetes.io/name=ollama --tail=1000
...
# Check if the GPU is found
time=2025-03-09T13:31:24.869Z level=INFO source=gpu.go:217 msg="looking for compatible GPUs"
time=2025-03-09T13:31:25.345Z level=INFO source=types.go:130 msg="inference compute" id=GPU-baa90da5-54b3-cf40-79d6-f3397ec1276b library=cuda variant=v12 compute=8.0 driver=12.8 name="NVIDIA A100-SXM4-40GB" total="38.5 GiB" available="38.1 GiB"
...
# Downloading of model
time=2025-03-09T13:31:26.182Z level=INFO source=download.go:176 msg="downloading ac3d1ba8aa77 in 20 1 GB part(s)"
...
# Check that qwen2.5-coder:32b fits in VRAM
time=2025-03-09T13:34:31.737Z level=INFO source=sched.go:715 msg="new model will fit in available VRAM in single GPU, loading" model=/root/.ollama/models/blobs/sha256-ac3d1ba8aa77755dab3806d9024e9c385ea0d5b412d6bdf9157f8a4a7e9fc0d9 gpu=GPU-baa90da5-54b3-cf40-79d6-f3397ec1276b parallel=4 available=40912420864 required="21.5 GiB"
...
llama_model_loader: Dumping metadata keys/values. Note: KV overrides do not apply in this output.
llama_model_loader: - kv   0:                       general.architecture str              = qwen2
llama_model_loader: - kv   1:                               general.type str              = model
llama_model_loader: - kv   2:                               general.name str              = Qwen2.5 Coder 32B Instruct
llama_model_loader: - kv   3:                           general.finetune str              = Instruct
llama_model_loader: - kv   4:                           general.basename str              = Qwen2.5-Coder
llama_model_loader: - kv   5:                         general.size_label str              = 32B
llama_model_loader: - kv   6:                            general.license str              = apache-2.0
...
llama_init_from_model: n_seq_max     = 4
llama_init_from_model: n_ctx         = 8192
llama_init_from_model: n_ctx_per_seq = 2048
llama_init_from_model: n_batch       = 2048
Connect to ollama
We can bind deployed ollama service to local port using kubernetes port-forwarding:
$ kubectl -n ollama port-forward service/ollama 11434:11434Ollama API will be available at http://localhost:11434
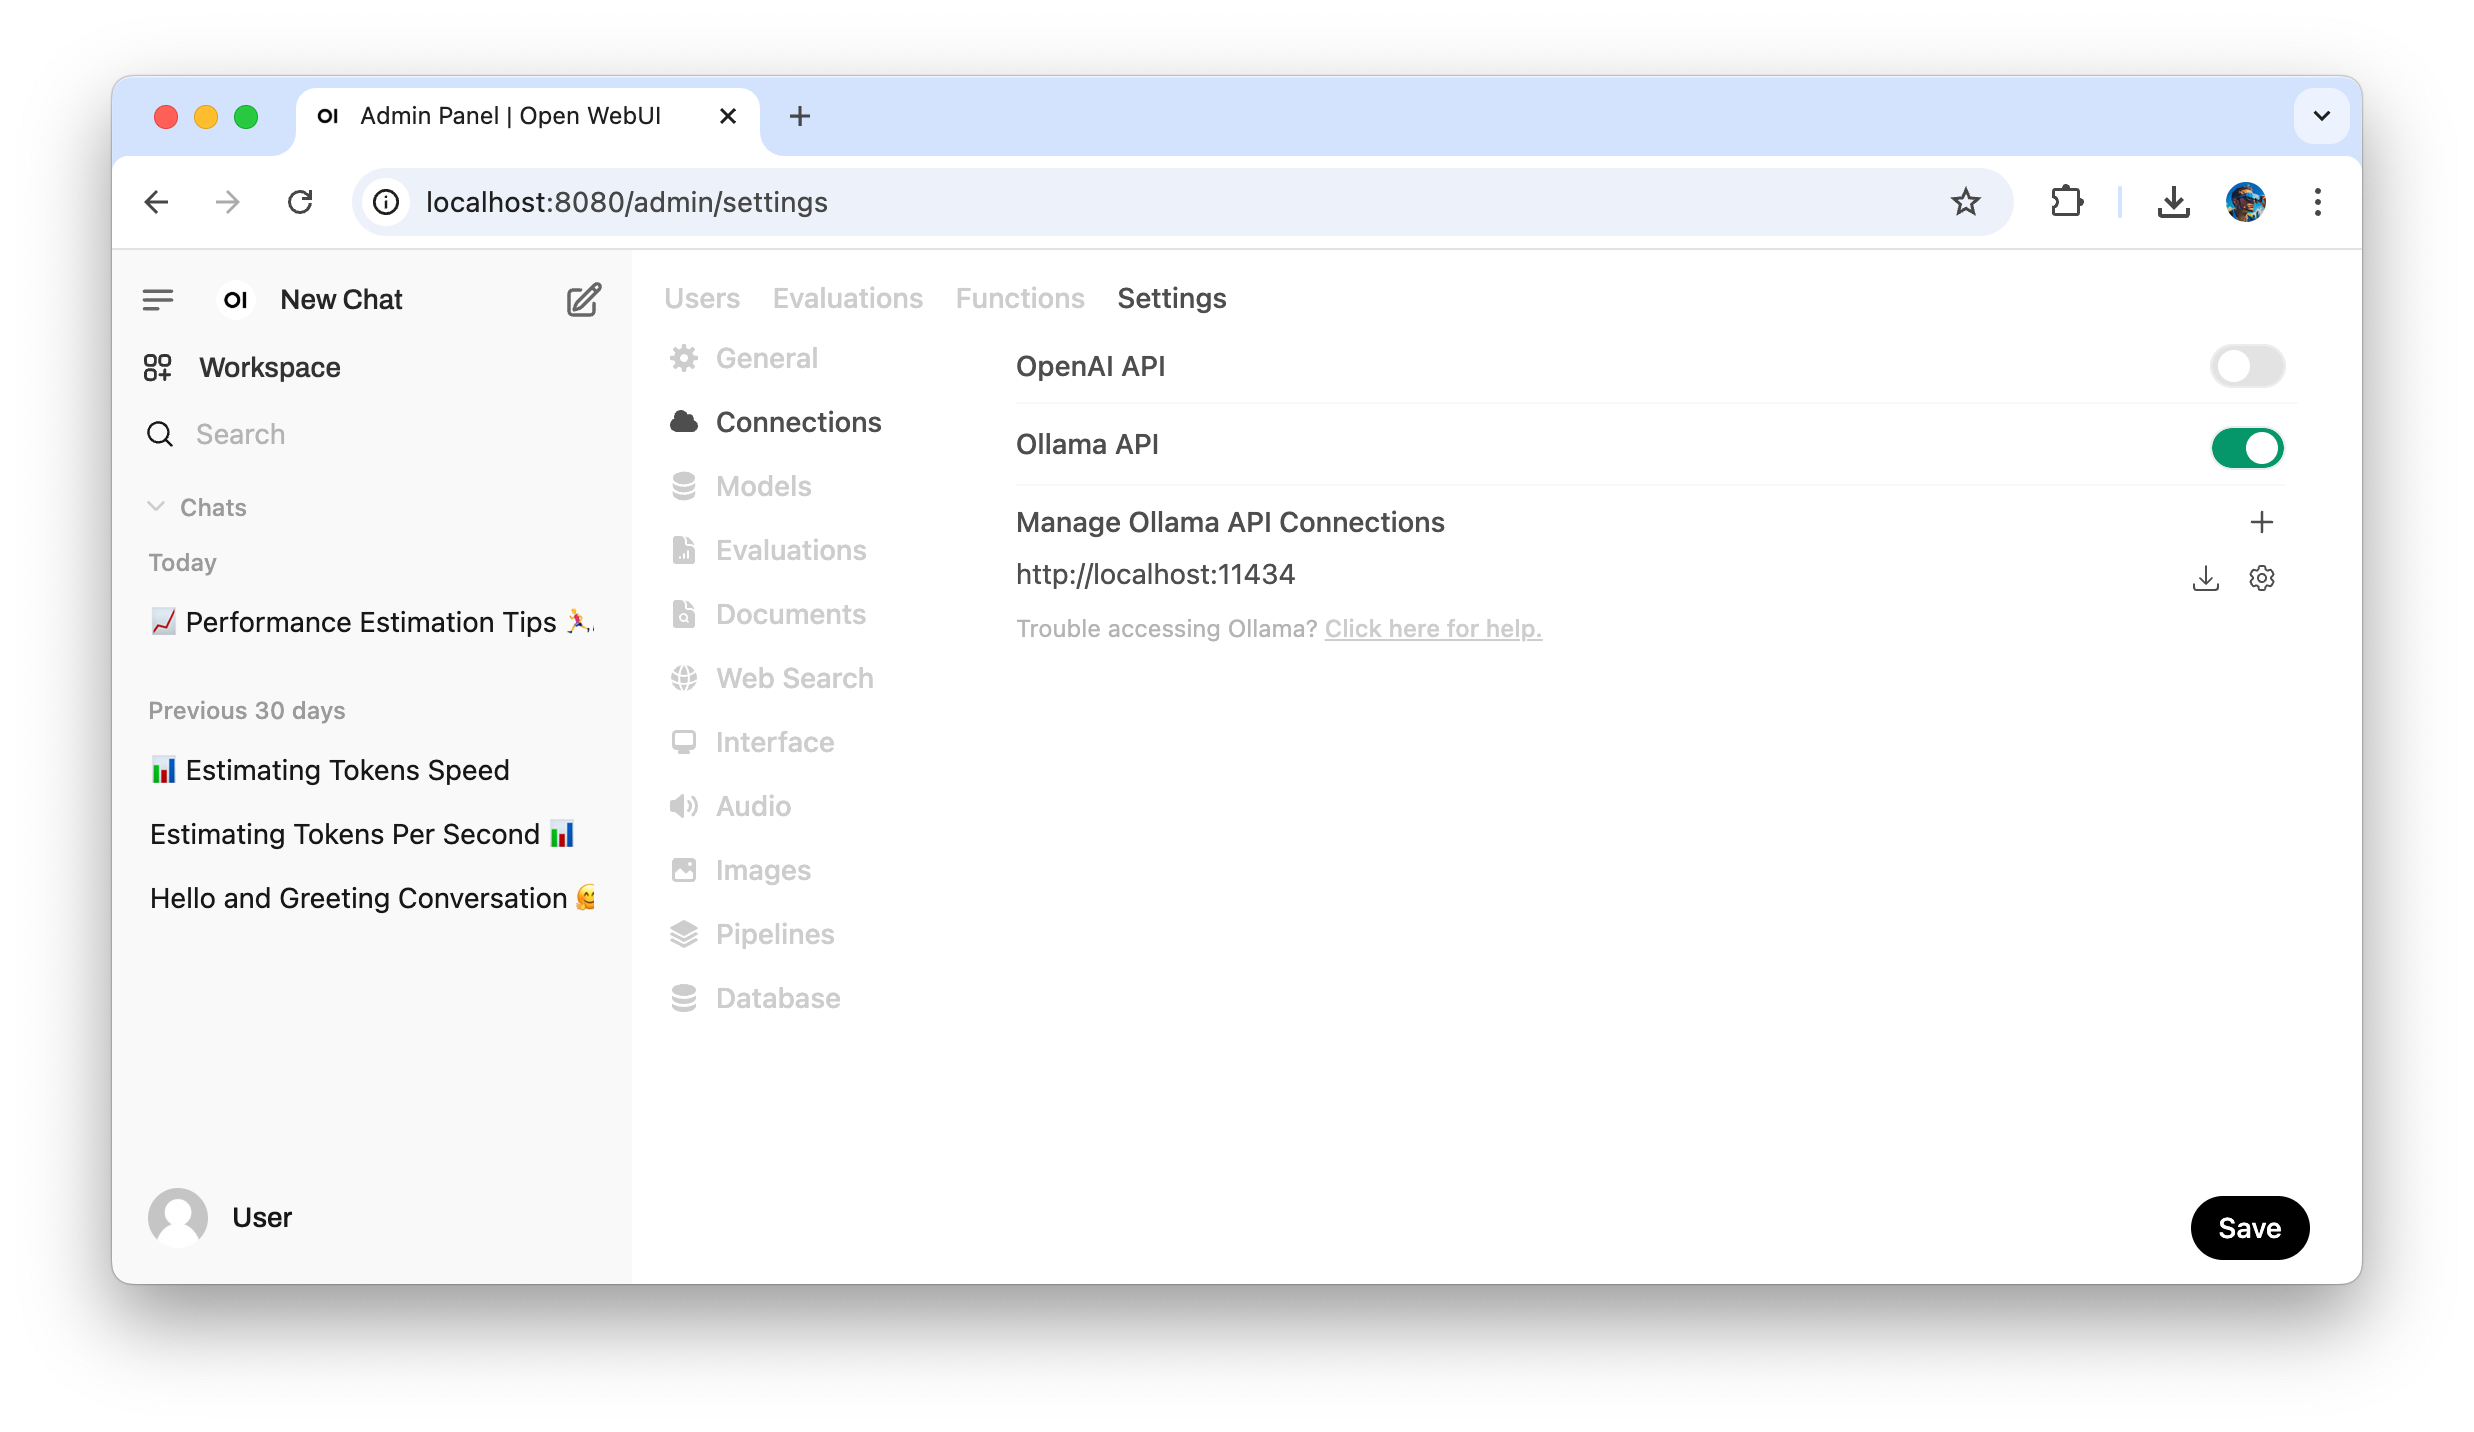
Configure Open WebUI
Open WebUI project will be used as a frontend application for ollama service. There are multiple ways to install Open WebUI, I prefer to create python environment using miniconda and run application without authentication:
$ conda create -n openwebui python=3.12 -y
$ conda activate openwebui
$ pip install open-webui
$ WEBUI_AUTH=False open-webui serve
Open WebUI will be available at http://localhost:8080 . To configure connection to ollama API, open http://localhost:8080/admin/settings and create new connection with url http://localhost:11434 .
That’s it. We are ready to talk to LLM.
Simple performance test
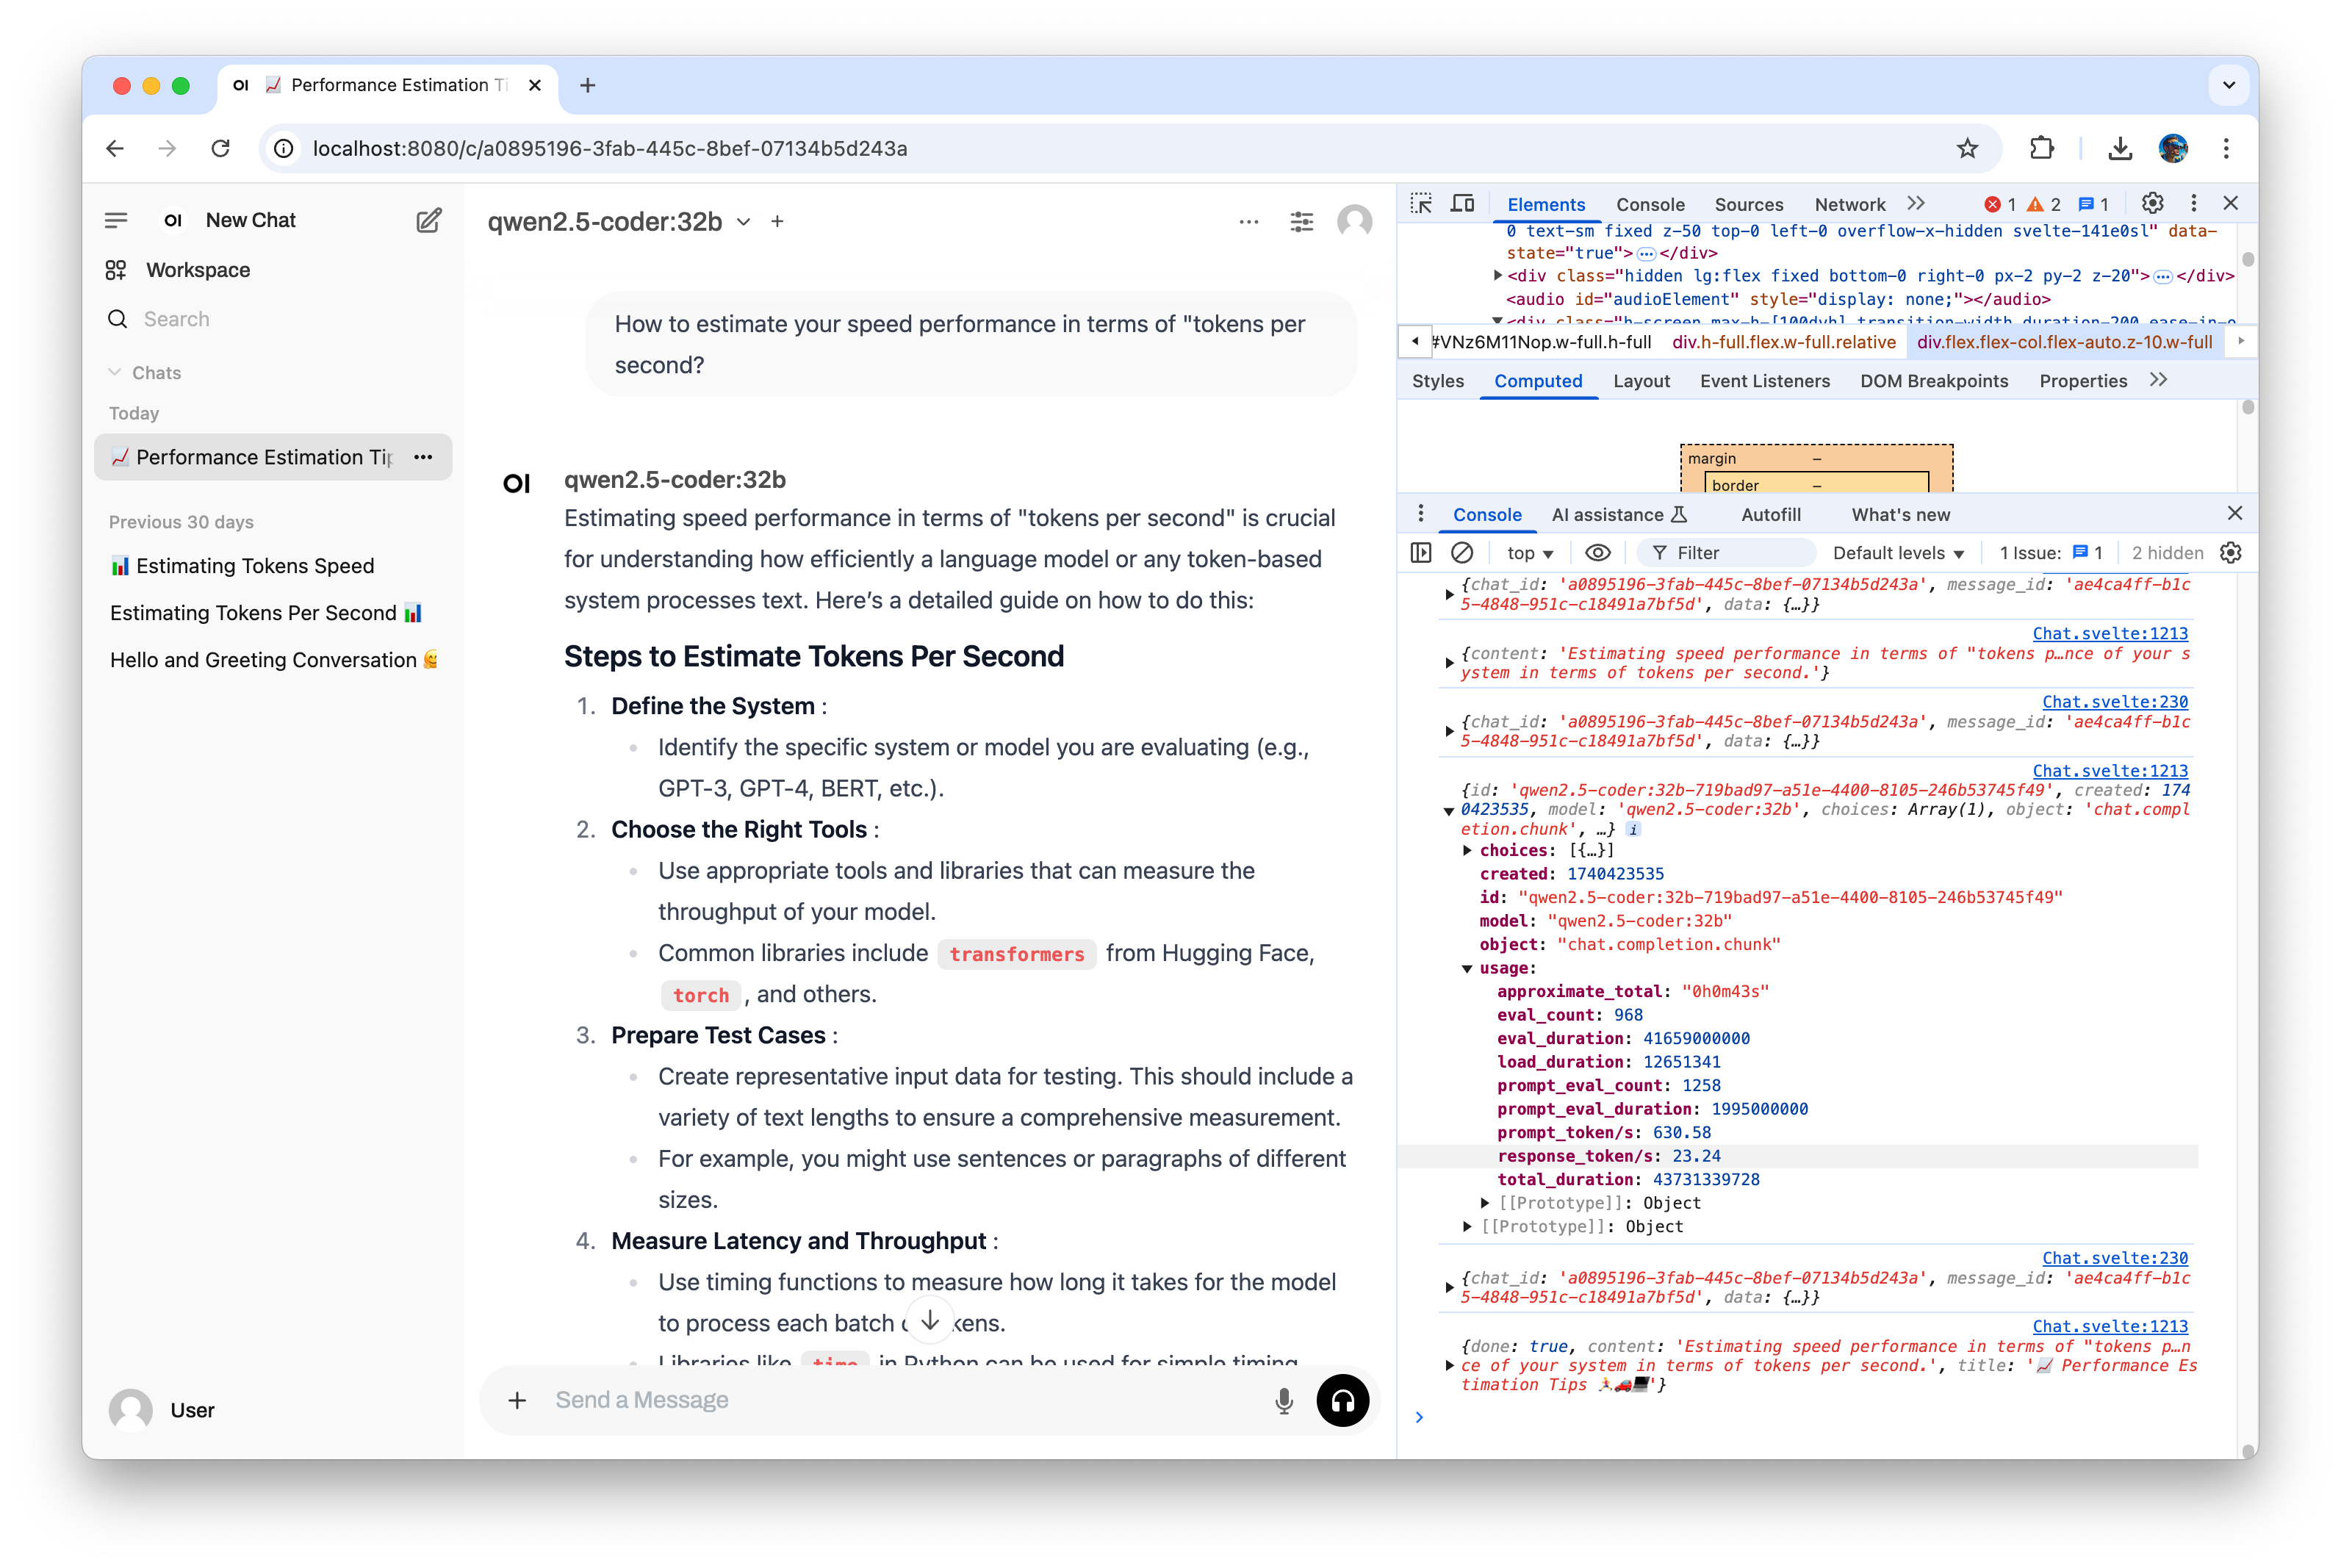
Open new chat in Open WebUI, open browser DevTools inspector window (right click, menu Inspect) and browser console tab. Select qwen2.5-coder:32b model and start a conversation by asking the question:
How to estimate your speed performance in terms of "tokens per second"?Ollama will start responding and you will see a lot of messages in your browser console. In the third message before the end you will find out the generation statistics, the most interesting for us is response_token/s.
The first question was to warm up ollama, run the same question second time for record.
Test results
Performance test results indicate the following findings:
- Based on cost per token per second (tps) per hour, the most cost-effective options are: Nvidia A100 40GB VRAM for 32b models (€0.1745/hour) and Nvidia H100 80GB VRAM for 70b models (€0.5180/hour)
- Token throughput (tokens per second) scales almost proportionally with model size: a 32b model (20GB size) yields twice the number of tokens per second compared to a 70b model (43GB size).
- H200 doesn’t provide better single-conversation performance than H100, but it should show better overall throughput performance for multi-conversation load across multiple NVLinked H200 (e.g. 4x 8H200).
- New qwq:32b model a bit slower than qwen2.5-coder:32b in terms of token throughput.
- DataCrunch offers better prices than Rackspace Spot, which I tested a month ago.
| GPU | VRAM | Model | Size | Context size (n_ctx_per_seq) | Performance, tokens/sec (tps) | Price per hour | Price per tpc per hour |
|---|---|---|---|---|---|---|---|
| Nvidia A100 | 40GB | qwen2.5-coder:32b | 20GB | 2048 | 35.97 | €0.1745/h | €0.0048/tps/h |
| Nvidia A100 | 40GB | qwq:32b | 20GB | 131072 | 24.68 | €0.1745/h | €0.0071/tps/h |
| Nvidia RTX A6000 | 48GB | qwen2.5-coder:32b | 20GB | 2048 | 28.33 | €0.2280/h | €0.0080/tps/h |
| Nvidia RTX A6000 | 48GB | qwq:32b | 20GB | 131072 | 26.03 | €0.2280/h | €0.0088/tps/h |
| Nvidia RTX A6000 | 48GB | llama3.3:70b | 43GB | 131072 | 14.71 | €0.2280/h | €0.0155/tps/h |
| Nvidia A100 | 80GB | qwen2.5-coder:32b | 20GB | 2048 | 40.35 | €0.3950/h | €0.0098/tps/h |
| Nvidia A100 | 80GB | qwq:32b | 20GB | 131072 | 31.33 | €0.3950/h | €0.0126/tps/h |
| Nvidia A100 | 80GB | llama3.3:70b | 43GB | 131072 | 23.92 | €0.3950/h | €0.0165/tps/h |
| Nvidia H100 | 80GB | qwen2.5-coder:32b | 20GB | 2048 | 63.26 | €0.5180/h | €0.0082/tps/h |
| Nvidia H100 | 80GB | qwq:32b | 20GB | 131072 | 59.58 | €0.5180/h | €0.0087/tps/h |
| Nvidia H100 | 80GB | llama3.3:70b | 43GB | 131072 | 38.50 | €0.5180/h | €0.0135/tps/h |
| Nvidia H200 | 141GB | qwen2.5-coder:32b | 20GB | 2048 | 63.08 | €0.9750/h | €0.0155/tps/h |
| Nvidia H200 | 141GB | qwq:32b | 20GB | 131072 | 58.21 | €0.9750/h | €0.0167/tps/h |
| Nvidia H200 | 141GB | llama3.3:70b | 43GB | 131072 | 39.35 | €0.9750/h | €0.0247/tps/h |
The data is collected from 5-6 runs, so strictly speaking it is not statistically reliable. Surprisingly, there is a noticeable performance gap between the A100 40 GB and the A100 80 GB, which indicates a significant statistical measurement error or the influence of additional factors (shared resources?).
Configure Cline VSCode extension
- Install VSCode and Cline extension
- Open VS Code
- Click Cline settings icon
- Select “Ollama” as API provider
- Enter configuration: Base URL: http://localhost:11434/ (default value, can be left as is)

Read more information about Cline configuration here
More deployment options
You can define the model context size when deploying, read more about parameters in Modelfile specification :
cat <<EOF | helm upgrade ollama ollama-helm/ollama --install --create-namespace -n ollama --version 1.8.0 -f -
persistentVolume:
  enabled: true
  size: 50Gi
ollama:
  gpu:
    enabled: true
  models:
    pull:
      - llama3.1:8b
    create:
      - name: llama3.1-ctx16384
        template: |
          FROM llama3.1:8b
          PARAMETER num_ctx 16384
    run:
      - llama3.1-ctx16384
extraEnv:
  - name: OLLAMA_KEEP_ALIVE
    value: 24h
EOF
Lower mid-sized qwq:32b parameters:
$ cat <<EOF | helm upgrade ollama ollama-helm/ollama --install --create-namespace -n ollama --version 1.8.0 -f -
persistentVolume:
  enabled: true
  size: 50Gi
ollama:
  gpu:
    enabled: true
  models:
    pull:
      - qwq:32b
    run:
      - qwq:32b
extraEnv:
  - name: OLLAMA_KEEP_ALIVE
    value: 24h
EOF
Mid-sized DeepSeek R1 70b parameters:
$ cat <<EOF | helm upgrade ollama ollama-helm/ollama --install --create-namespace -n ollama --version 1.8.0 -f -
persistentVolume:
  enabled: true
  size: 70Gi
ollama:
  gpu:
    enabled: true
  models:
    pull:
      - deepseek-r1:70b
    run:
      - deepseek-r1:70b
extraEnv:
  - name: OLLAMA_KEEP_ALIVE
    value: 24h
EOF
Mid-sized Llama 3.3 70B parameters:
$ cat <<EOF | helm upgrade ollama ollama-helm/ollama --install --create-namespace -n ollama --version 1.8.0 -f -
persistentVolume:
  enabled: true
  size: 50Gi
ollama:
  gpu:
    enabled: true
  models:
    pull:
      - llama3.3:70b
    run:
      - llama3.3:70b
extraEnv:
  - name: OLLAMA_KEEP_ALIVE
    value: 24h
EOF
Changelog
- 2025-03-09: first version
Next steps
In the next tutorials we will deploy cloud-native machine learning platform and start using LLM for something useful. Stay tuned!